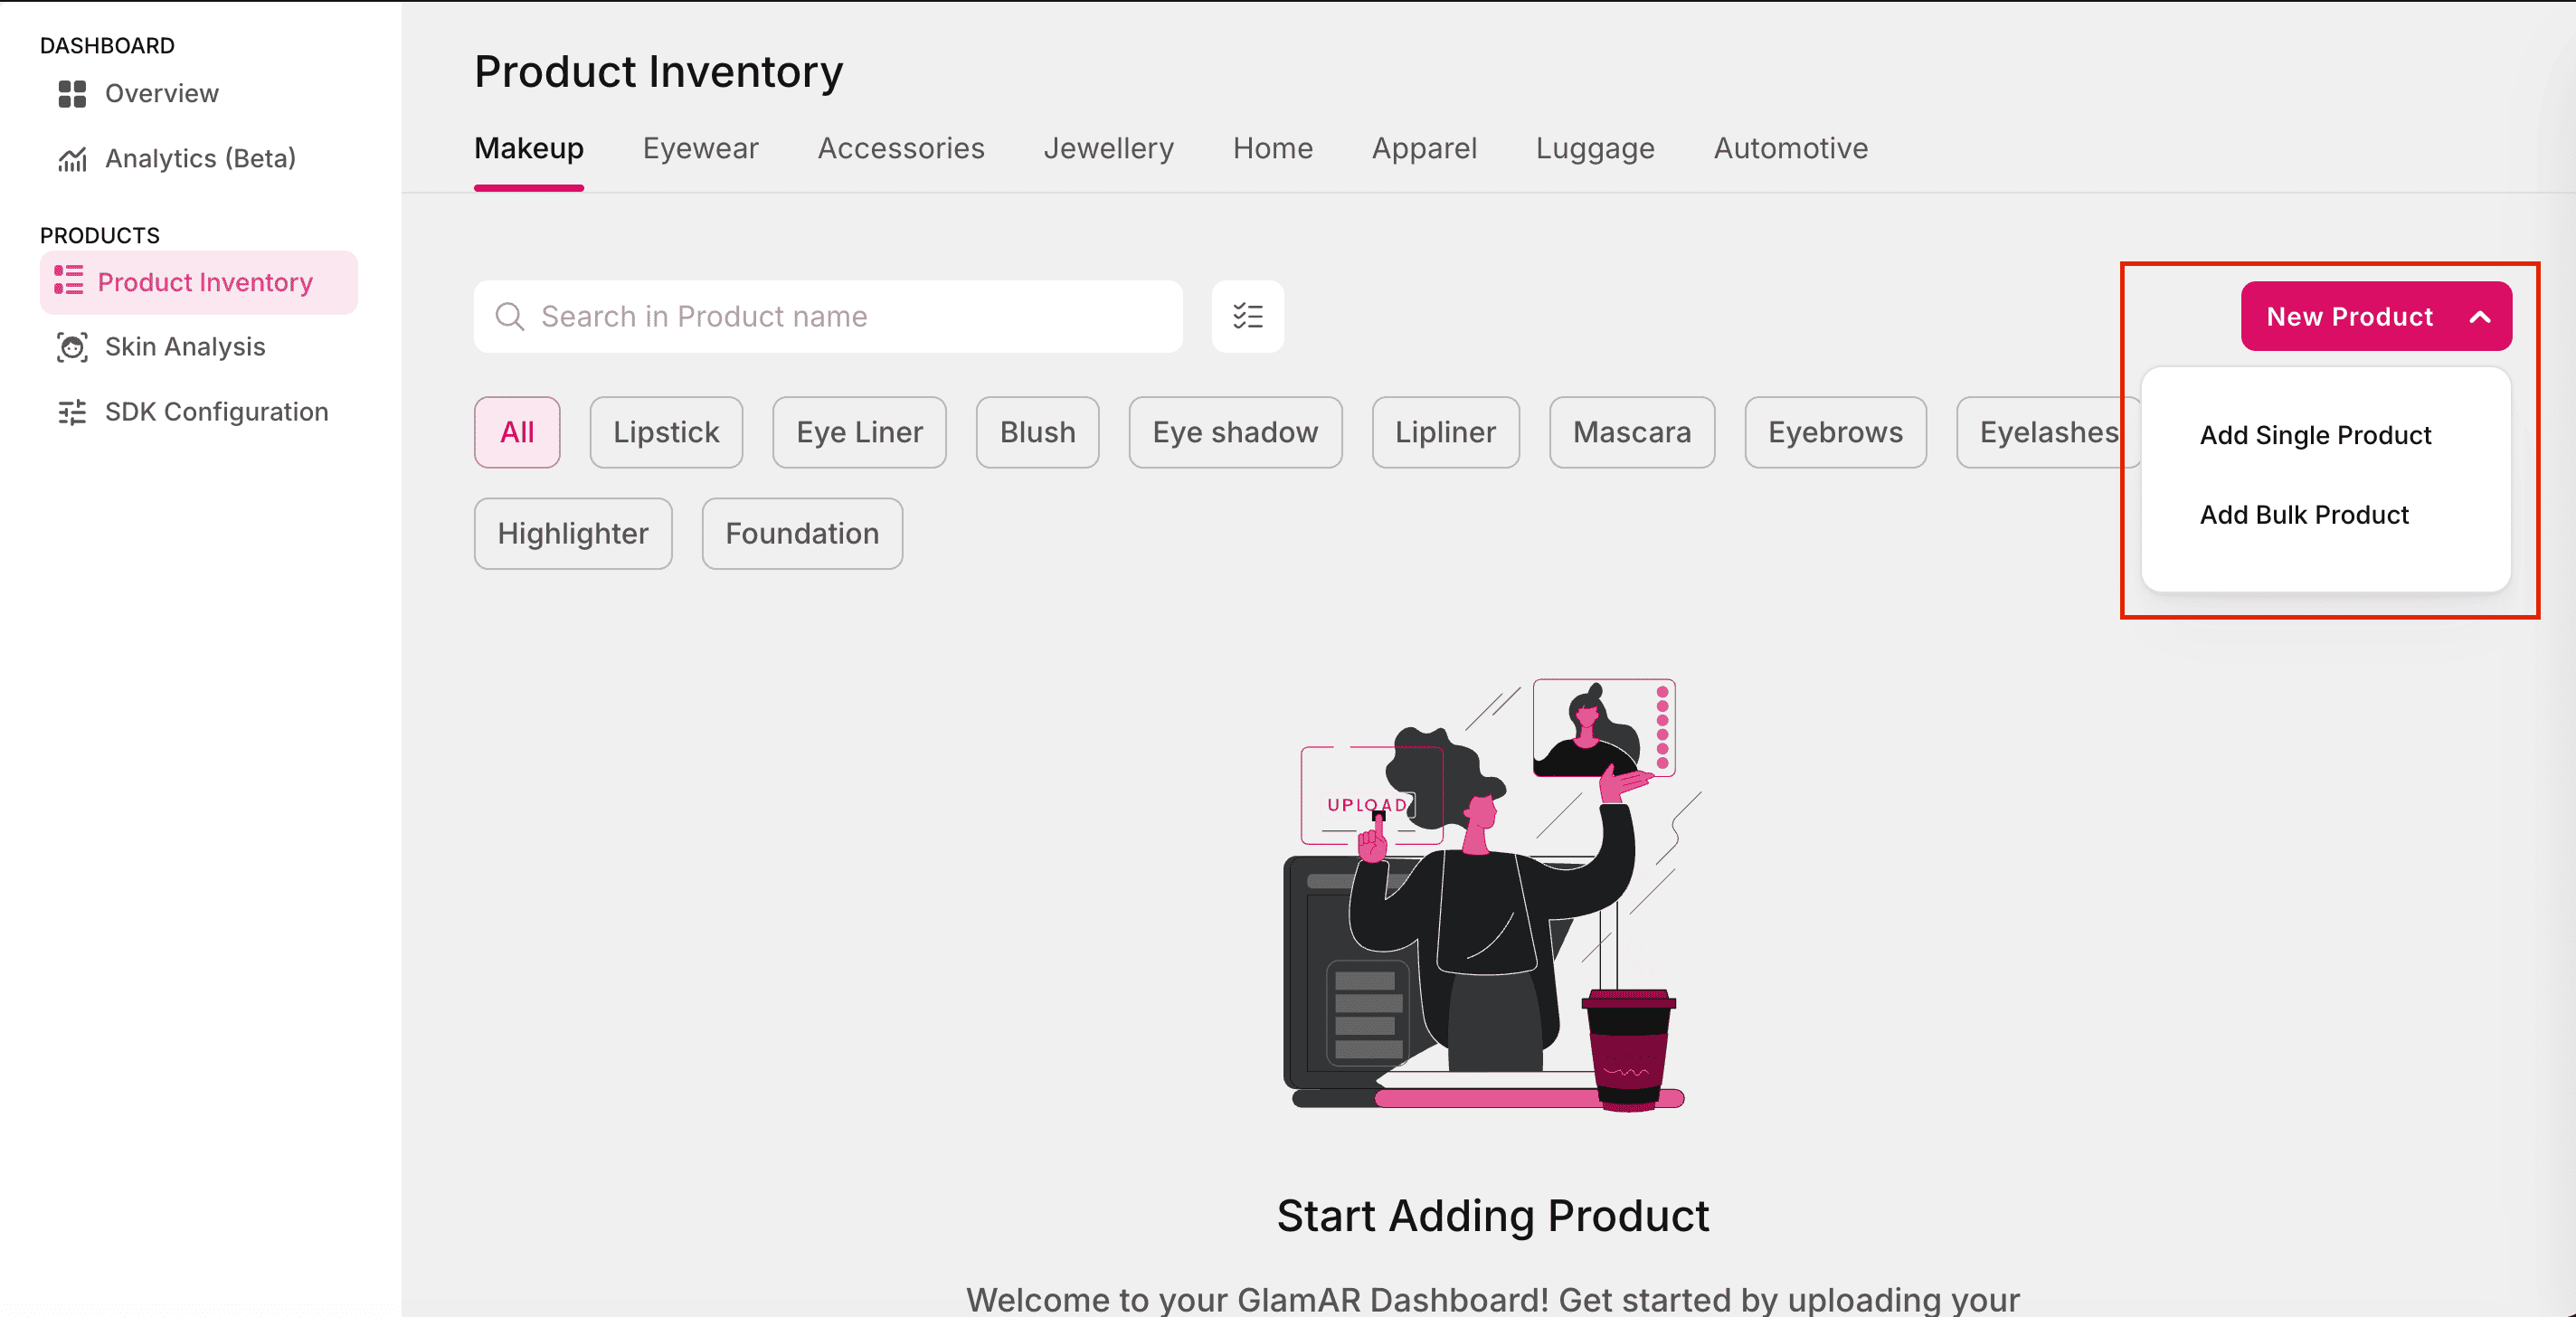
Product Inventory
The Product Inventory section allows you to create and manage products for different categories supported by the SDK. Each product you add here will be available for use in the virtual try-on. You can create products across wide range of categories, including:
- Makeup
- Eyewear
- Accessories
- Jewellery
- Home
- Apparel
- Luggage
- Automotive
In the next section, we’ll explore how to create a product for each category.
Creating a Product
Navigate to the Product Inventory tab and click on the New Product button to add a product to the inventory. You can choose one of the following options:
- Add Single Product: Manually add product details one at a time. This option is useful for adding a small number of products or testing new entries.
- Add Bulk Product: Upload multiple products at once, ideal for larger catalogs.
Add Single Product
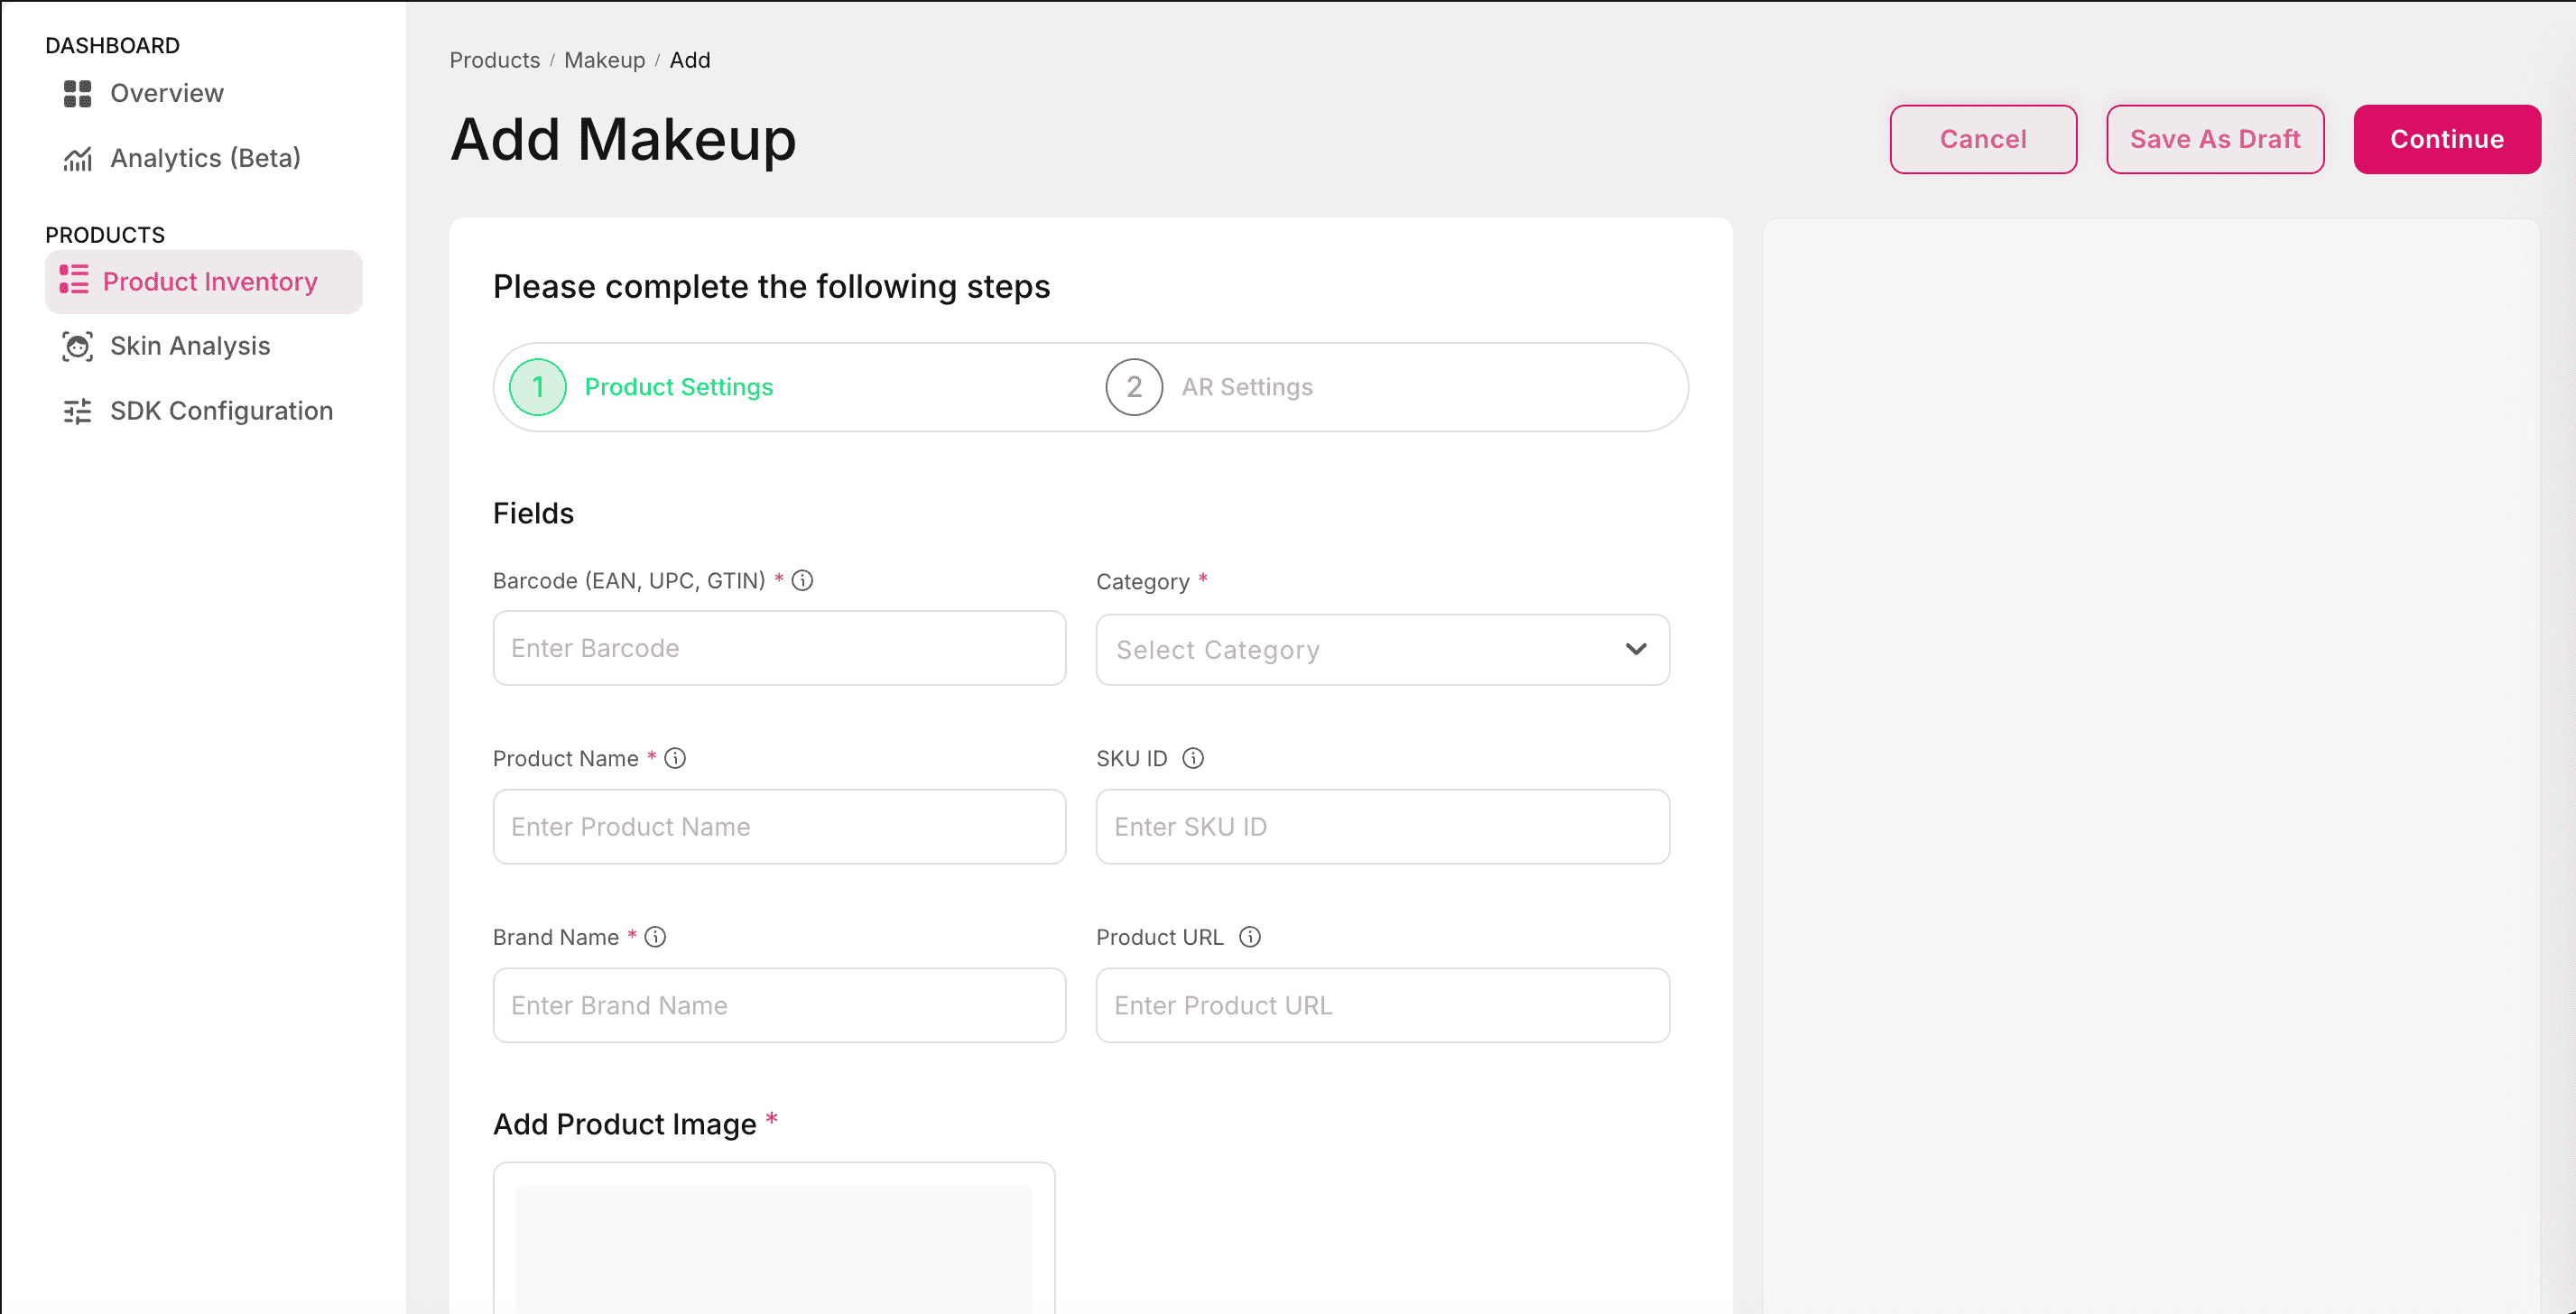
Product Settings
When adding a single product, the Product Settings form must be completed with the following details. These are applicable to all products:
- Barcode (EAN, UPC, GTIN): Unique product identifier at the SKU level, provided by the manufacturer or vendor. Accepted formats include EAN, UPC, or GTIN codes.
- Category: Select the relevant product category from the available list.
- Product Name: The name of the product. For products in the same product line, the name must match exactly.
- SKU ID: Unique identifying number for each product in your catalog, helps in managing inventory, updates, and products.
- Brand Name: The manufacturer’s name or collection name, as shown on the client’s website.
- Product URL: The link to the product’s detail page on the website.
- Add Product Image: Upload an image representing the product.
Product Categories
Makeup
Makeup products use the same fields defined in Product Settings. Please refer there for details on Barcode, Category, Product Name, SKU ID, Brand Name, Product URL, Product Image, and optional fields like Age and Material.
Additional Fields
The Additional Fields section allows you to add category-specific product attributes that extend beyond the standard fields such as SKU ID, Product Name, or Brand. These fields vary by product type such as Eyewear, Jewellery, or Home and capture other details like dimensions, material, or other technical specifications.
- Age: Enter the target age for which the product is intended.
- Material: Enter the material used in the product.
AR Settings
AR Settings determine how products are visualized in the virtual try-on experience. These settings differ by product and sometimes by category.
Each section below describes the specific AR Settings available per category.
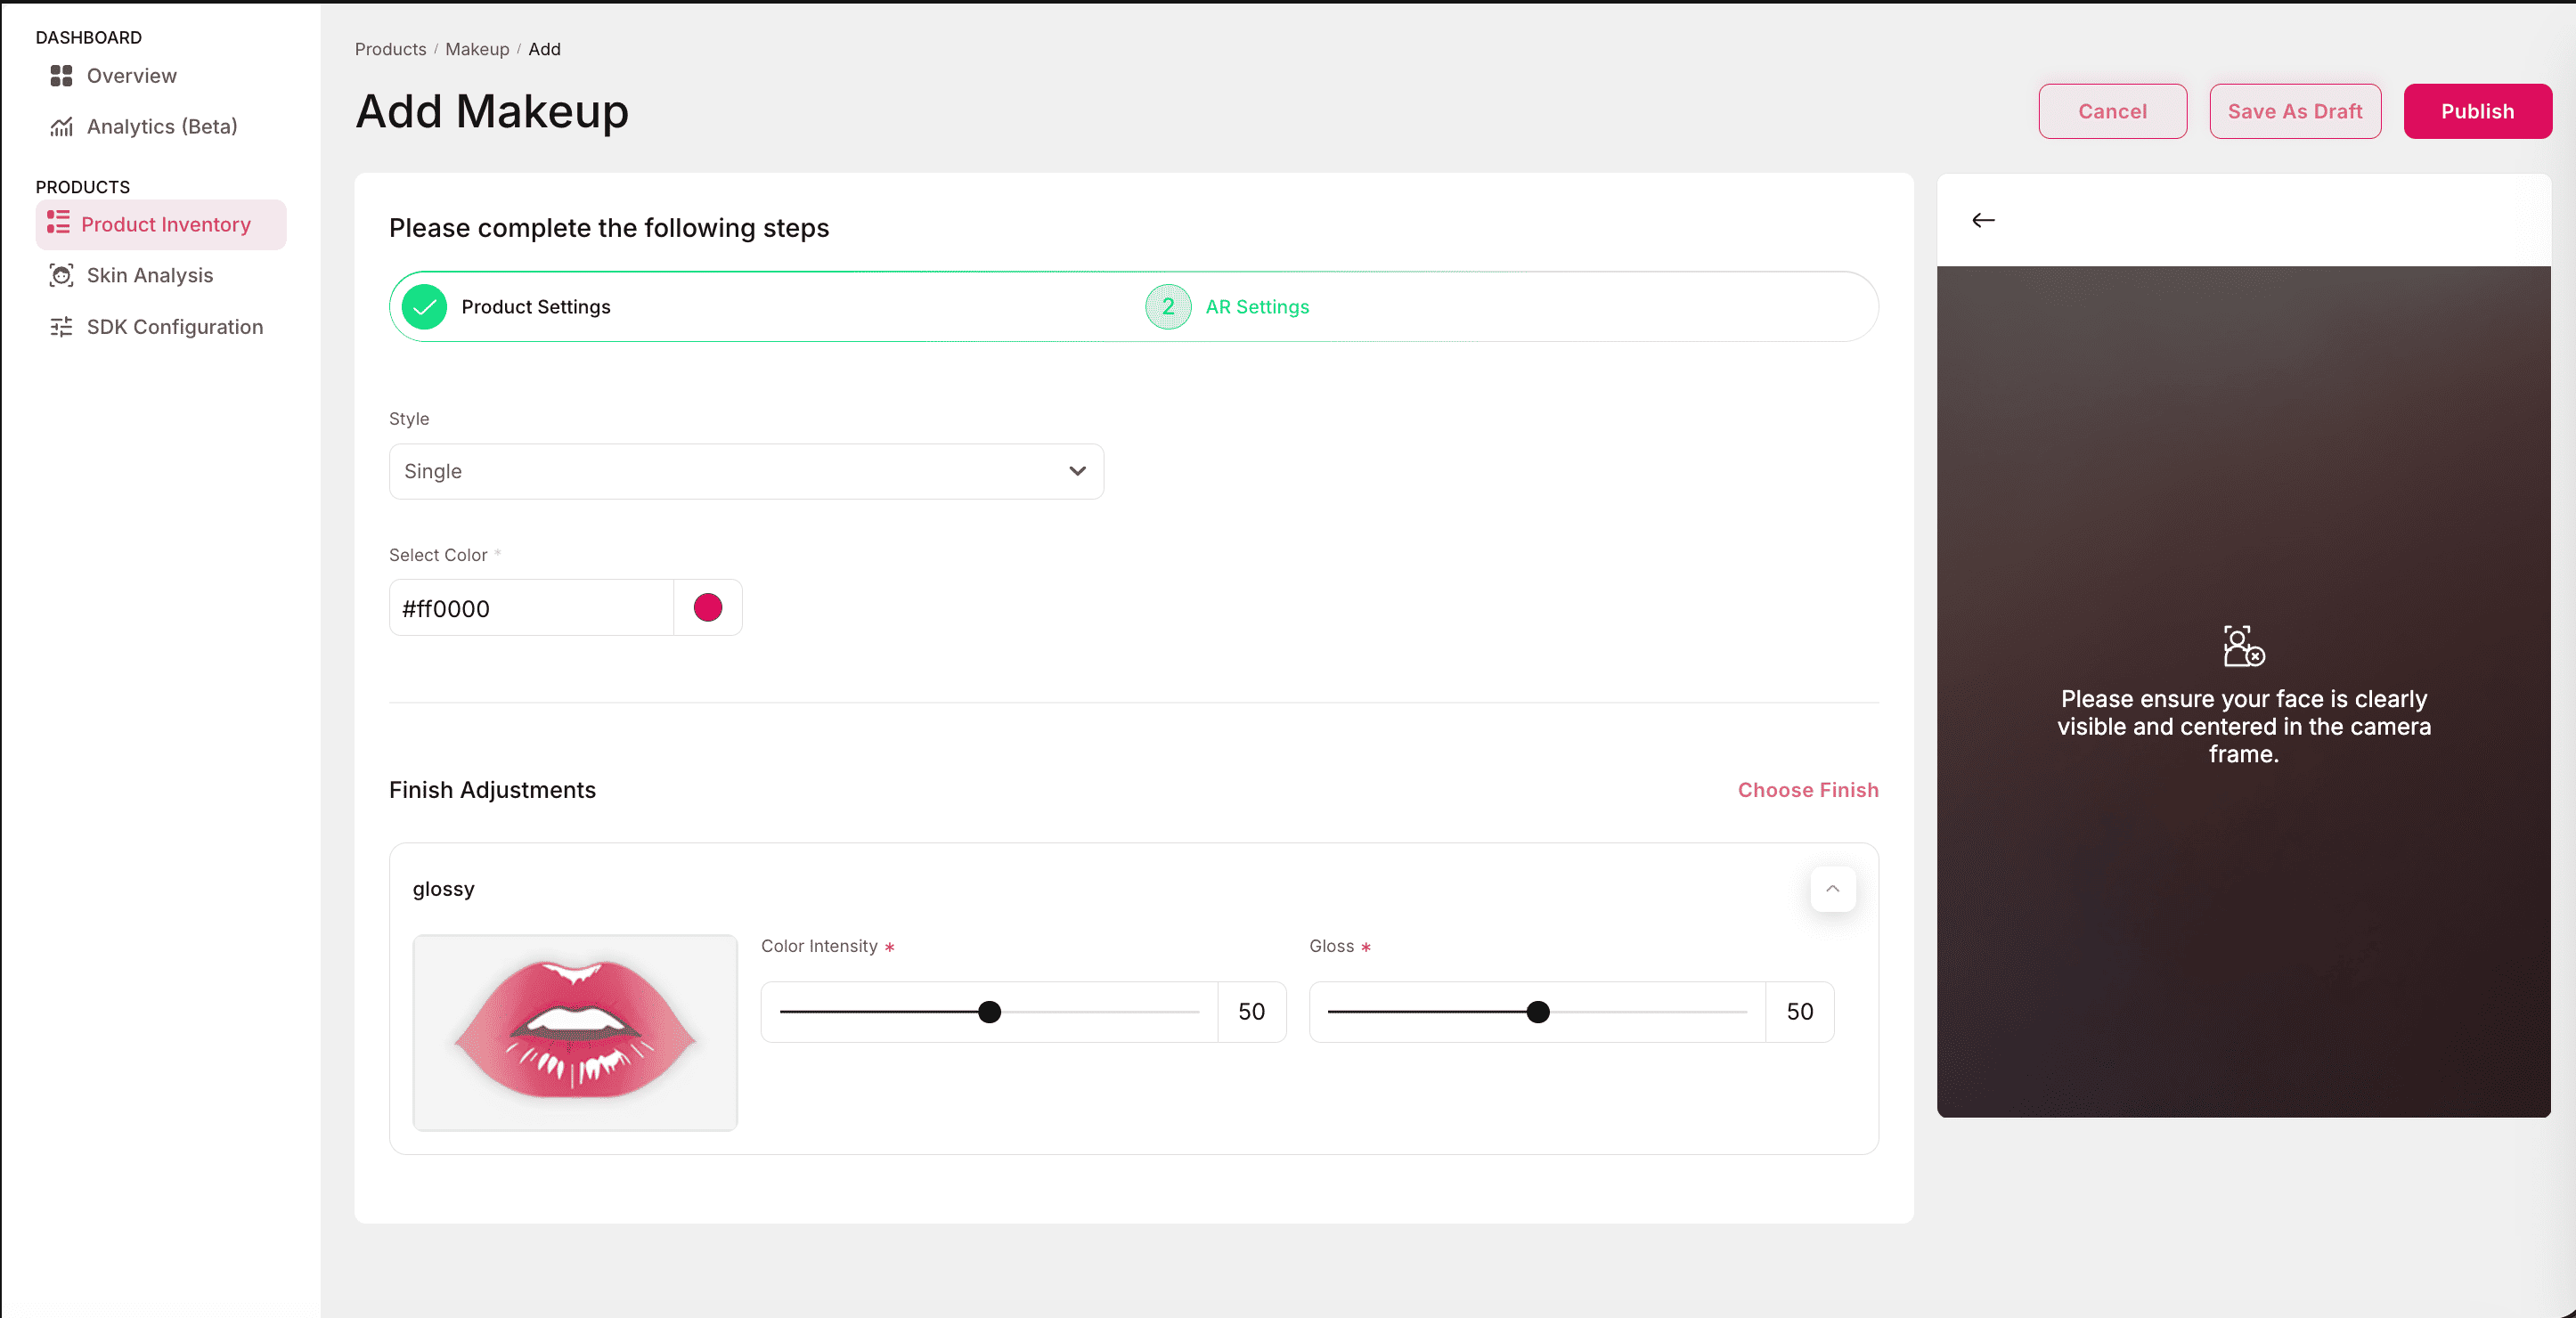
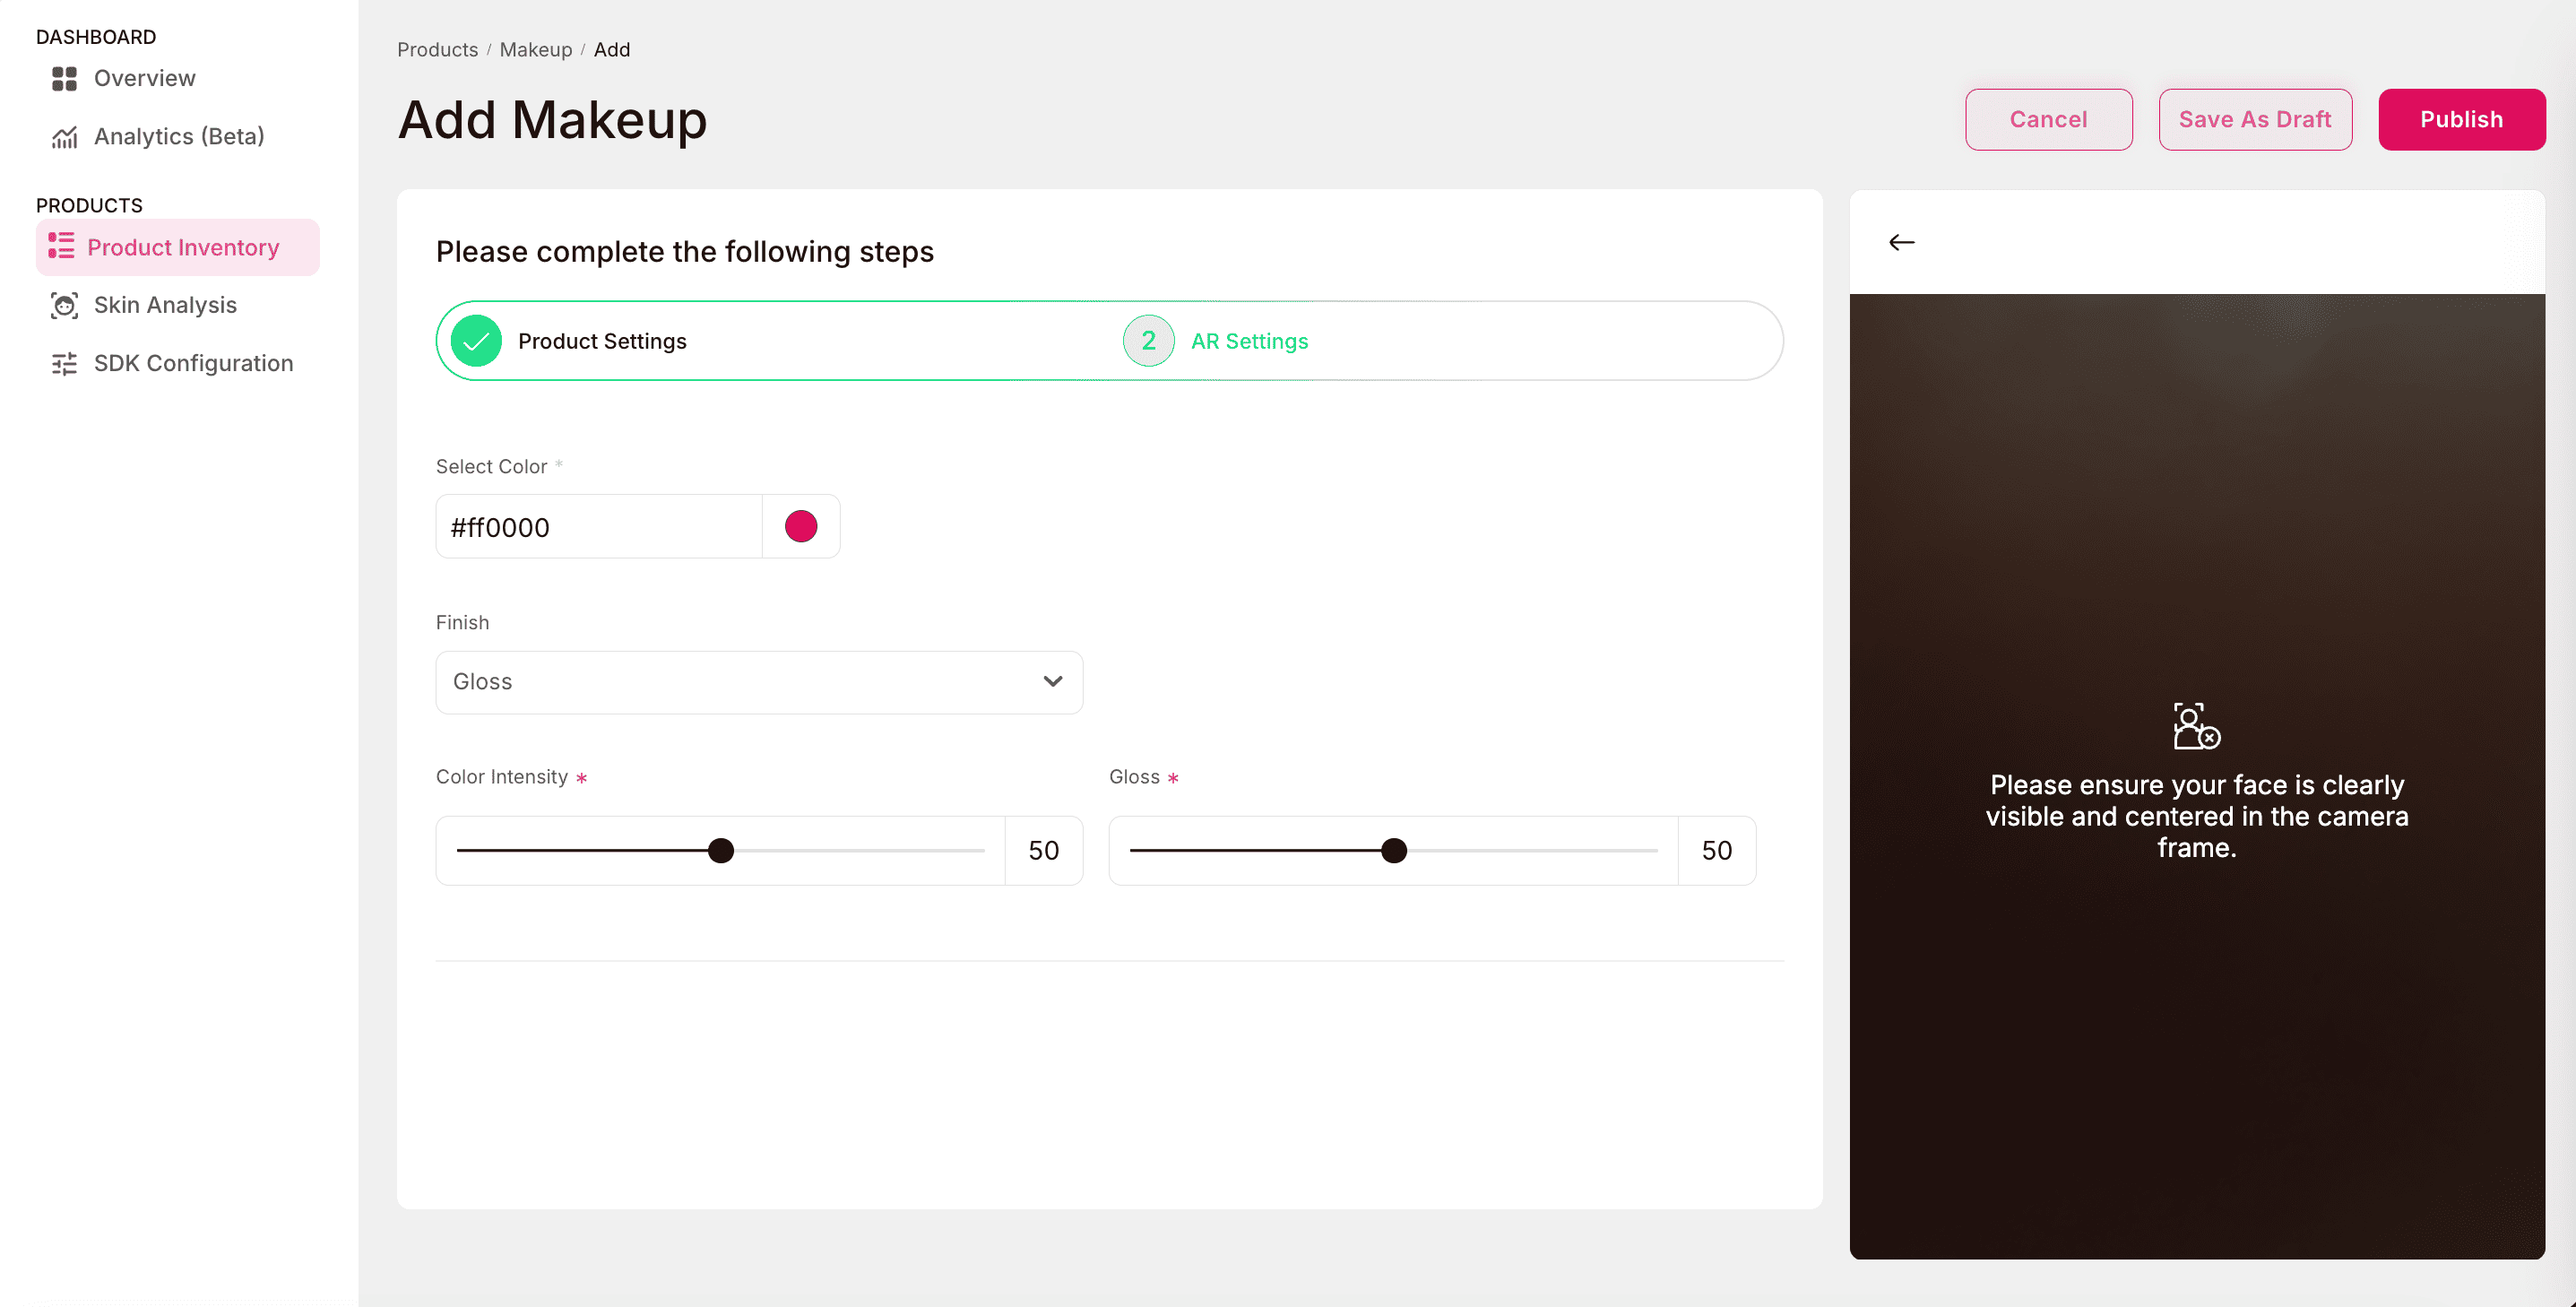
Lipstick
The AR settings for lipstick define how the product appears and behaves in the try-on window. These options allow fine-grained control over the lipstick style, color, and finish.
Style:
Choose how the lipstick is applied in the try-on window:
- Single: Applies a single uniform shade across the lips.
- Dual: Splits the lips into two regions (e.g., inner and outer) for dual-tone effects.
Select Color:
- Allows selection of the lipstick shade.
- Supports custom shade selection.
- Color choice is applied immediately in the try-on preview.
Finish Adjustments:
Finish Adjustments define the texture and refinement of the lipstick effect. The available patterns are:
- Glossy
- Color Intensity: Adjusts the strength of the lipstick shade.
- Gloss Intensity Slider: Controls the amount of gloss applied (low = soft shine, high = bright reflective finish).
- Shimmer
- Color Intensity: Controls how vivid the base shade appears.
- Shimmer Color: Choose the color of the shimmer particles.
- Shimmer Density: Defines how densely shimmer particles are applied.
- Shimmer Intensity: Controls the brightness of the shimmer effect.
- Shimmer Granularity: Adjusts the size/texture of the shimmer particles (fine vs. coarse sparkle).
- Matte
- Color Intensity: Single slider to adjust the opacity/strength of the matte shade.
- Lipstick AR settings are specific to this category and may differ from other Makeup products.
- Multiple adjustments (Style, Color, Finish) can be combined to create highly customizable looks.
- Shimmer finishes allow advanced control, while Matte keeps a minimal, flat look.
- Always test different finishes in the try-on console to ensure realistic rendering across devices.
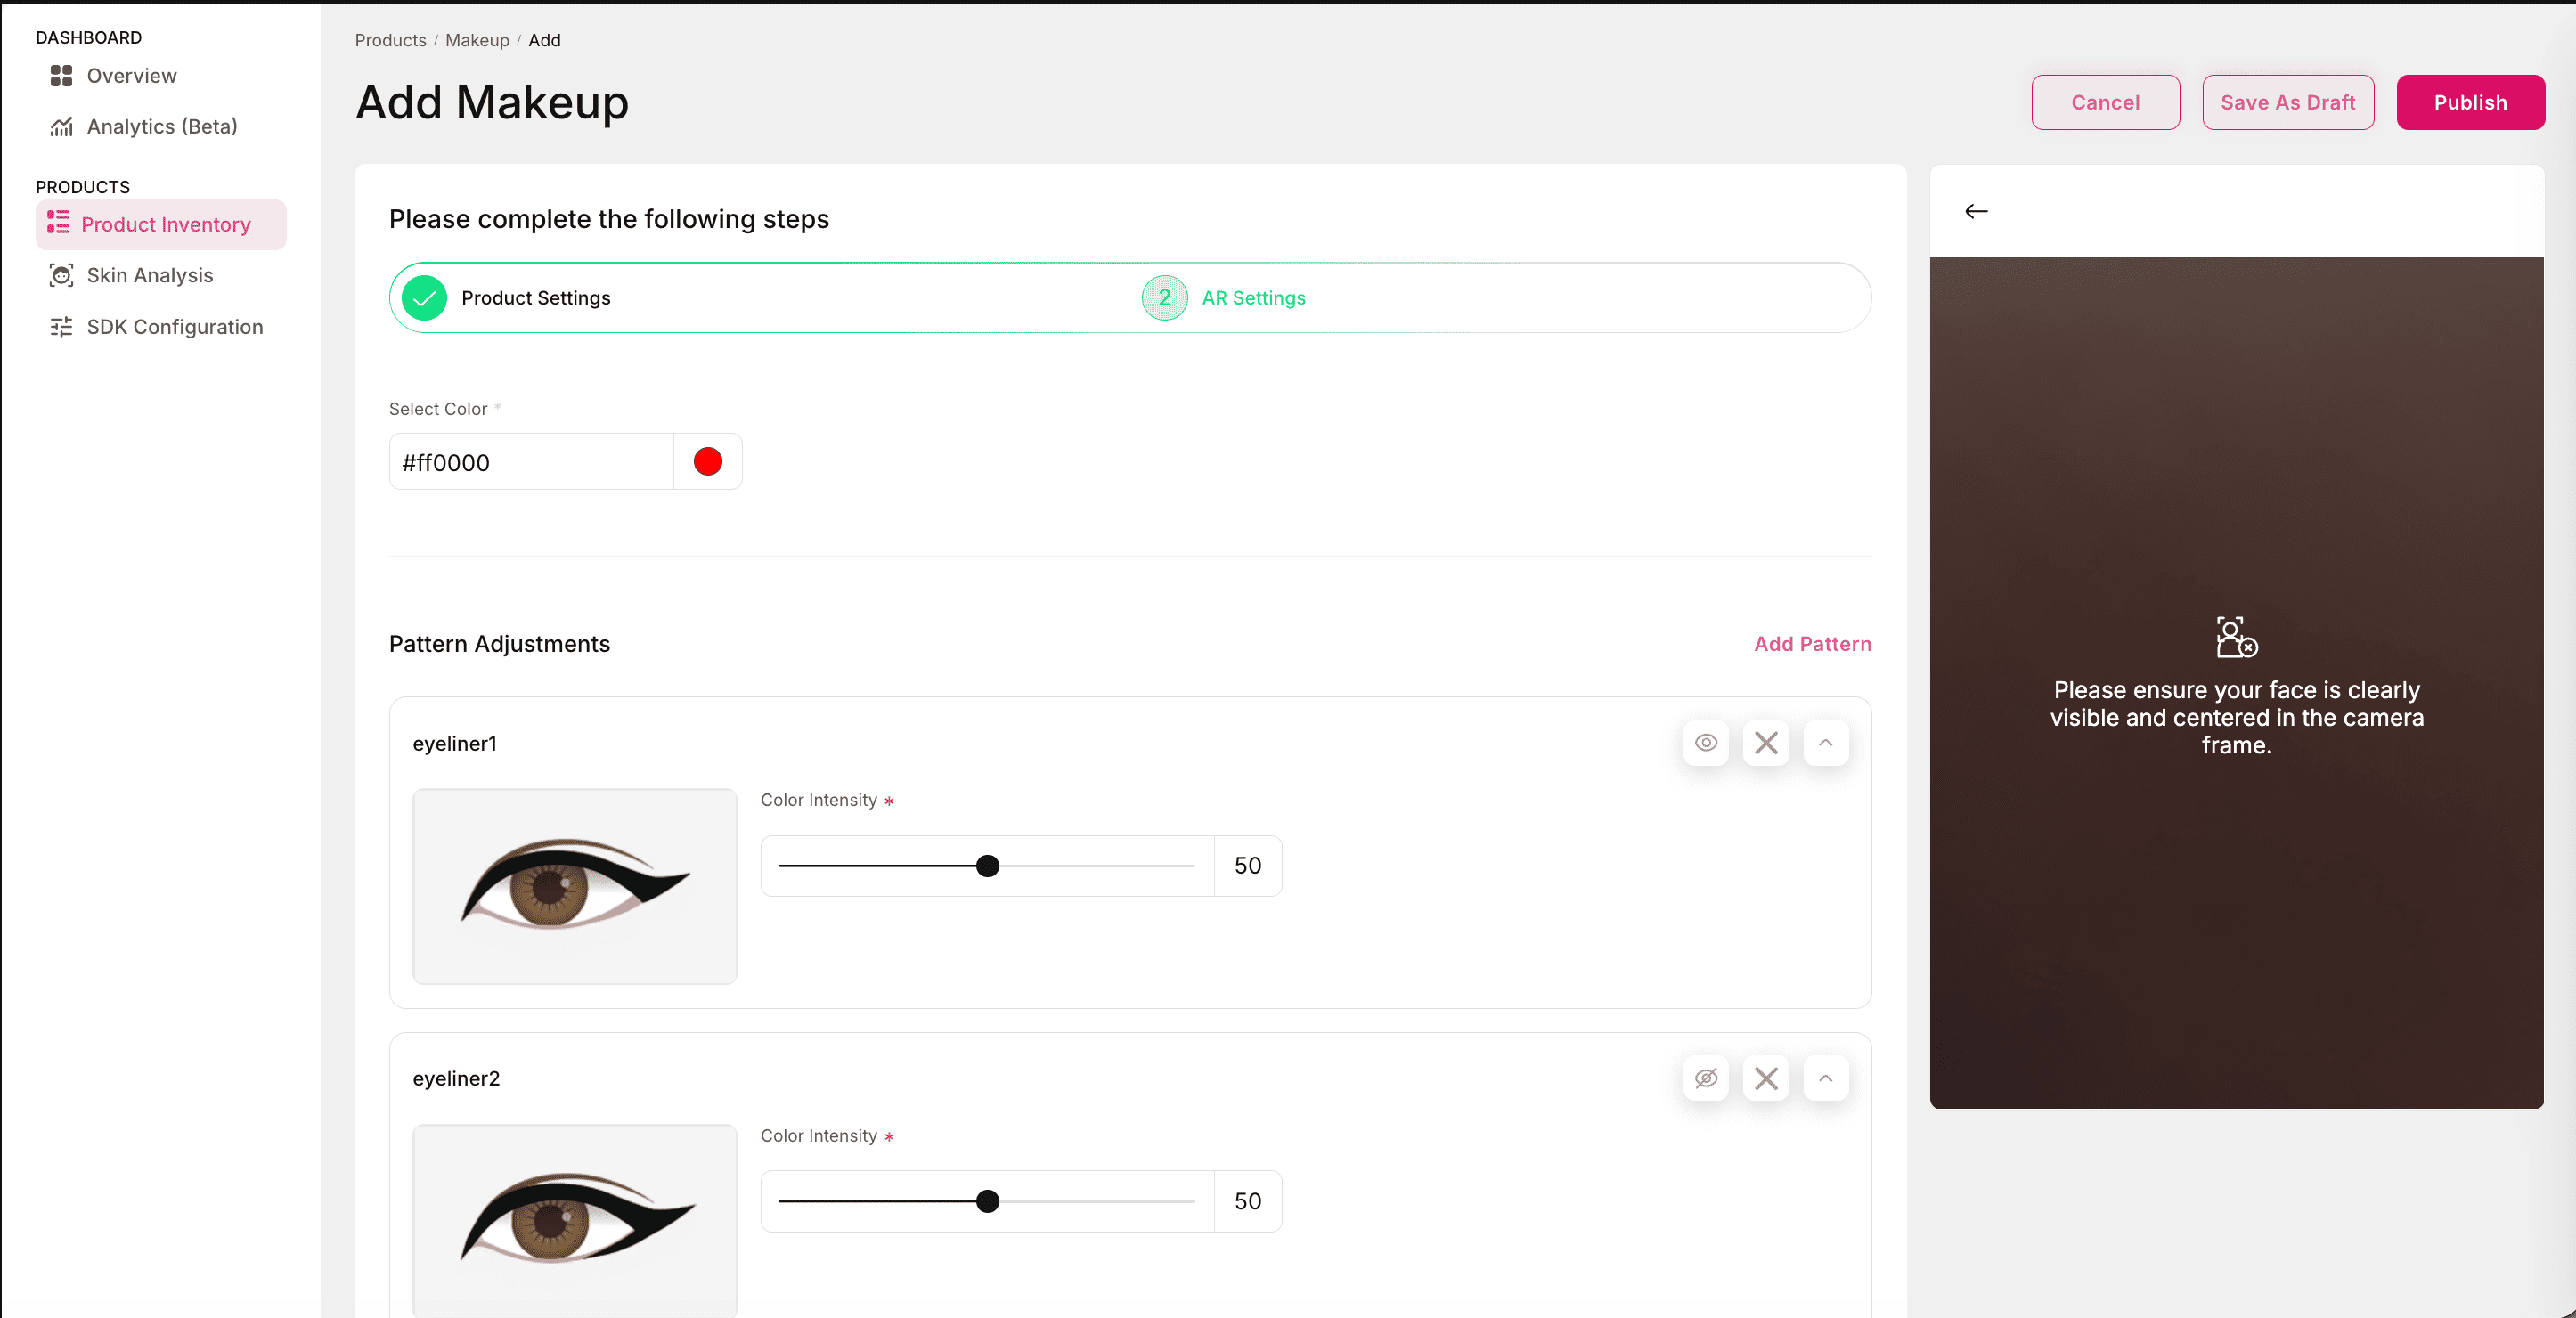
Eyeliner
The AR settings for Eyeliner allow customization of eyeliner color, intensity, and patterns to create realistic or artistic looks during the try-on experience.
Select Color:
- Choose the eyeliner color by defining a custom shade.
- The selected color can be viewed directly in the try-on preview.
Pattern Adjustments:
Pattern Adjustments provide control over eyeliner styles and their visibility. The available options are:
- Add Pattern: A total of two eyeliner patterns are currently available.
- Users can select one or more patterns.
- Patterns can be layered for unique styling.
- Color Intensity: Adjusts the opacity and depth of the applied eyeliner color.
- Low = subtle eyeliner effect.
- High = bold, defined lines.
- Visibility control: Each pattern that has been added can be individually hidden or removed in the try-on preview.
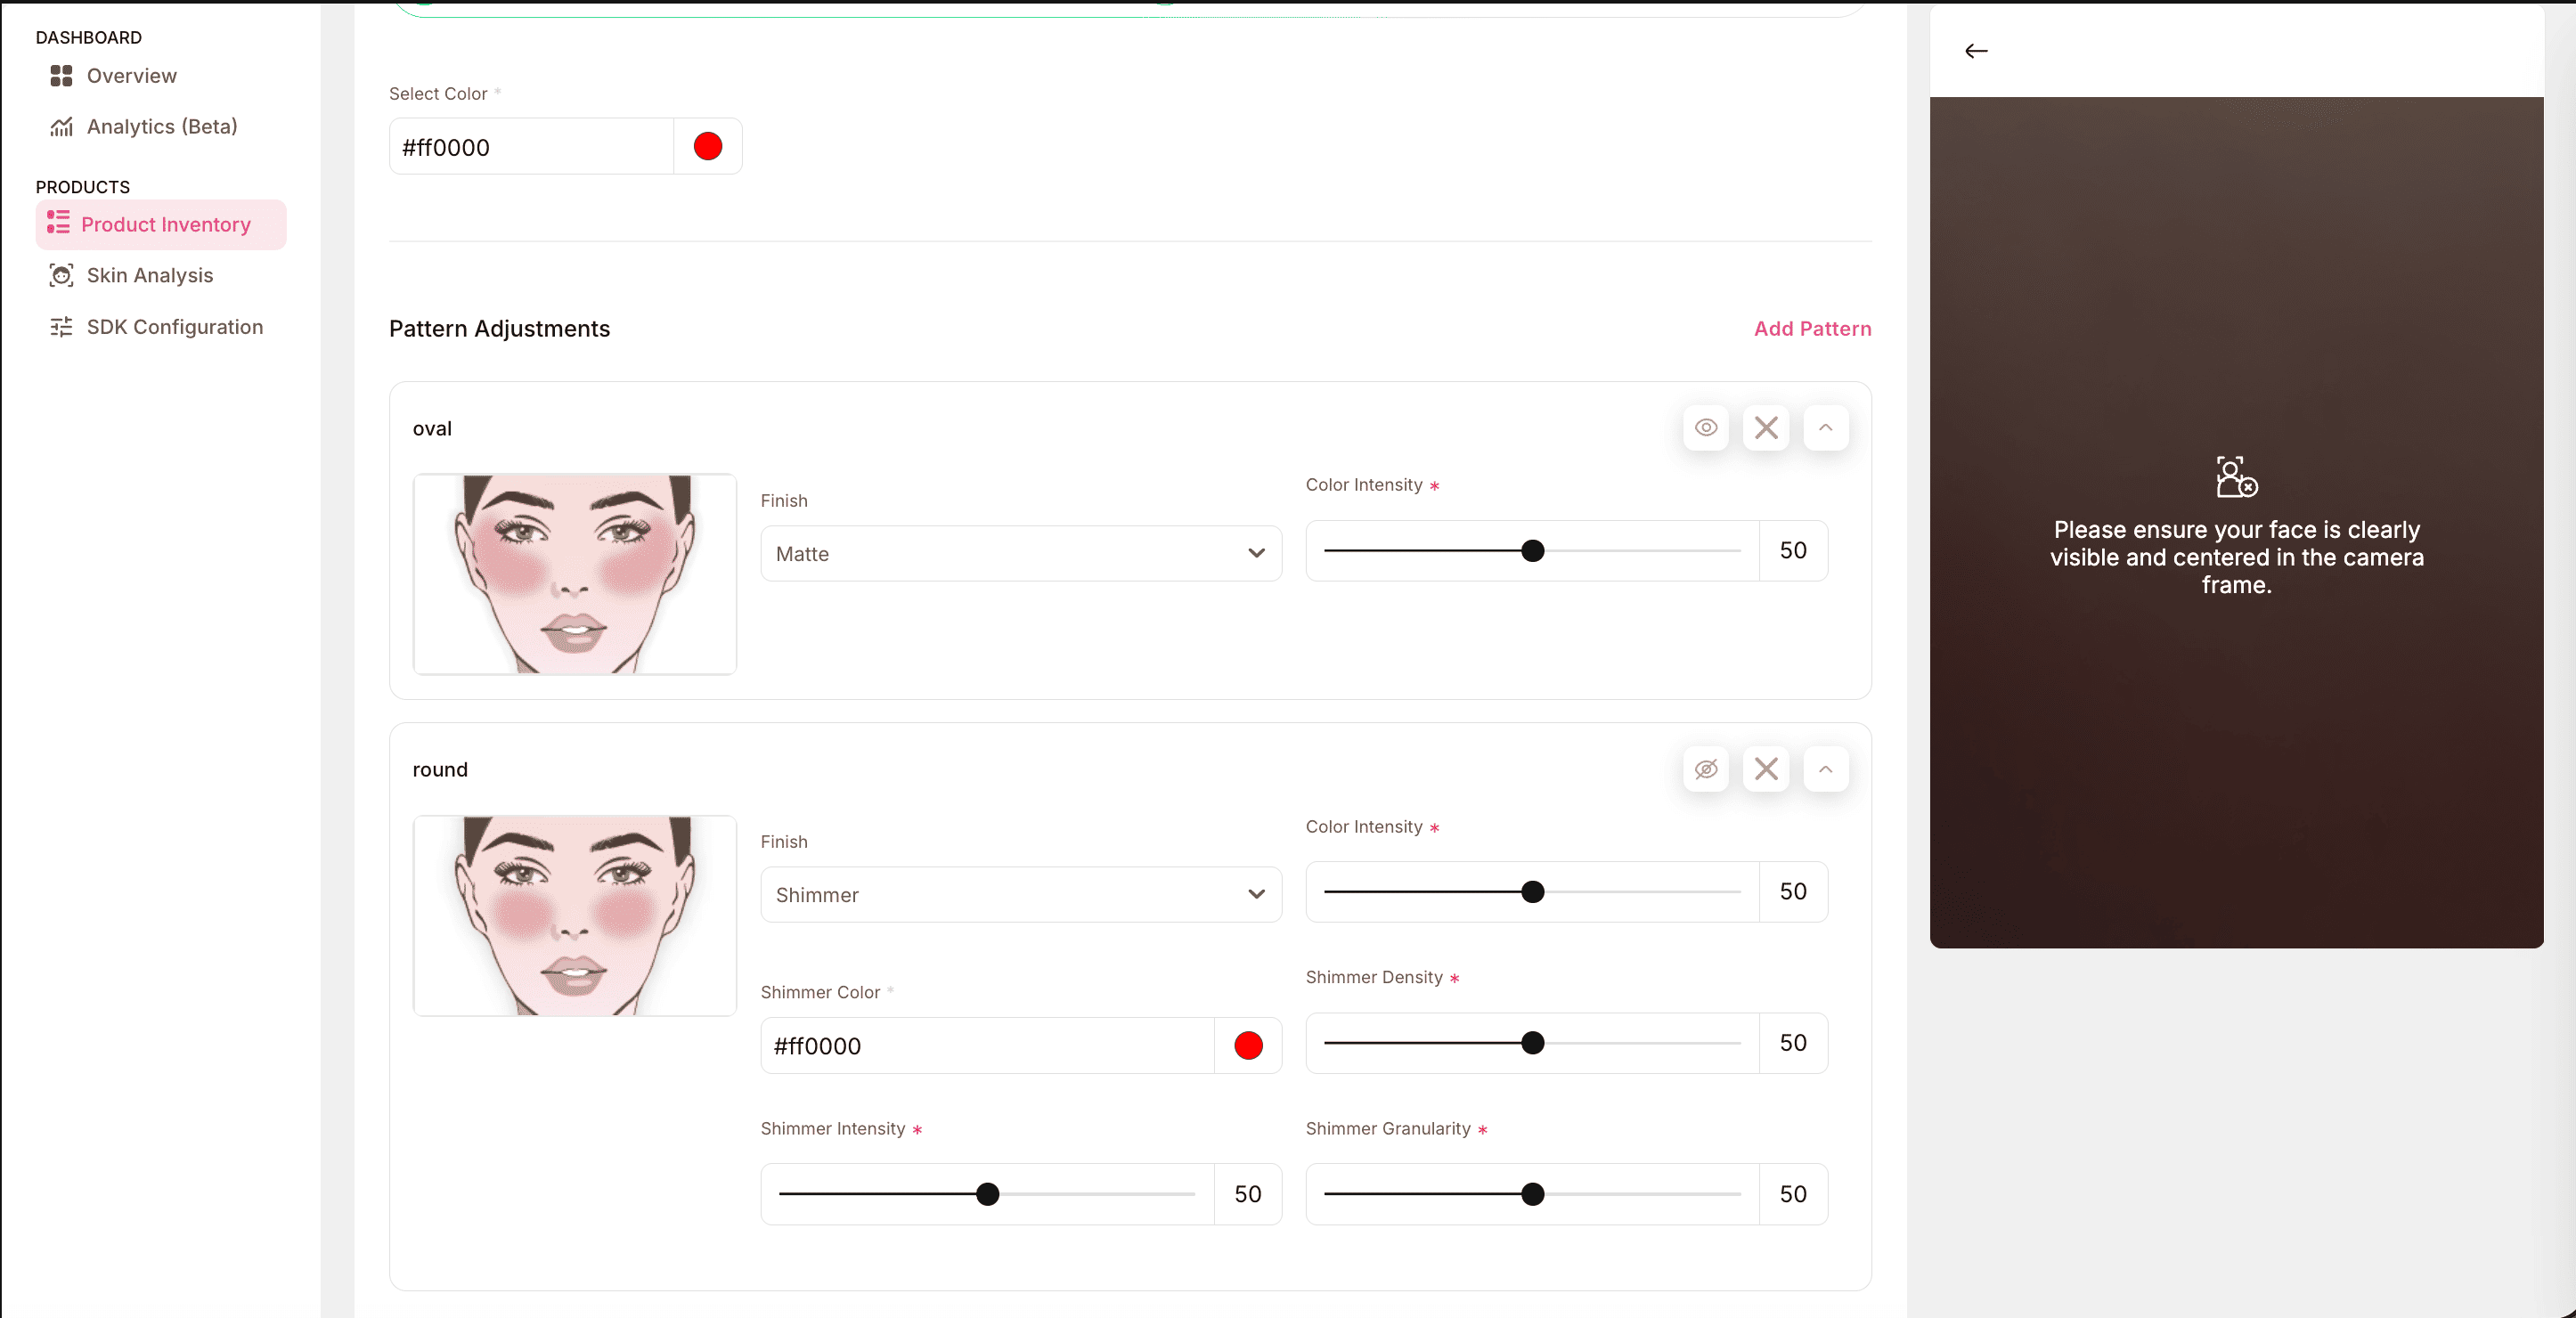
Blush
The AR settings for Blush allow you to apply customizable patterns and finishes to visualize realistic blush effects in the try-on window.
Select Color:
- Choose the base color for the blush.
- Supports custom color selection.
- The selected shade can be viewed instantly in the try-on preview.
Pattern Adjustments:
Blush patterns determine the placement and shape of the blush effect on the face. The available patterns are:
- Oval: A natural, soft oval-shaped application.
- Round: A more concentrated, circular blush pattern.
- Upper: Applied higher on the cheekbones for a lifted effect.
Pattern options:
Each pattern supports the following options:
- Finish: Choose between:
- Matte: Flat, non-reflective finish.
- Options: Color Intensity only.
- Shimmer: Sparkling, reflective finish.
- Options:
- Color Intensity: Controls how strong the base shade appears.
- Shimmer Color: Selects the color of the shimmer particles.
- Shimmer Density: Adjusts how densely shimmer particles appear.
- Shimmer Intensity: Controls the brightness of the shimmer effect.
- Shimmer Granularity: Adjusts particle size (fine vs. coarse sparkle).
- Options:
- Matte: Flat, non-reflective finish.
- Visibility control:
- Multiple patterns can be added simultaneously to create layered looks.
- Patterns can be hidden or removed directly from the try-on preview without restarting.
Eye shadow
The AR settings for Eye Shadow define how colors, shimmer, and patterns are applied to the eyelids in the virtual try-on window.
Select Color:
- Choose the primary eye shadow color from custom shades.
- Multiple colors can be applied together to create layered effects.
Enable Shimmer:
- Toggle Shimmer on or off.
- When enabled, shimmer is applied to the selected color(s) for a reflective finish.
- Multiple shimmer options can be combined for creative styles.
Pattern Adjustments:
Eye Shadow supports up to three different patterns, each customizable for unique looks.
Options per pattern:
- Color: Choose the color specific to that pattern.
- Color Intensity: Adjust how bold or subtle the applied color appears.
Visibility control:
- Multiple patterns can be added simultaneously.
- Any applied pattern can be hidden or removed during the try-on preview without resetting the session.

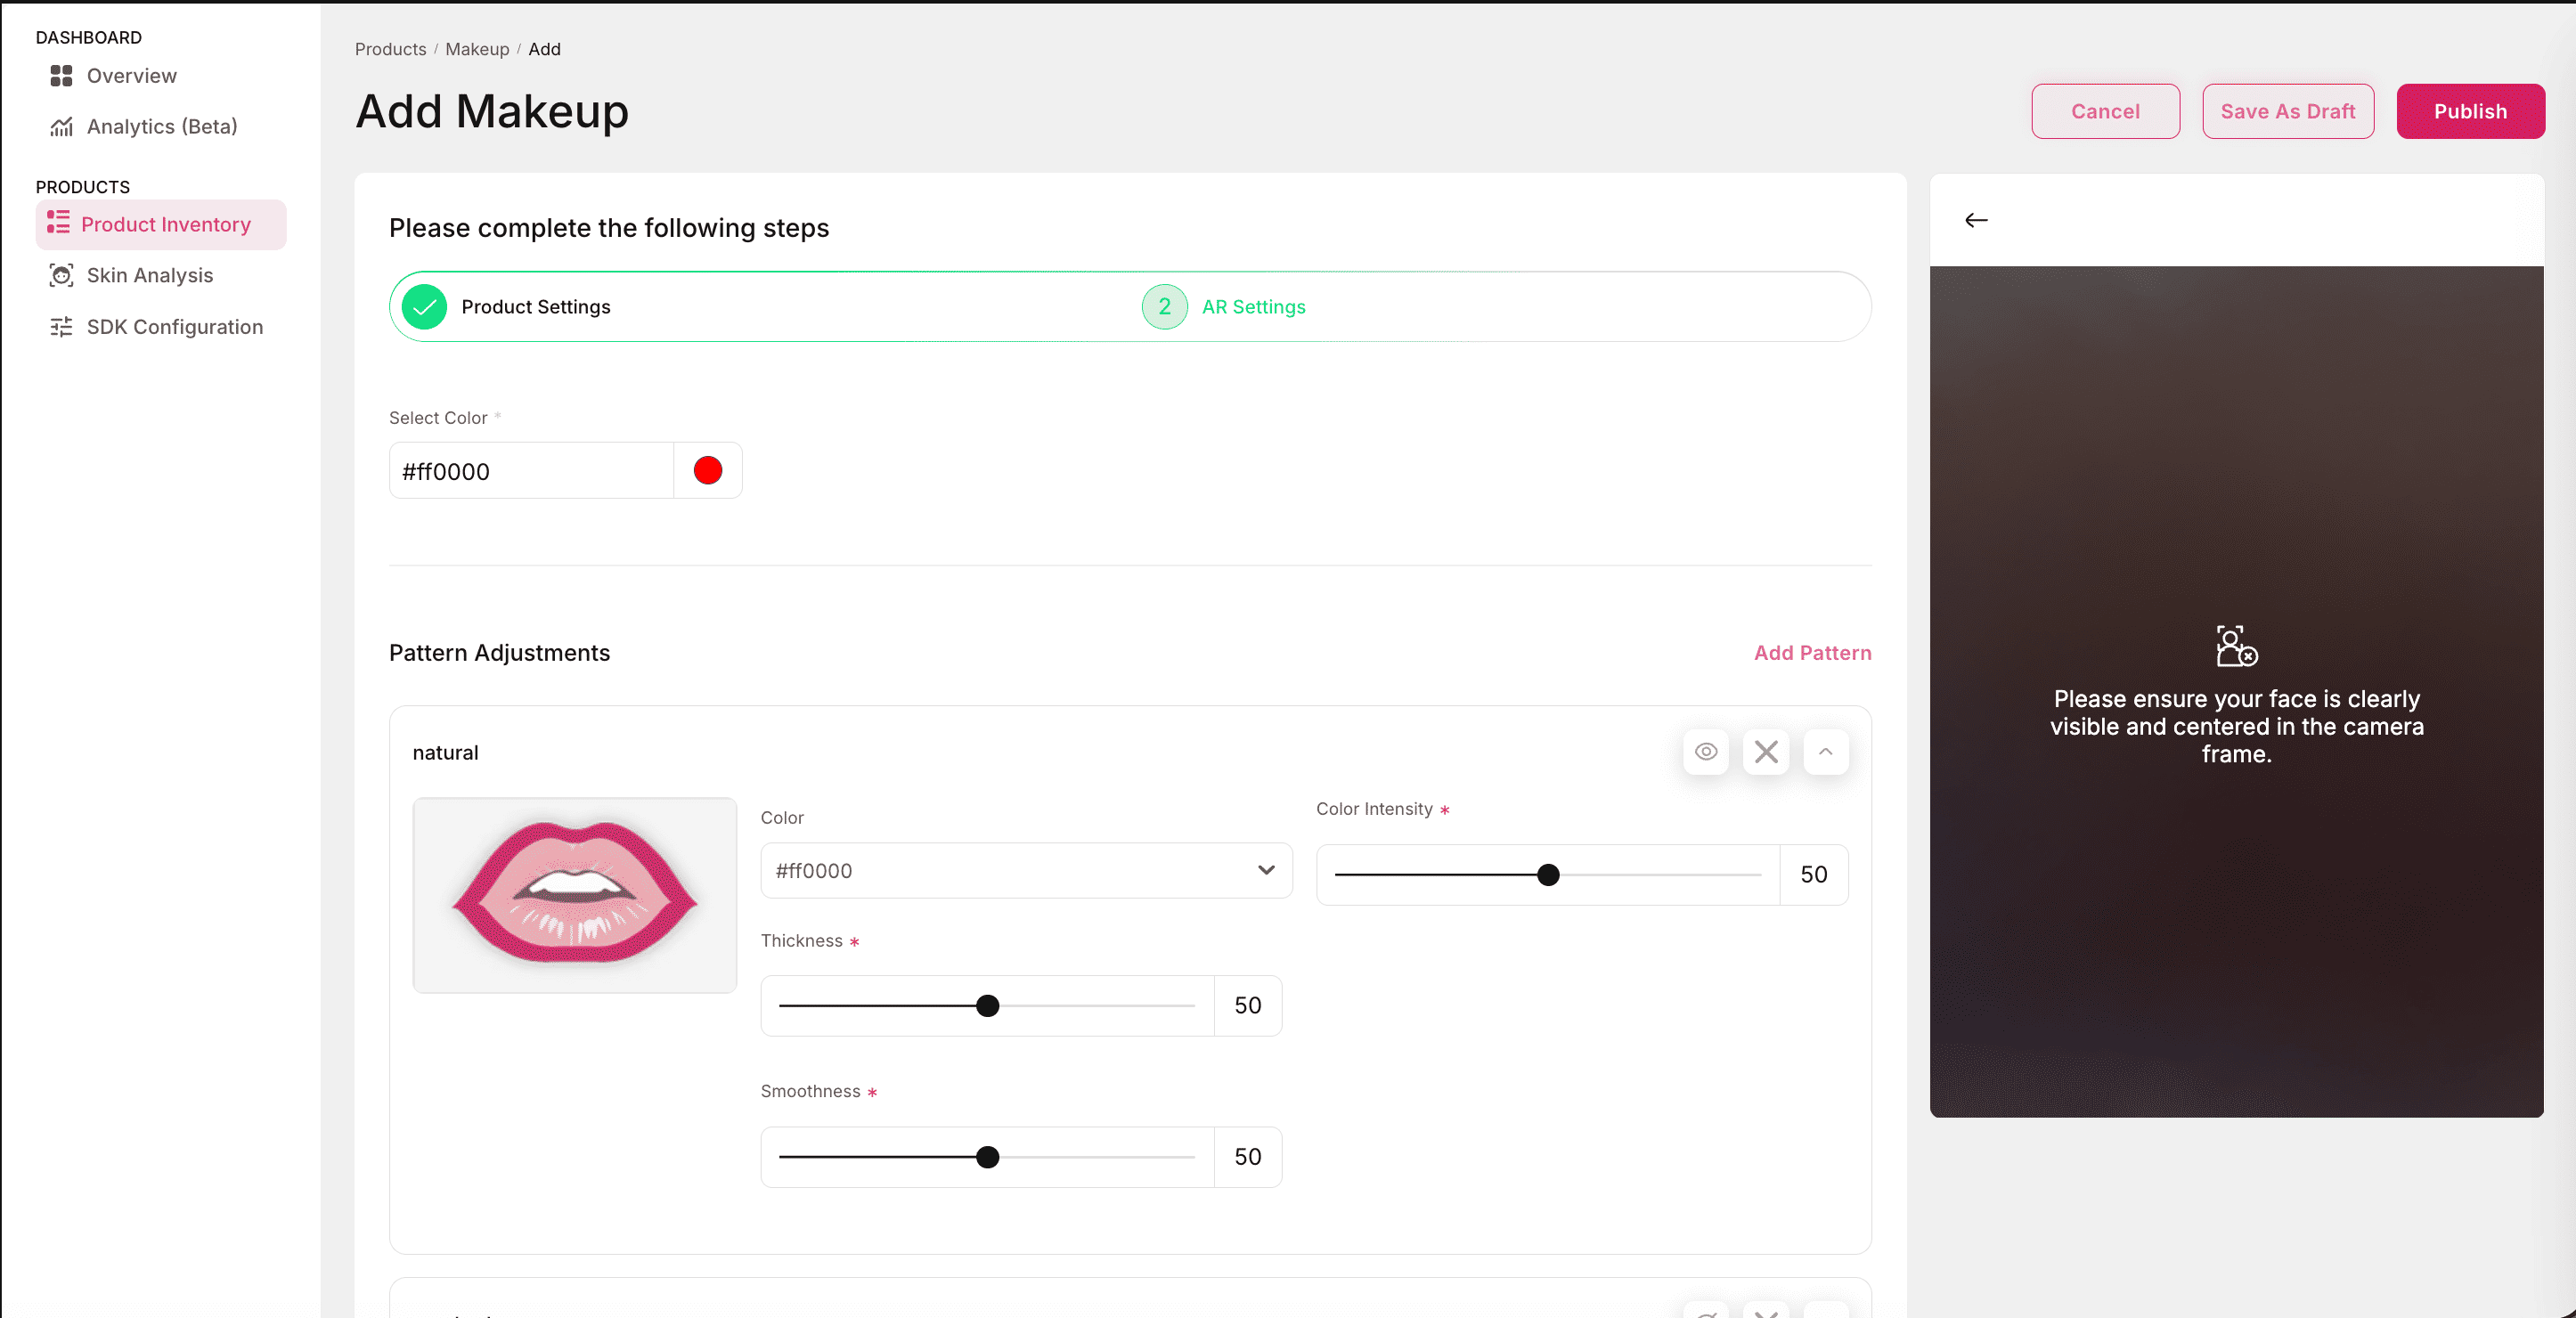
Lipliner
The AR settings for Lipliner define how lip contours are visualized and customized in the try-on console. These options allow for different shapes, thicknesses, and styles to match real-world product variations.
Select Color:
- Choose the lipliner shade from custom colors.
- The selected color applies directly to the chosen lipliner pattern.
Pattern Adjustments:
Lipliner supports a total of seven unique patterns, each offering different lip contour styles:
- Natural
- Small
- Wide
- Rosebud
- Large and Full
- Large Upper
- Large Lower
Options per pattern:
- Each pattern comes with the following adjustable parameters:
- Color: Selects the shade applied to the contour.
- Color Intensity: Adjusts how bold or subtle the shade appears.
- Thickness: Controls the width of the lipliner stroke.
- Smoothness: Adjusts the blending and refinement of the lip contour edges.
- Visibility control:
- Multiple patterns can be applied at the same time to experiment with looks.
- Each added pattern can be hidden or removed directly during the try-on preview.
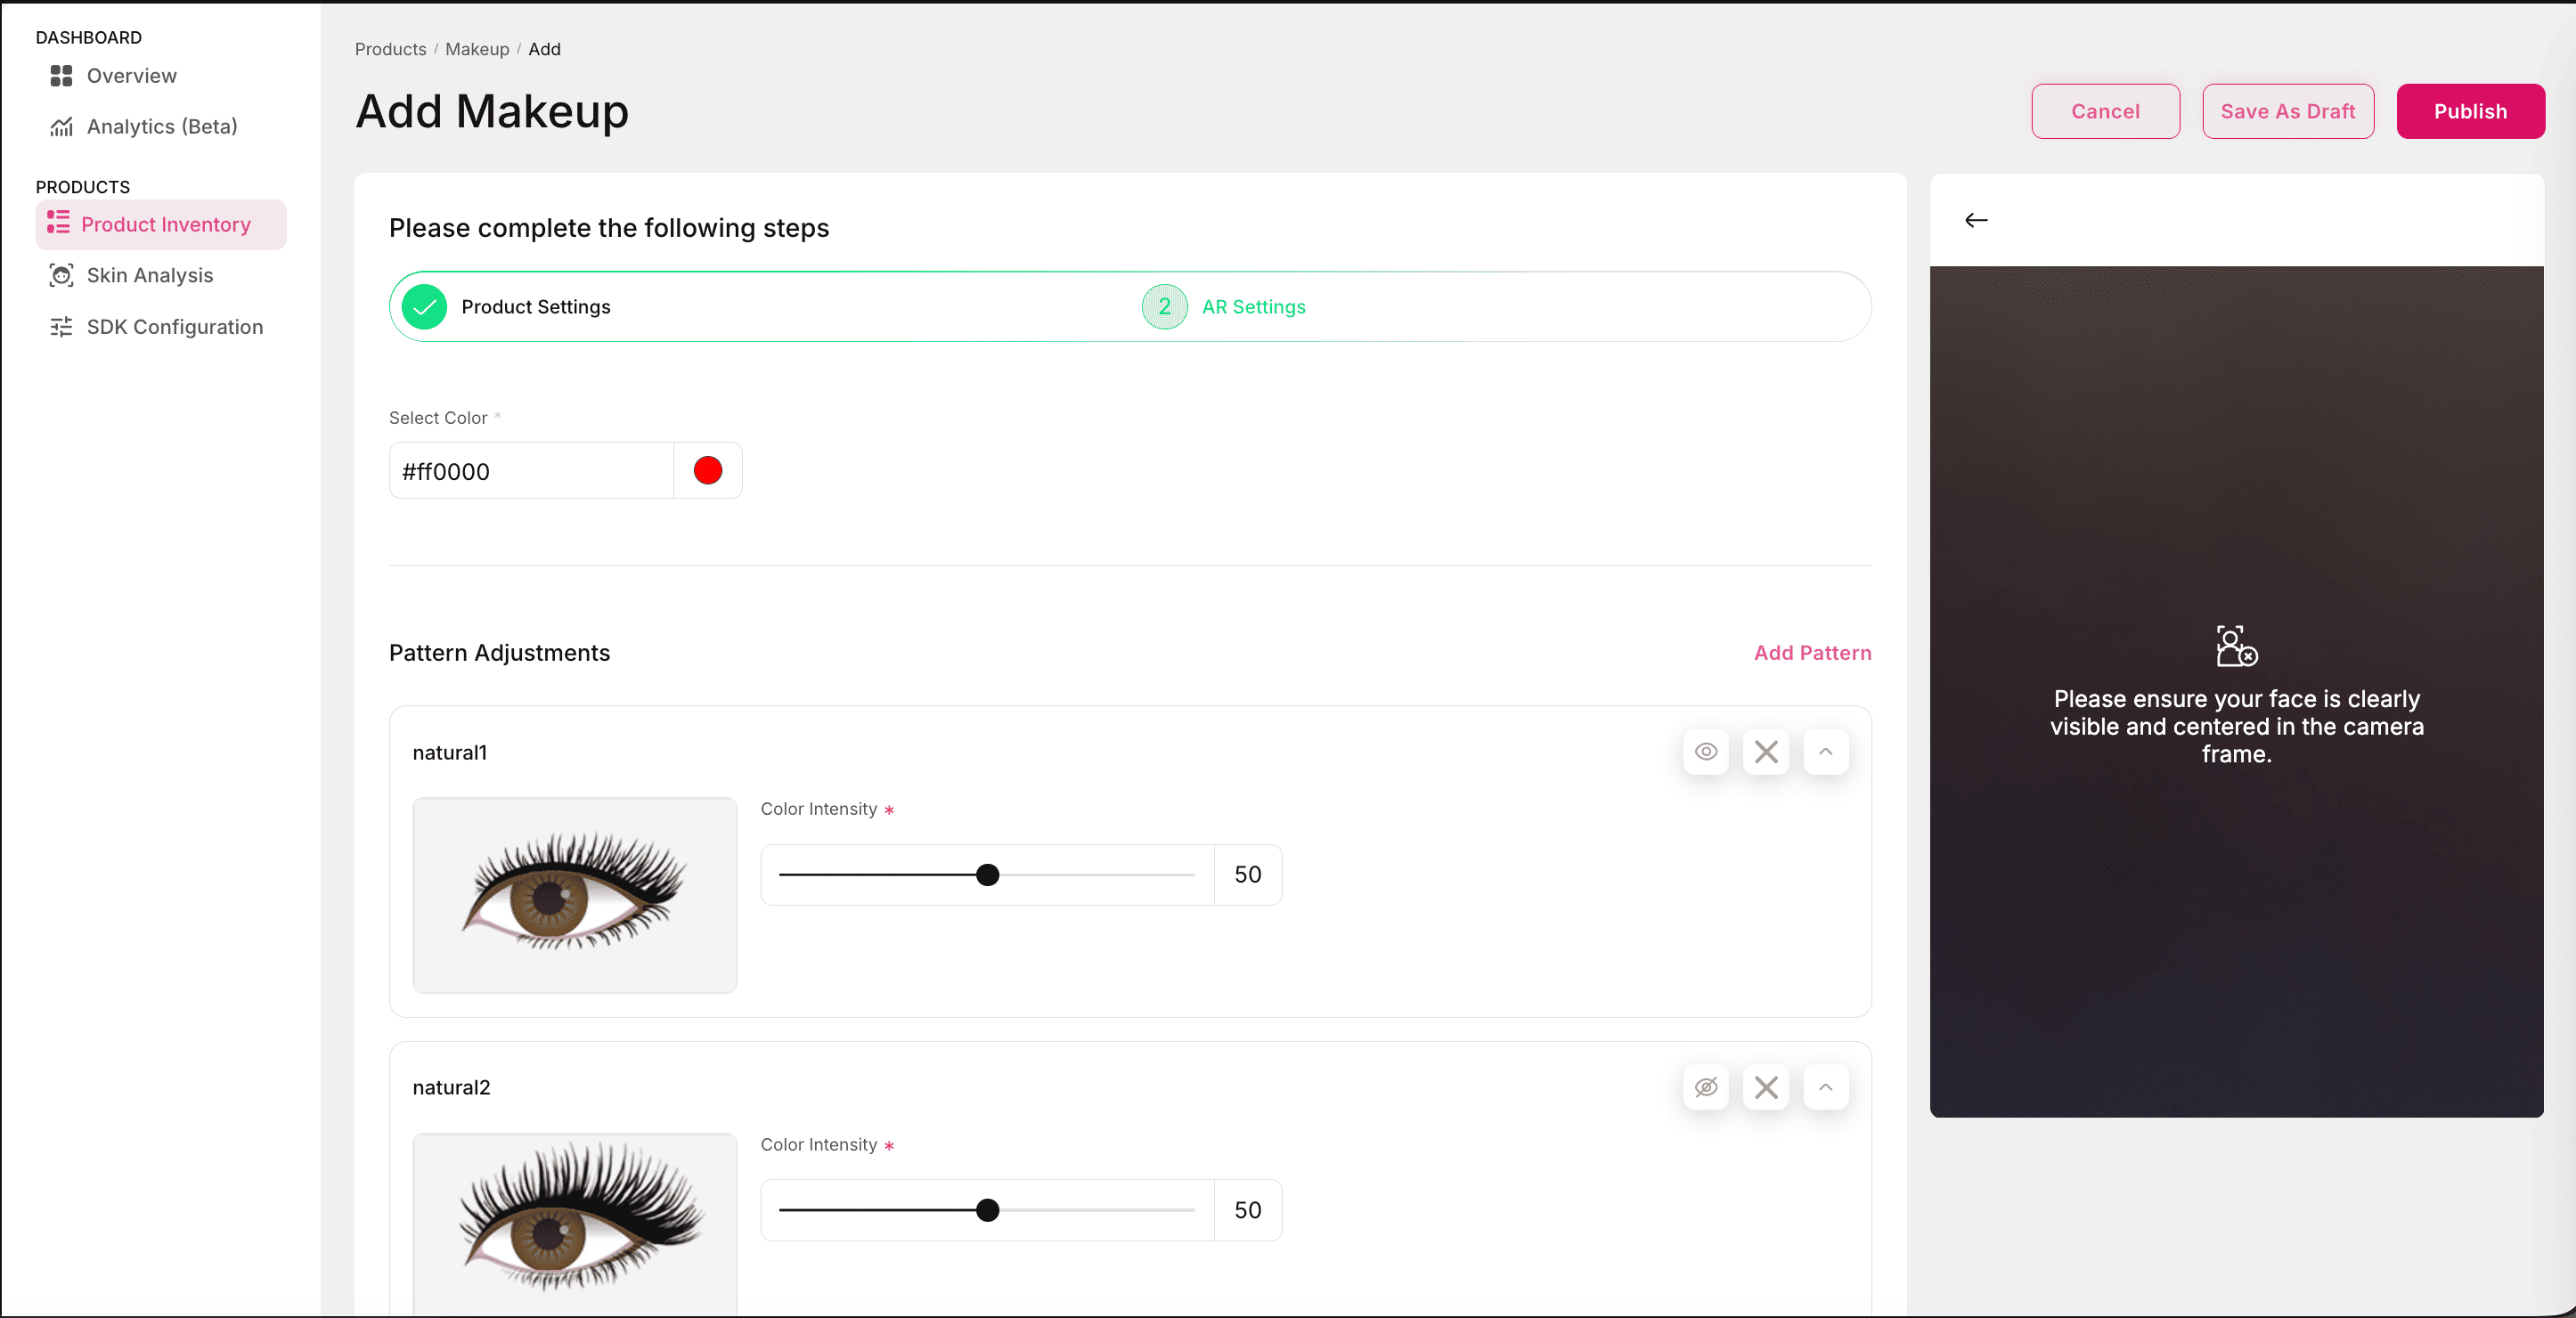
Mascara
The AR settings for Mascara allow you to customize how lashes appear during the try-on experience, with options for color selection, intensity, and different styling patterns.
Select Color:
- Choose the mascara color from a custom shade.
- The chosen shade can be viewed immediately in the try-on preview.
Pattern Adjustments:
Mascara supports five unique lash patterns, giving flexibility to simulate different lash styles.
Options per pattern:
- Color Intensity: Adjusts how bold or subtle the mascara color appears on the lashes.
- Low = soft, natural lash appearance.
- High = dramatic, volumized effect.
- Visibility control:
- Multiple patterns can be added at the same time to test looks.
- Any applied pattern can be hidden or removed from the try-on preview without restarting.

Eyebrows
The AR settings for Eyebrows controls how eyebrow shades, shapes, and intensities are applied in the virtual try-on experience.
Select Color:
- Choose the eyebrow shade from preset palettes or custom-defined colors.
- The selected color applies directly to the chosen eyebrow pattern.
Pattern Adjustments:
Eyebrows support five unique patterns, each representing different eyebrow shapes and styling.
Options per pattern:
- Color: Choose the eyebrow shade applied to that pattern.
- Color Intensity: Adjusts the strength of the applied color (from light tint to bold fill).
- Visibility control:
- Multiple patterns can be applied at once to experiment with styles.
- Each applied pattern can be hidden or removed in the try-on preview without resetting the session.

Eyelashes
The AR settings for Eyelashes define how lash styles and colors are applied during the try-on experience.
Select Color:
- Choose the eyelash shade from preset palettes or define a custom color.
- The selected color can be viewed directly in the try-on window.
Pattern Adjustments:
Eyelashes support five unique lash patterns, allowing you to simulate different lash styles and volumes.
Options per pattern:
- Color: Selects the shade applied to the lash pattern.
- Color Intensity: Adjusts the visibility of the chosen lash color.
- Low = softer, more natural lash look.
- High = bold, dramatic lash effect.
- Visibility control:
- Multiple patterns can be applied at once for layered lash styles.
- Any applied pattern can be hidden or removed directly in the try-on preview.
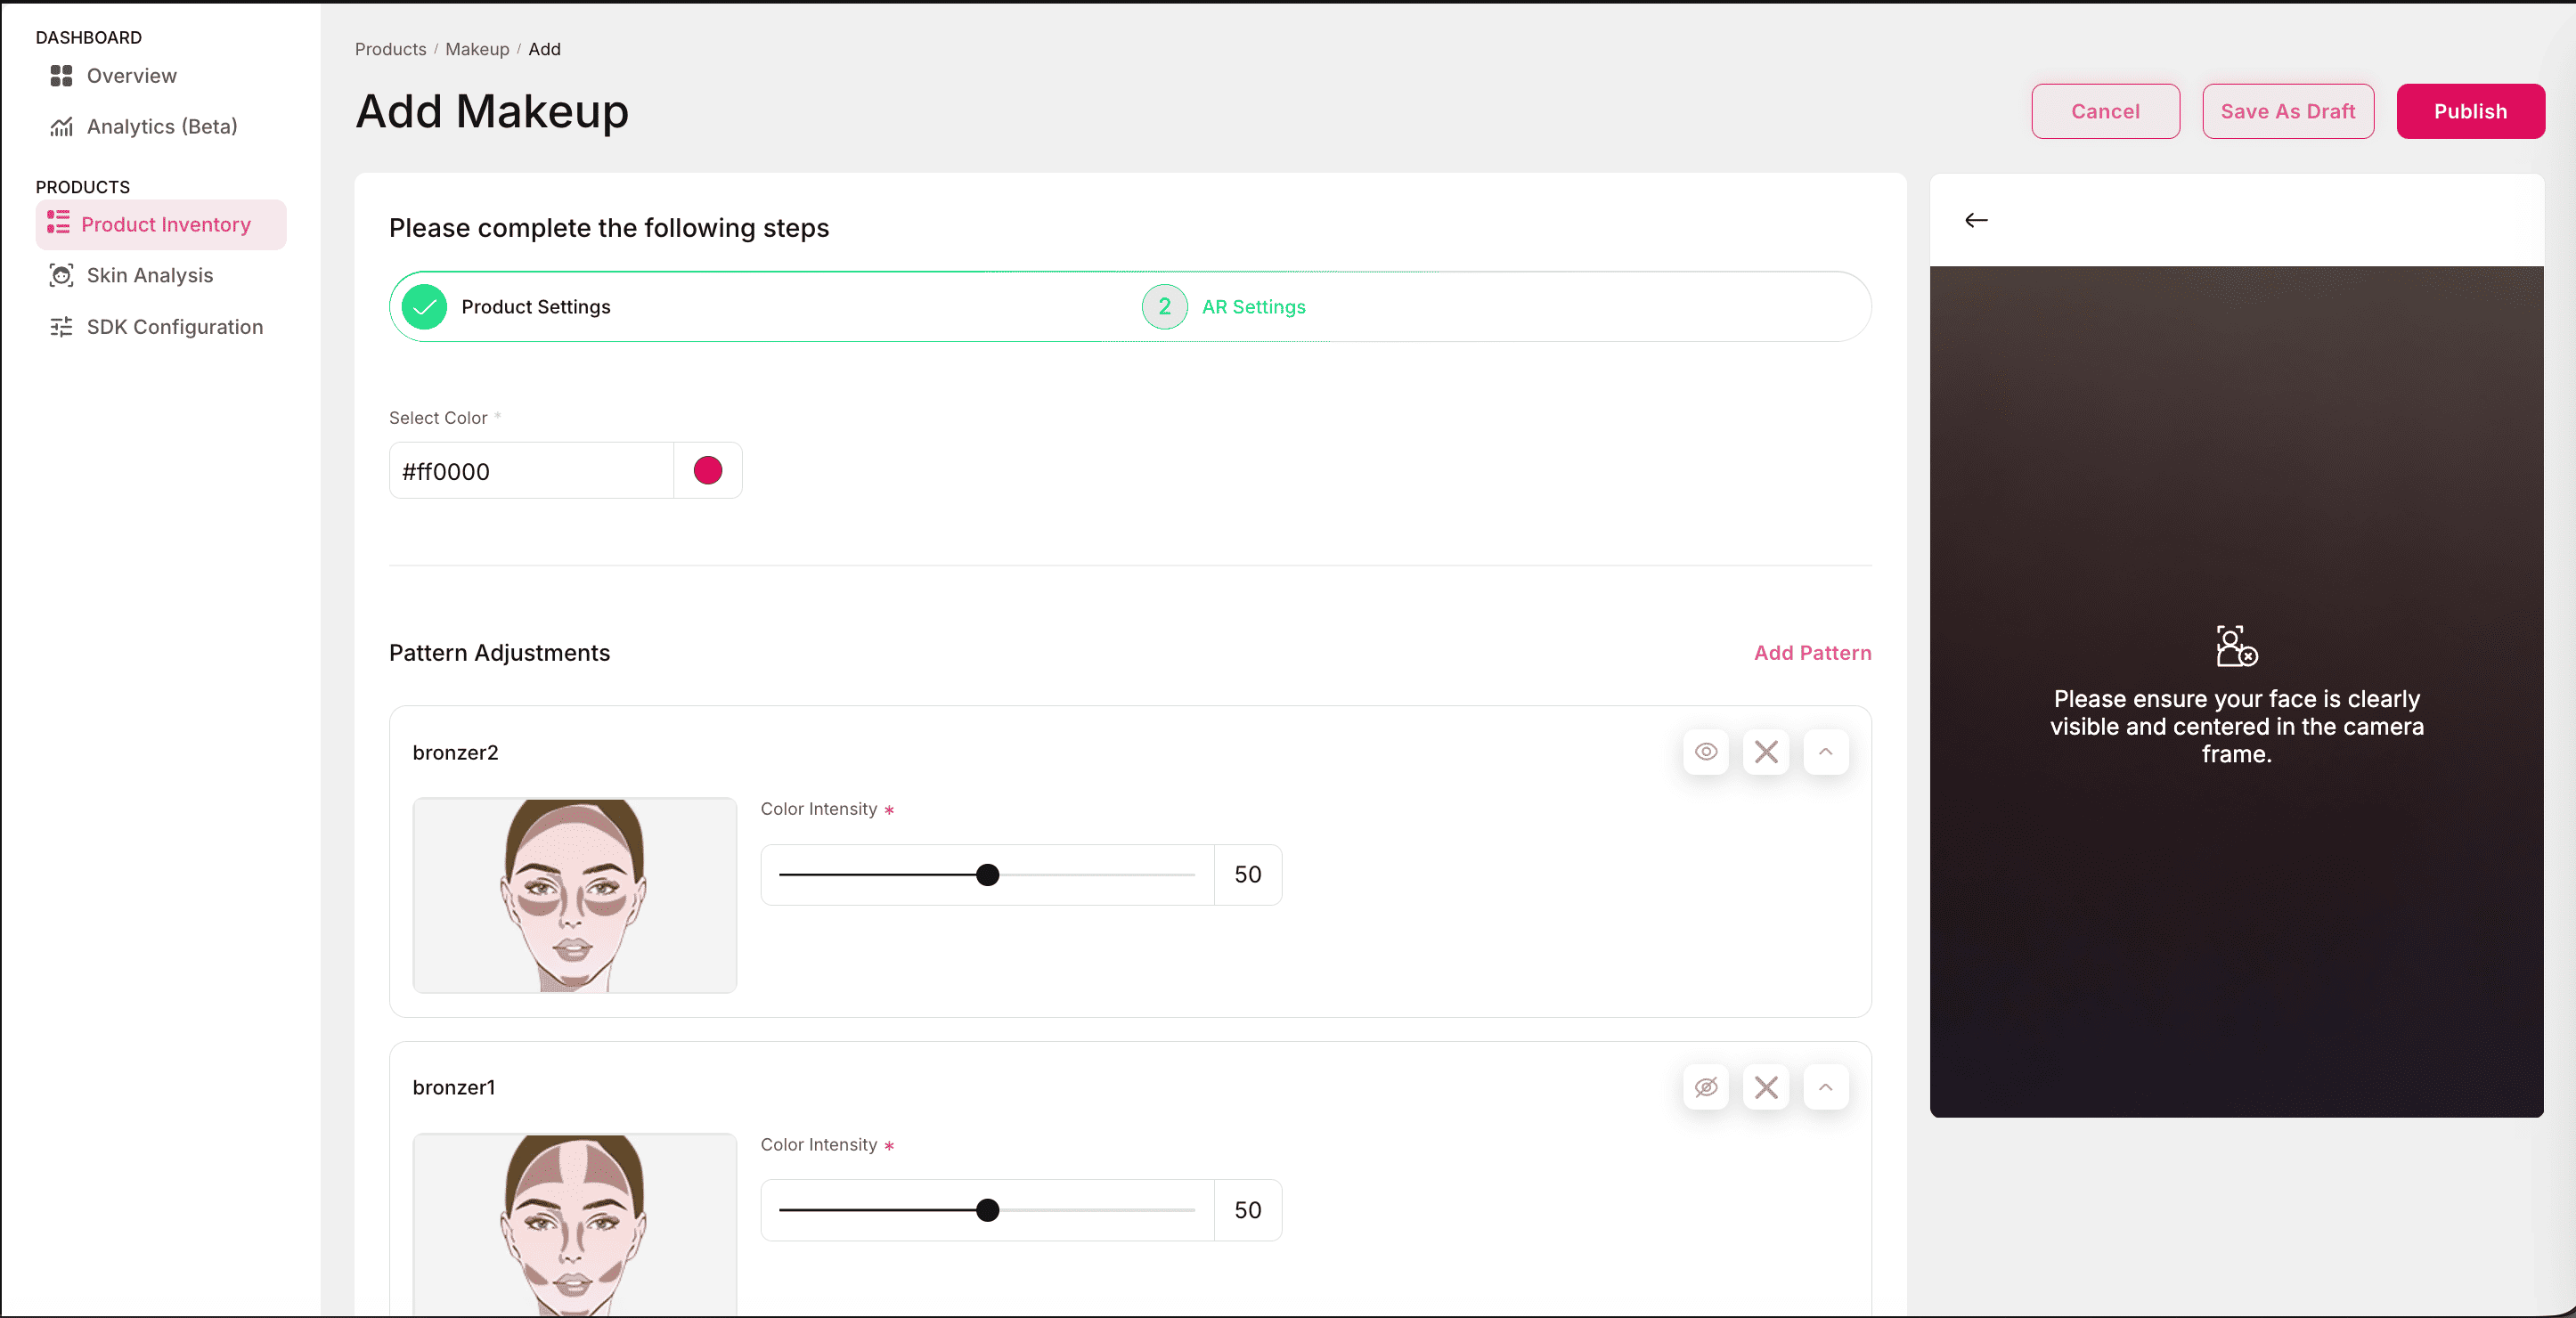
Bronzer
The AR settings for Bronzer allow you to simulate bronzer application on the face with customizable shades, intensities, and placement patterns.
Select Color:
- Choose the bronzer shade from a custom color.
- The selected color is applied directly to the chosen pattern in the try-on preview.
Pattern Adjustments:
Bronzer supports five unique application patterns, allowing flexibility in placement and styling.
Options per pattern:
- Color: Choose the bronzer shade for the selected pattern.
- Color Intensity: Adjust how subtle or strong the bronzer effect appears.
- Low = soft, natural contouring.
- High = bold, defined bronzed look.
- Visibility control:
- Multiple patterns can be applied at once to experiment with looks.
- Each applied pattern can be hidden or removed directly from the try-on preview without resetting.
Highlighter
The AR settings for Highlighter control how highlights are rendered on the face during the try-on experience.
Select Color:
- Choose the highlighter shade from a custom shade.
- The selected shade is applied immediately to the preview in the try-on console.
Pattern Adjustments:
Highlighter supports five unique application patterns, allowing users to preview different placement and glow effects.
Options per pattern:
- Color: Select the shade for the applied highlighter.
- Color Intensity: Adjusts how subtle or bold the highlight appears.
- Low = soft, natural glow.
- High = intense, radiant shine.
- Visibility control:
- Multiple highlighter patterns can be added simultaneously for layered effects.
- Each applied pattern can be hidden or removed directly in the try-on preview without restarting the session.

Foundation
The AR settings for Foundation control how shades and finishes are applied in the try-on console, allowing users to preview coverage and texture.
Select Color:
- Choose the foundation shade from custom tones.
- The selected shade applies instantly to the try-on preview.
Finish:
Foundation supports two types of finishes:
- Matte
- Color Intensity: Adjusts the opacity and strength of the matte foundation layer.
- Lower intensity = lighter coverage.
- Higher intensity = bold, full-coverage look.
- Color Intensity: Adjusts the opacity and strength of the matte foundation layer.

- Gloss
- Color Intensity: Adjusts the coverage of the shade.
- Gloss Intensity: Controls the level of shine applied.
- Low = subtle dewy finish.
- High = radiant glossy look.
Eyewear
Eyewear products use the standard fields defined in Product Settings, with the following additional fields specific to Eyewear.
Additional Fields
- Length: Specify the length of the frame in centimeters.
- Width: Specify the width of the frame in centimeters.
- Height: Specify the height of the frame in centimeters.
- Eye Lens: Size of the eye lens in centimeters.
- Frame Width: Overall width of the frame in centimeters.
- Bridge: Specify the bridge size in centimeters.
- Temple: Specify the length of the temple arm in centimeters.
- Lens Height: Specify the height of the lens in centimeters.
- Lens Width: Specify the width of the lens in centimeters.
- Color Code: Internal lens color code (e.g., C1, B2).
- Color Name: Add human-readable lens color description (e.g., Black, Amber).
- Color Hex Code: Add hexadecimal code for the lens color (e.g., #000000).
- Gender: Specify the intended gender for the frame (e.g., Male, Female).
- Age: Specify the target age group (e.g., 15, 25, 35).
- Frame Size: Specify the overall frame size (e.g., Small, Medium, Large).
- Frame Shape: Specify the shape of the frame (e.g., Round, Square).
- Material: Specify the material used for the frame (e.g., Metal, Acetate).
- Rim Type: Specify the type of rim (e.g., Full, Half, Rimless).
- Multifocal Compatible: Indicates if the frame supports multifocal lenses.
AR Settings
The following AR settings apply to all Eyewear products including Sunglasses, Eyeglasses, and Smart Glasses.
Upload 3D File
The Upload 3D Model feature lets you bring eyewear products into the try-on console as interactive models. This provides the realistic and accurate AR experience, since users can view true-to-life frames in 3D.
- Drag and drop 3D files of eyewear products.
- Supported formats: GLTF, GLB
- Size limit: up to 5 MB
Upload 2D Images
If a 3D model is not available, you can upload 2D images of the eyewear from specific angles. These images are used to generate a realistic AR preview of the product:
- Frontal
- Left temple (outer)
- Right temple (outer)
- Left temple (inner)
- Right temple (inner)
- Top-down
- 45-degree angle view
- Supported formats: PNG, JPG
- Size limit: up to 5 MB

Transform Settings
These settings allows you to adjust the placement and orientation of 3D eyewear models:
- Rotation: Adjust around the X, Y, and Z axes.
- Position: Adjust placement along the X, Y, and Z axes.
- Reset to default: Resets the rotation and position values to 0.
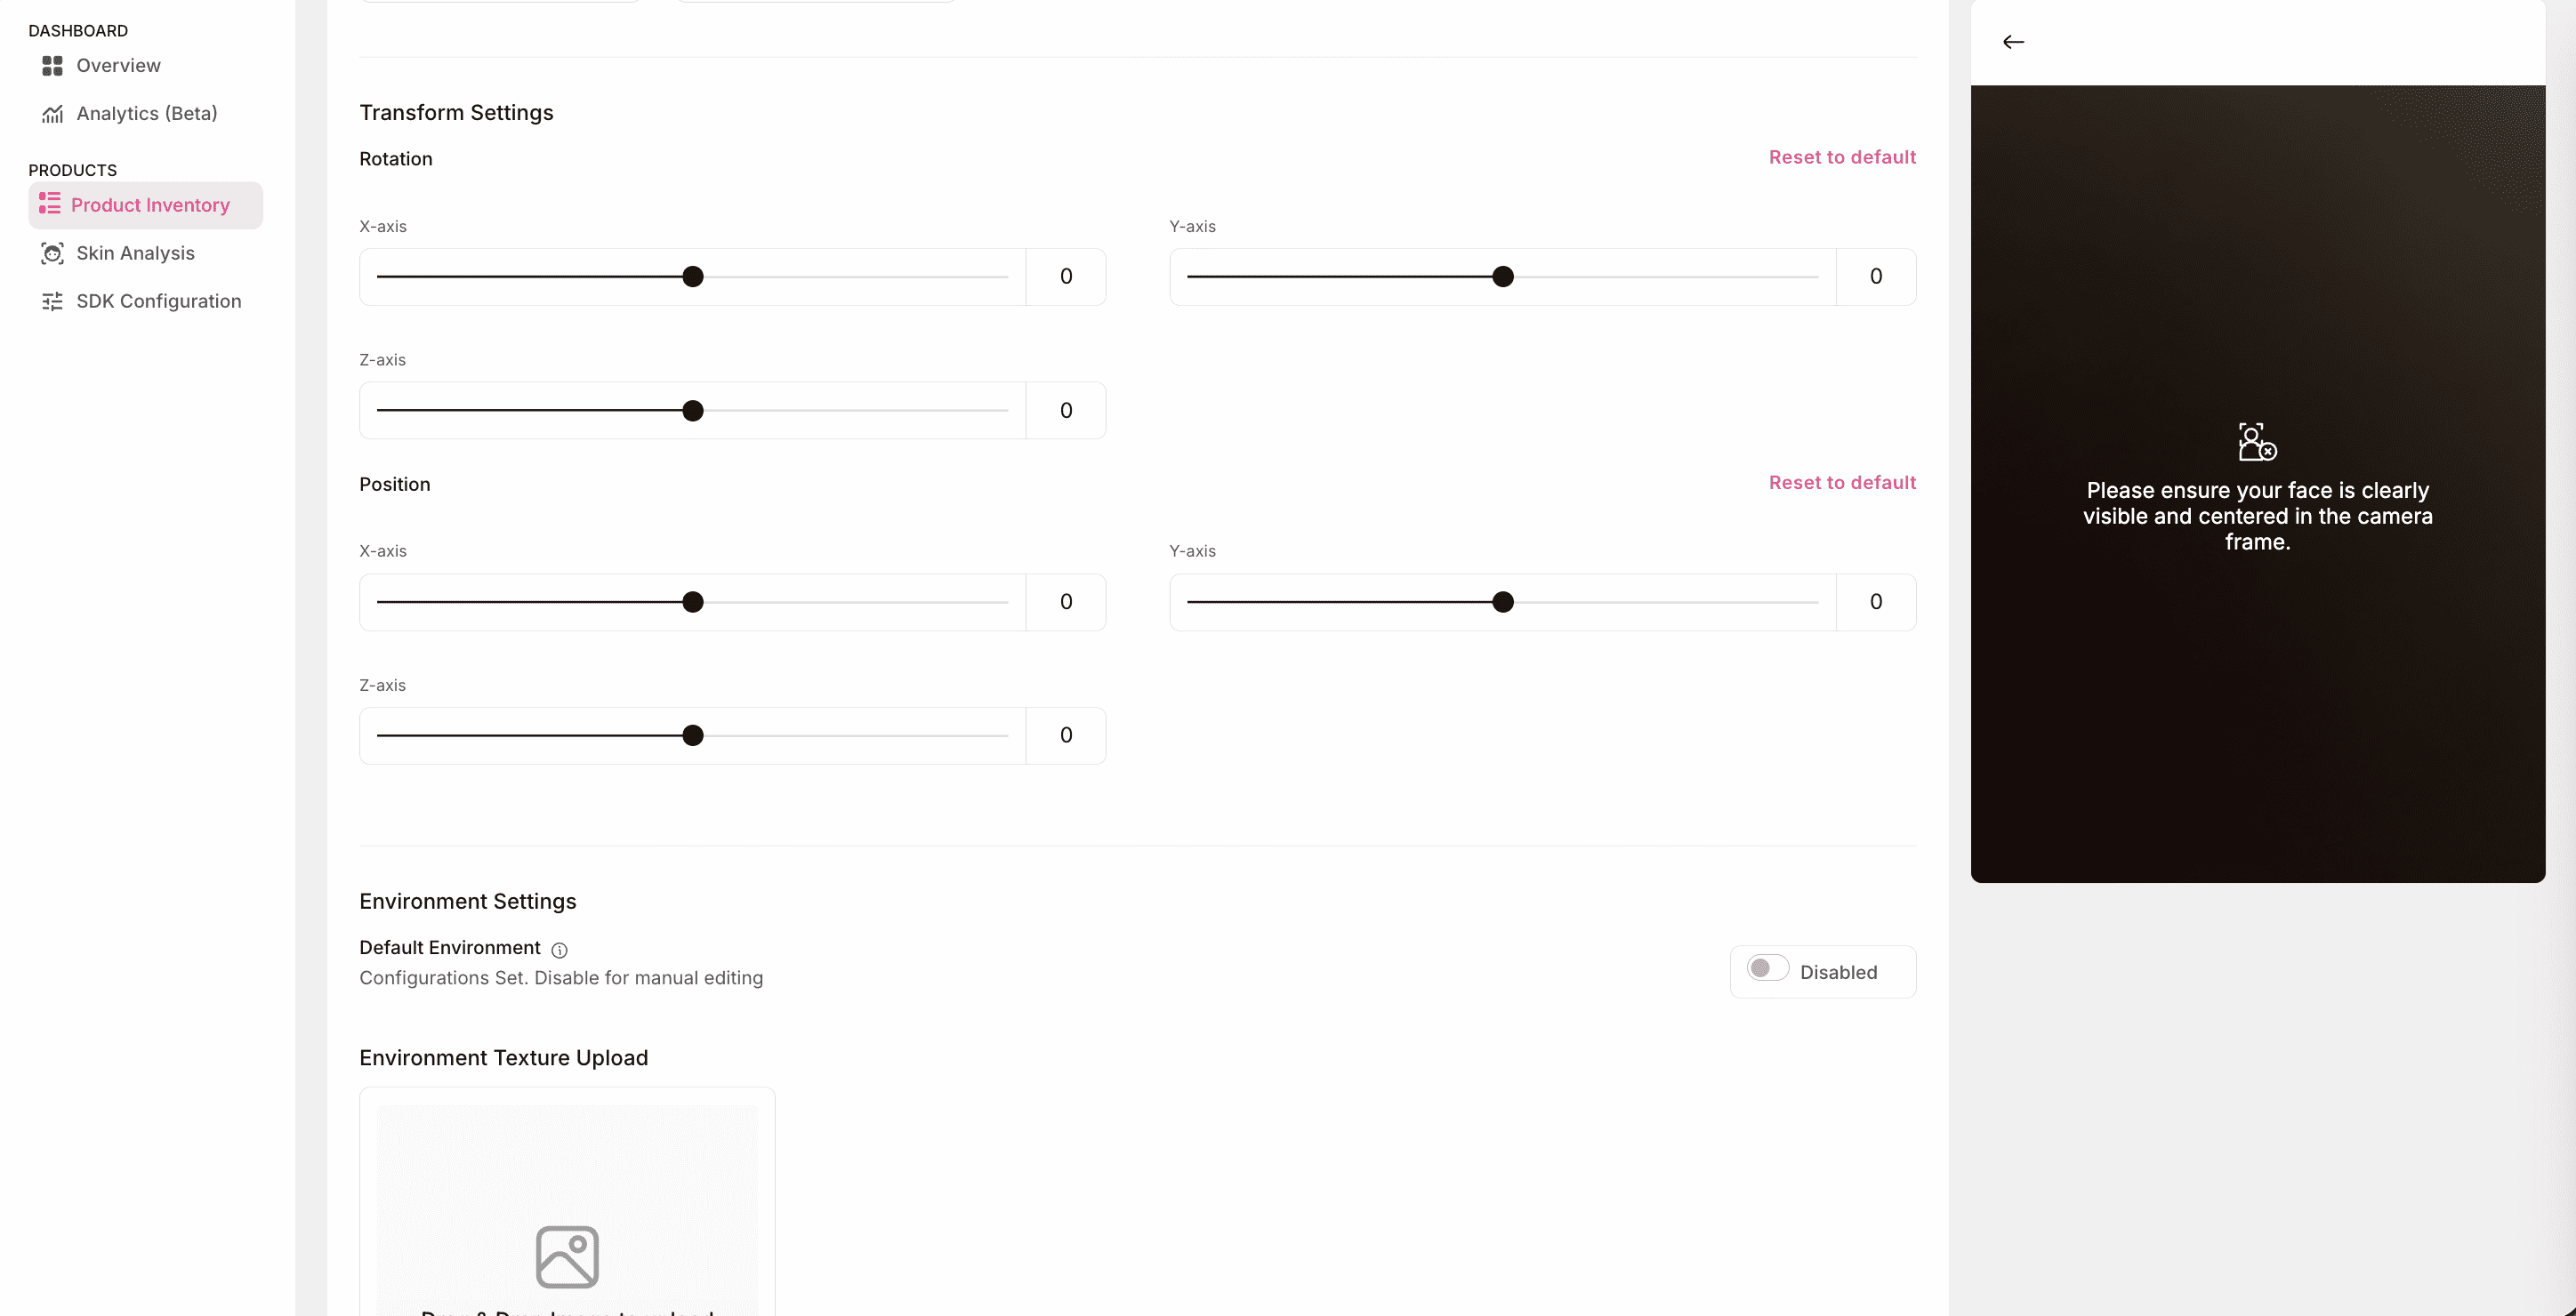
Environment Settings
Environment Settings control how lighting and reflection affect the 3D eyewear model in the try-on window. These options allow you to fine-tune the realism of the AR preview:
- Default Environment: When enabled, the try-on console uses predefined lighting and reflection settings for quick setup. When disabled, you can customize the environment using the following options:
- Environment Texture Upload:
- Upload an HDR or EXR image (upto 5 MB).
- This file is used as a skybox, affecting reflections.
- Tile X / Tile Y:
- Define how many times the environment texture repeats across the X and Y axes.
- Useful for controlling whether the background looks seamless or repeated.
- Environment Intensity:
- Adjusts the brightness/strength of the environment lighting.
- Higher values = brighter reflections and highlights on the 3D model surface.
- Tone Mapping: Determines how brightness and contrast are calculated in the final render. The available options are:
- Neutral: Balanced tone production.
- ACES: Advanced color grading standard for cinematic realism.
- Linear: No tone mapping, preserves raw color values.
- AgX: Soft, filmic tone mapping for natural-looking light response.
- Shadow Intensity:
- Controls how dark shadows appear beneath and around the 3D model.
- Higher values = stronger contrast, lower values = softer look.
- Shadow Softness:
- Adjusts how sharp or blurred shadow edges appear.
- Useful for simulating diffuse vs. direct lighting conditions.
- Enable SMAA: Reduces jagged edges in the rendered model for smoother visuals.
- Bloom Settings:
- When enabled, it adds a glow effect around bright areas (like reflections on lenses).
- Bloom Strength: Controls the intensity of the glow.
- Bloom Radius: Determines spread of the glow around highlights.
- Bloom Threshold: Minimum brightness level at which bloom is applied.
- When enabled, it adds a glow effect around bright areas (like reflections on lenses).
- SSAO Setting:
- Screen Space Ambient Occlusion (SSAO) simulates subtle shading in creases, corners, and contact points to enhance depth. Adjustable property:
- SSAO Strength: Controls the degree of ambient shadow applied (e.g., 2.0 for light effect, 100 or more for stronger occlusion).
- Screen Space Ambient Occlusion (SSAO) simulates subtle shading in creases, corners, and contact points to enhance depth. Adjustable property:
- Environment Texture Upload:
Accessories
Accessories use the standard fields defined in Product Settings, with the following additional fields.
Additional Fields
- Length: Specify the length of the product in centimeters.
- Width: Specify the width of the product in centimeters.
- Height:Specify the height of the product in centimeters.
- Size: General size, head size, or shoe size, depending on the accessory type.
- Circumference: Specify the circumference of the product in centimeters; applicable for round accessories like caps or hats.
- Dial Size: Specify the dial size of the product; applicable for watches.
- Material Type: Specify the type of material used (e.g., Leather, Metal).
- Color: Primary color of the product.
- Gender: Specify the target gender for the product (e.g., Male, Female, Unisex).
- Age: Target age group for the product (e.g., 15–25).
AR Settings
Accessories use the same AR settings as defined for Eyewear and applies to all products within Accessories - Watch, Cap, Hat, and Shoes. These include:
- Upload 3D Models
- Upload 2D Images
- Transform Settings (rotation and position controls)
- Environment Settings (lighting, tone mapping, bloom, SSAO, etc.)
For detailed configuration and best practices, see Eyewear AR Settings.
Jewellery
Jewellery products use the same fields defined in Product Settings, with the following additional fields specific to Jewellery.
Additional Fields
- Length: Specify the length of the product in centimeters.
- Width: Specify the width of the product in centimeters.
- Height:Specify the height of the product in centimeters.
- Material: Specify the material used for the product (e.g., Gold, Silver, Glass).
- Carat Value: Specify the carat value of the metal (e.g., 18, 22, 24).
- Stone Type: Specify the type of stone used (e.g., Diamond, Ruby).
- Stone Cut: The stone cut style (e.g., Round, Oval, Princess).
- Stone Weight: Specify the weight of the stone.
- Metal Finish: The finish of the metal (e.g., Polished, Matte, Glossy, Antique).
- Size: Overall size of the necklace in centimeters.
- Weight: Specify the weight of the product.
- Gender: Specify the intended gender (e.g., Male, Female, Unisex).
- Age: Target age group for the product (e.g., 18 - 25).
AR Settings
Jewellery products use the same AR settings as defined for Eyewear and applies to all Jewellery products - Necklace, Bracelet, Ring, Earrings, and Mangtika. These include:
- Upload 3D Models
- Upload 2D Images
- Transform Settings (rotation and position controls)
- Environment Settings (lighting, tone mapping, bloom, SSAO, etc.)
For detailed configuration and best practices, see Eyewear AR Settings.
Home
Home products use the same fields defined in Product Settings, with the following additional fields specific to Home.
Additional Fields
- Length: Specify the length of the product in centimeters.
- Width: Specify the width of the product in centimeters.
- Height: Specify the height of the product in centimeters.
- Material Type: Specify the type of material used in the product (e.g., Wood, Plastic, Metal)
- Color: Specify the product color in HEX code.
- Weight: Specify the weight of the product in Kilograms.
- Usage area: Specify where the product is intended to be used (e.g., Indoor or Outdoor)
- Room type: Specify which type of room the product is for (e.g., Living room, Bedroom)
AR Settings
The following AR settings apply to all Home product categories, including Furniture, Floor Décor, Wall Décor, Lighting, Kitchen, and Appliances.
Placement
- Choose how the product is placed in the AR environment.
- Options:
- Floor: For products that rest on the ground, such as furniture, flooring, or large appliances.
- Wall: For products mounted on vertical surfaces, such as wall décor or lighting fixtures.
View in Room
- Toggle to enable or disable this feature.
- When enabled, users can preview how the product appears in a real-world room setting using their device camera.
- Useful for contextualizing products like furniture or home décor in the customer’s actual environment.
Upload 3D File
- Upload a 3D representation of the product for rendering in the try-on console.
- Supported formats: GLTF (
.gltf) and GLB (.glb). - Max size: 5 MB.
For detailed environment configuration and best practices, refer to AR settings of Eyewear.
Apparel
Apparel products use the same fields defined in Product Settings. Please refer there for details on Barcode, Category, Product Name, SKU ID, Brand Name, Product URL, Product Image, and optional fields like Age and Material.
AR Settings
Apparel products use the same AR Settings as defined for Home products. These include:
- Placement (Floor or Wall)
- View in Room (Enable/Disable)
- Upload 3D Files
- Environment Settings
For detailed configuration and best practices, refer to AR settings for Home.
Luggage
Luggage products use the same fields defined in Product Settings, identical to those for Makeup products. Please refer there for details on Barcode, Category, Product Name, SKU ID, Brand Name, Product URL, Product Image, and optional fields like Age and Material.
AR Settings
Luggage products use the same AR settings as defined for Home products. These include:
- Placement (Floor or Wall)
- View in Room (Enable/Disable)
- Upload 3D Files
- Environment Settings
For detailed configuration and best practices, refer to AR settings for Home.
Automotive
Automotive products use the same fields defined in Product Settings, identical to those for Makeup products. Please refer there for details on Barcode, Category, Product Name, SKU ID, Brand Name, Product URL, Product Image, and optional fields like Age and Material.
AR Settings
Automotive products use the same AR Settings as defined for Home products. These include:
- Placement (Floor or Wall)
- View in Room (Enable/Disable)
- Upload 3D Files
- Environment Settings
For detailed configuration and best practices, refer to AR settings of Home.
Add Bulk Product
In addition to adding a single product, the console also supports bulk product uploads. This method is recommended when you need to create or update a large catalog of products at once.
To access, navigate to the Product Inventory tab. Click the dropdown next to the New Product button and select Add Bulk Product. After clicking Add Bulk Product, a popup window guides you through several steps to complete the bulk upload setup:
-
Select Platform: The first step is choosing the platform from which you want to sync your product catalog.
- Currently supported: CSV file upload.
- Future support (coming soon): Direct integrations with platforms like Fynd Platform, Shopify and others. This step enables flexibility. While today you rely on a CSV file, in the future you’ll be able to connect your store directly to auto-import products.

-
Upload File: In this step, you upload your product catalog file.
- Drag and drop your CSV file into the window, or use the file picker.
- File format: Only CSV is supported at present.
- Maximum file size: 20 MB.
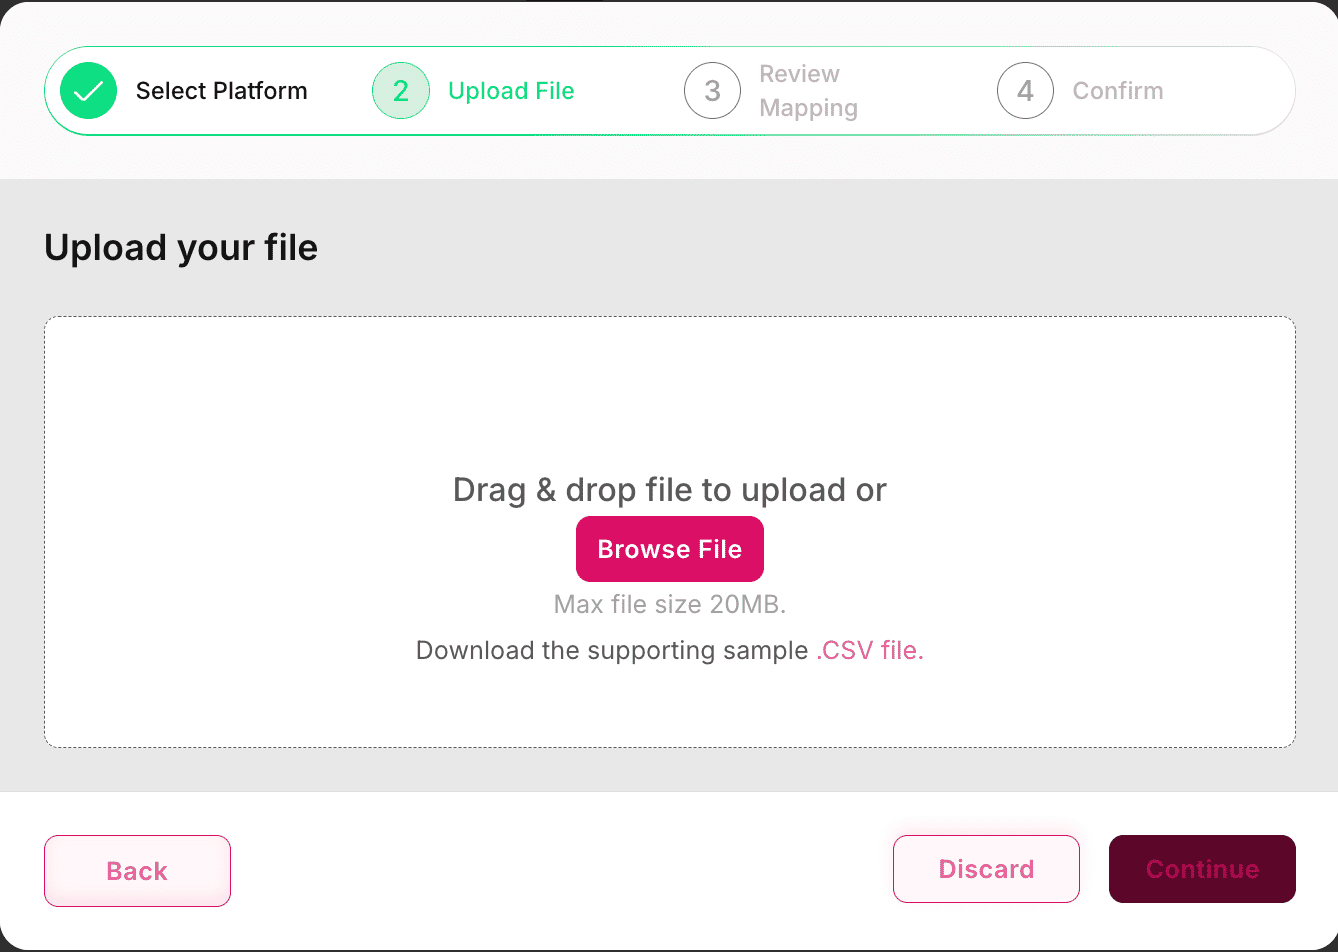
- Use the downloadable CSV template provided to ensure correct formatting.
- Always double-check that mandatory fields (e.g., Barcode, SKU ID, Product Name) are included.
- For categories with extra fields (like Eyewear, Jewellery), make sure the file contains those columns too.
After uploading, the platform automatically parses the CSV and prepares the data for mapping in the next step.
-
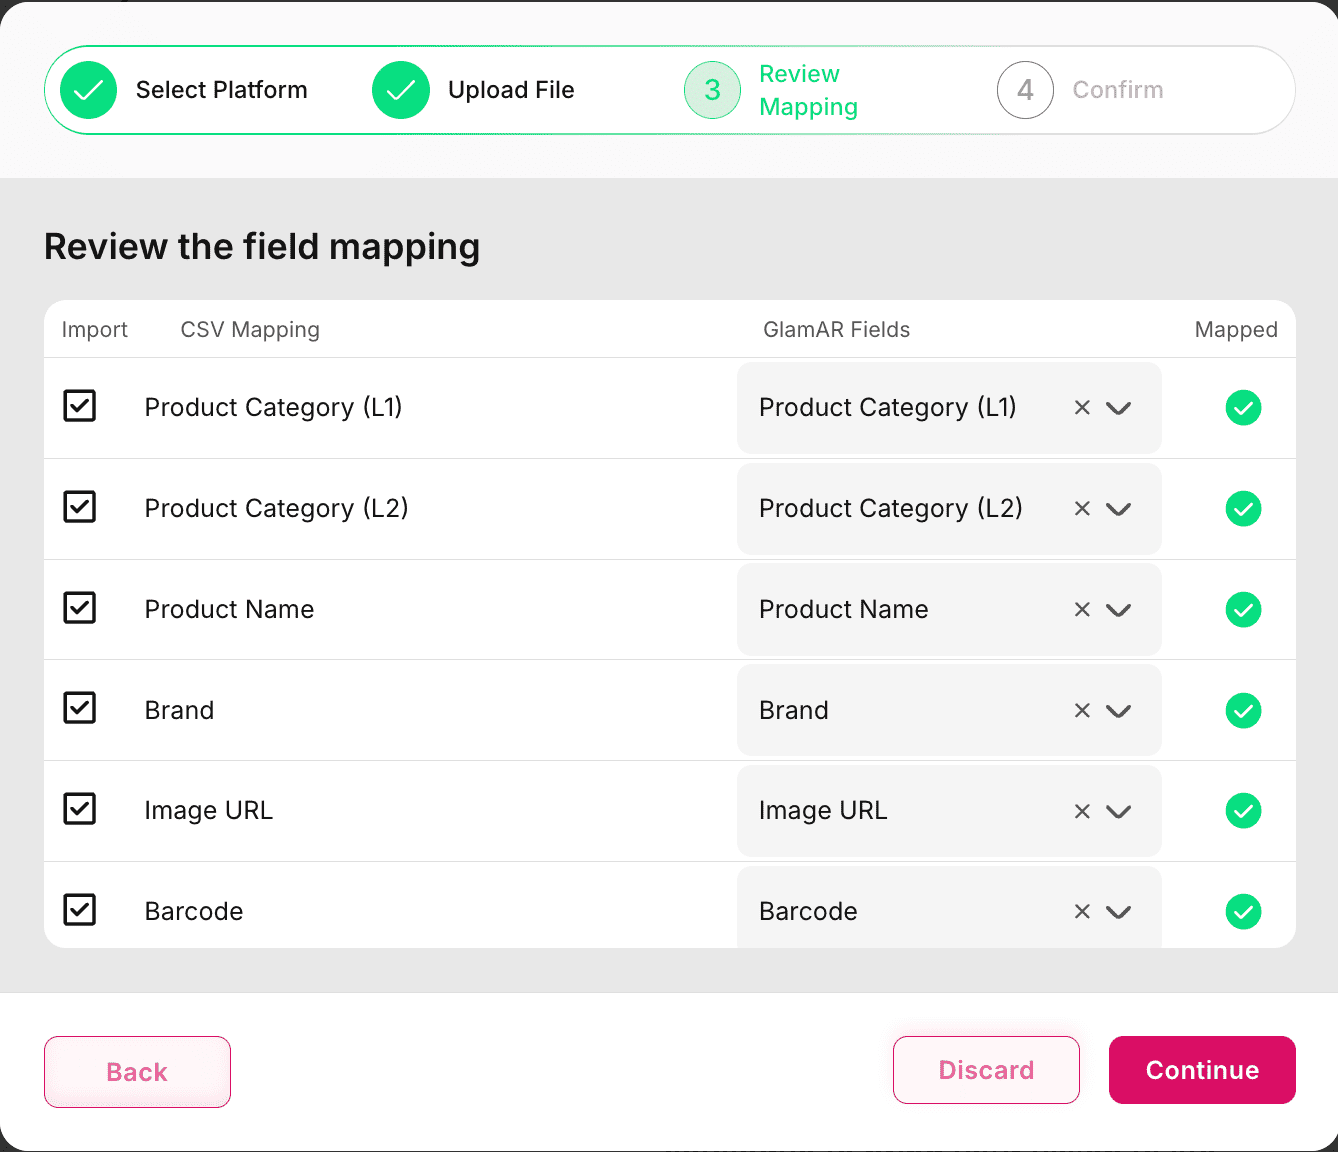
Review Mapping: The mapping window helps align your CSV columns with GlamAR’s predefined fields. This ensures imported data flows correctly into the system. The window contains four columns:
- Import:
- Checkbox that allows you to choose whether a particular field from the CSV should be imported.
- Useful if your file has additional fields not needed in GlamAR.
- CSV Mapping:
- Auto-filled with the column names from your uploaded CSV file.
- Example:
sku_id,brand_name,color_code.
- GlamAR Fields:
- Predefined fields required by GlamAR.
- Example: SKU ID, Brand, Color.
- Your CSV fields must be mapped to these.
- Mapped:
- Displays the mapping status.
- ✅ Green Tick = Field successfully mapped.
- ⚠️ Blank/Unmapped = Needs user input.
You can skip unnecessary columns by unchecking them in Import. Manual mapping is allowed if automatic mapping does not match a field. Once everything looks correct, click Confirm to complete the bulk upload.
- Import:
-
Confirm: This is the final review and confirmation stage.
Successfully imported products are added to the inventory. Any invalid or skipped records will be logged, and you’ll be notified.
Editing Products
Once products are added, they appear in the Product Inventory. This page provides an overview of all products and lets you manage them easily.
The product list is displayed in a table format with the following columns:
- Image: A thumbnail of the product for quick identification.
- Product Name: The name entered during product creation.
- Category: The product category (e.g., Makeup, Eyewear, Jewellery, Home).
- Subcategory: The more specific type of product within the category (e.g., Lipstick, Sunglasses, Rings).
- Last Updated: Timestamp of the most recent modification.
- SKU ID: The unique SKU identifier for the product.
- Status: Shows the status, if the product is published or in a draft.
- Actions: A menu of available management options for each product.
This table makes it easy to search, scan, and manage products without opening each one individually.
In the Actions column, each row contains an ellipsis (…) menu. Clicking it reveals three options:
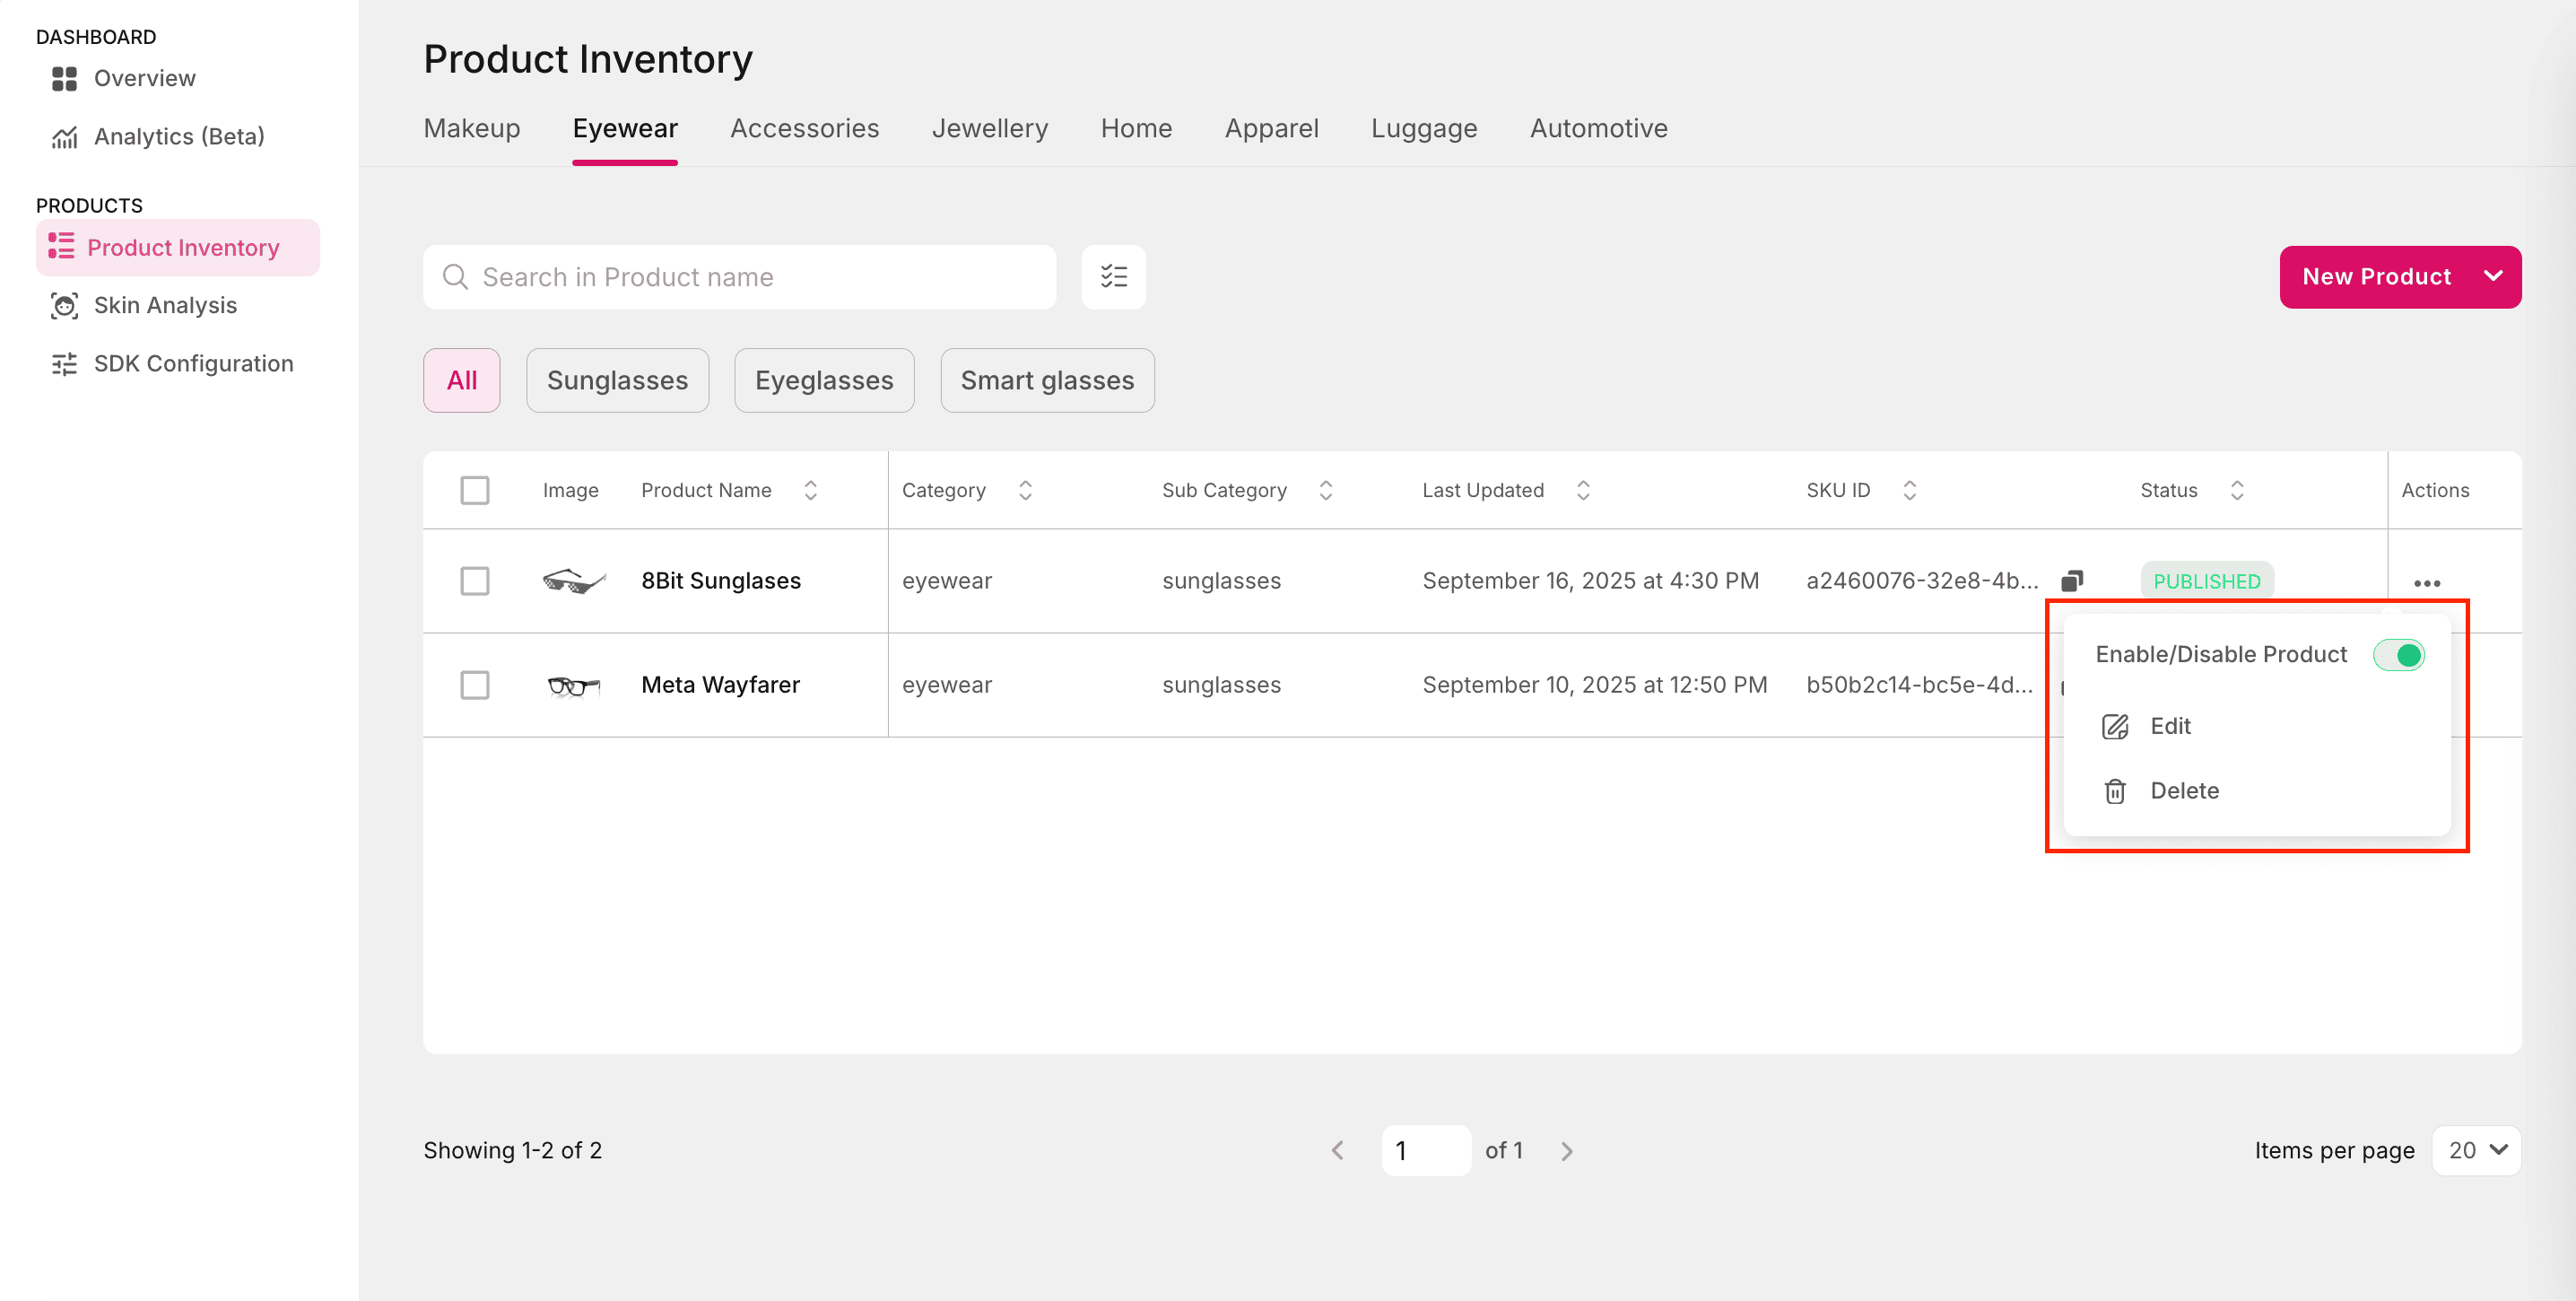
-
Enable/Disable Product: Toggles the availability of the product in the try-on experience.
- Enabled products appear in the console and can be previewed in AR.
- Disabled Products remain in the inventory but are hidden from users.
Useful when a product is temporarily unavailable (e.g., out of stock) but you don’t want to delete it.
-
Edit: Opens the product configuration page where you can update details. Editable sections include:
- Product Settings (e.g., Product Name, Brand, SKU ID).
- Additional Fields (category-specific fields like Eyewear dimensions or Jewellery carat value).
- AR Settings (e.g., uploading new 3D models, adjusting transforms).
- After saving, the Last Updated field in the inventory table is automatically refreshed.
- Allows you to refine details without having to delete and re-add the product.
-
Delete:
- Permanently removes the product from the inventory.
- A confirmation dialog is shown to avoid accidental deletions.
- Once deleted, the product cannot be recovered.
Use Delete only when a product is obsolete. If the product may return, prefer using Disable instead.
Best practices:
- Use the Edit option for minor corrections (e.g., typo in Product Name, updated Product Image).
- Use Disable instead of Delete if the product may become active again later.
- Always double-check SKU IDs when editing to avoid inconsistencies in product mapping.
- For bulk updates across multiple products, consider using the bulk upload feature instead of editing one by one.
See It in Action
Watch a step-by-step walkthrough showing how to manage product inventory. This demo covers the full flow discussed above and helps you visualize each step before going live.