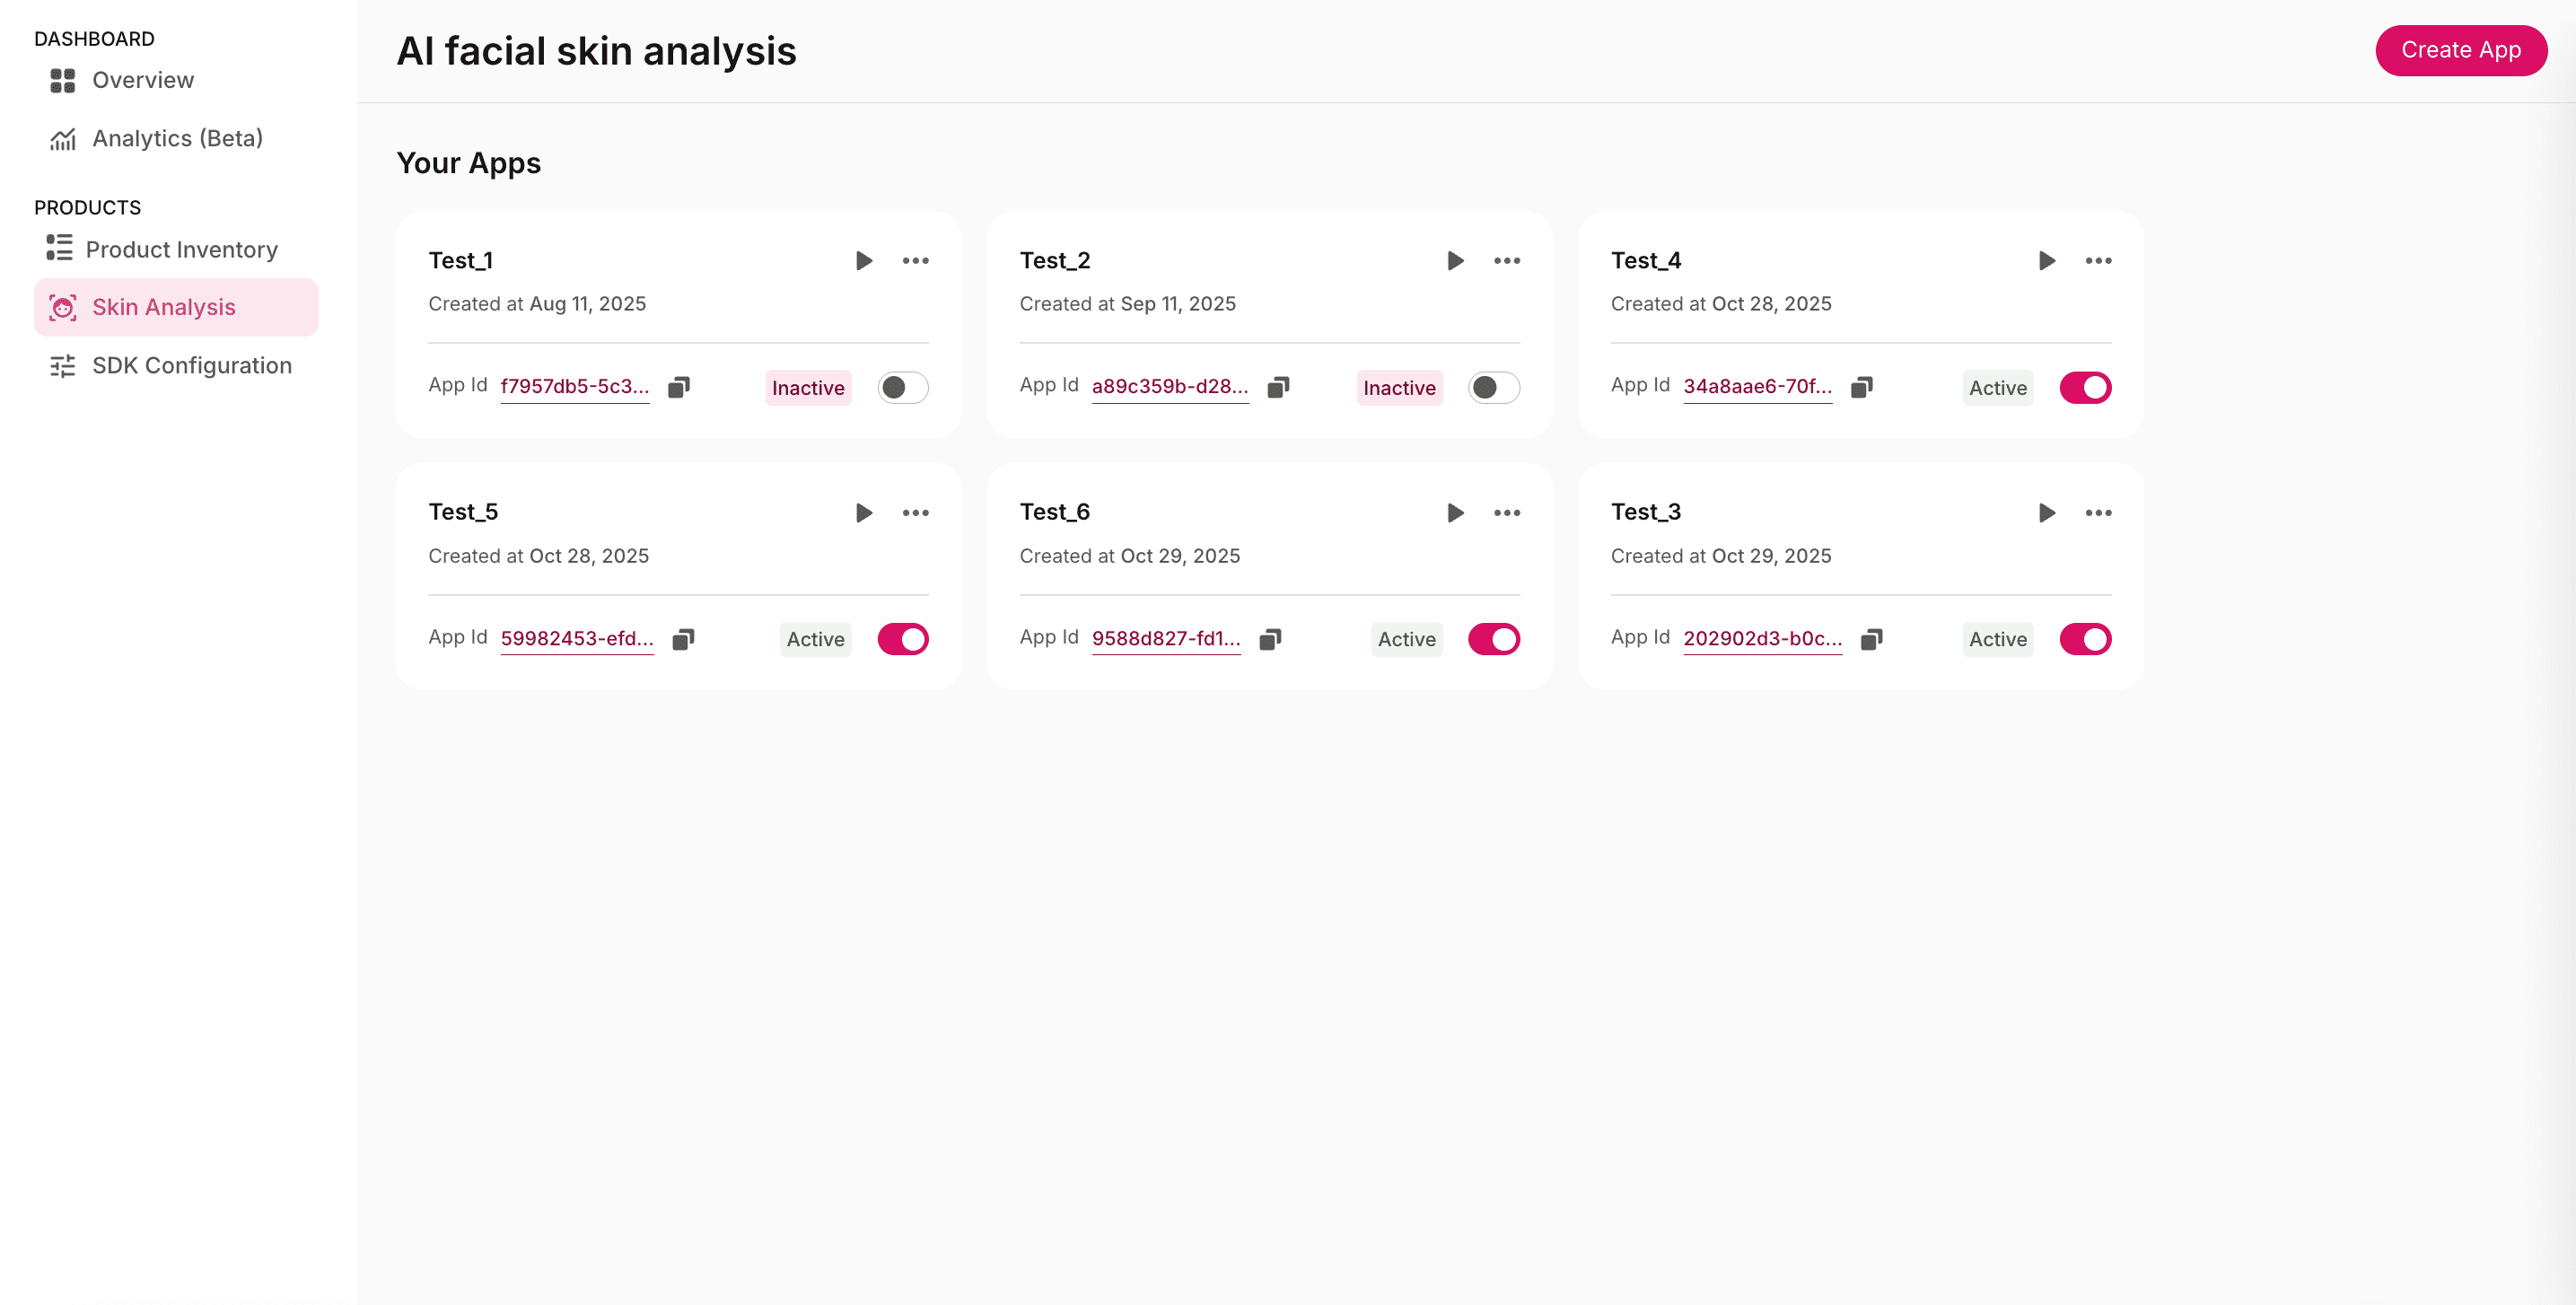
Creating an App
To create a new app, click the Create App button at the top-right corner and a configuration page opens with several setup options. These settings define how your Skin Analysis app behaves, stores data, and interacts with other environments.
Key Configuration Options
This section defines the foundational setup of your GlamAR Skin Analysis SDK. It determines how your application handles user data, identifies environments, and connects to GlamAR’s backend services. Configuring this section properly ensures that the SDK operates smoothly, adheres to compliance standards, and aligns with your deployment strategy.
The App Details section contains the following configuration options:
App Name
Assign a clear and recognizable name to your application. The name appears in your GlamAR Console and helps differentiate between multiple apps or environments (e.g., Staging vs. Production).
- Use descriptive labels such as
SkinScan_ProdorRetail_Demo. - Avoid special characters or spaces to maintain consistency with API references.
Data Storage
Define how long user data (such as scan images and reports) should be retained.
Options:
| Duration | Description |
|---|---|
| None | No data is stored. Ideal for testing or non-persistent demos. |
| 1 Year | Data retained for one year for analysis continuity. |
| 3 Years | Extended storage period for historical tracking and reporting. |
Compliance: All storage durations are GDPR- and HIPAA-compliant. GlamAR encrypts all stored data and provides secure deletion upon request.
Best practices:
- Use None for internal QA or demo environments.
- Use 1 Year or 3 Years for production environments with active users.
Ensure data retention aligns with your organization’s privacy policy and regulatory obligations.
Allowed Domains
Whitelist the origins where your GlamAR SDK can be used. This feature prevents unauthorized use of your SDK on unverified platforms.
For Web Platforms
Format: Enter full URLs separated by commas.
Example:
https://myshop.com, https://myshop.com
Best practices:
- Always include both staging and production URLs.
- Use HTTPS domains for better security.
- Don't forget to add
localhostif you're testing in a local development environment. - If you encounter a domain access error, verify this list first.
For Native Platforms (Android & iOS)
For native mobile applications, enter the app bundle identifier instead of a domain name.
- Android: Enter the application ID (for example,
com.yourcompany.yourapp). - iOS: Enter the bundle identifier (for example,
com.yourcompany.yourapp). - Separate multiple bundle identifiers using commas (
,).
You can find your bundle identifier in
build.gradle(Android) orInfo.plist/ Xcode project settings (iOS).
Common Issue:
"SDK fails to load or skin analysis doesn't start" \-- Confirm that your active domain or bundle identifier is whitelisted here.
SDK Version
Select the SDK version to determine which build of GlamAR’s SDK your app will run.
Recommendations:
- Always use the latest version (e.g.,
2.0.0) for optimal performance. - Avoid switching between versions frequently unless testing new releases.
If switching SDK versions, review the release notes and update your integration code accordingly to prevent compatibility issues.
Algorithm Version
Choose the AI algorithm version for your skin analysis.
Purpose: Ensures your app uses GlamAR’s most accurate and up-to-date detection models.
Best practices:
- Always choose the latest algorithm version unless specific A/B testing requires comparison with older models.
- Keep documentation of which algorithm version is active per environment.
Language Support
Set the display language for your app’s UI elements.
Currently available: English (more languages will be added in future updates).
The selected language affects all system-generated UI text such as buttons, labels, and analysis results.
Watermark
Decide whether to display or hide the Powered by GlamAR watermark.
Options:
- Enabled (default): Displays watermark for brand transparency.
- Disabled: Requires a Premium Plan upgrade.
Best practices:
- Keep enabled for free and standard plans.
- Disable only if your business requires white-label integration.
Interface Customization
This section defines how users interact with your GlamAR Skin Analysis SDK before, during, and immediately after their facial scan. It combines two major configuration areas: Face Scan Instructions and App Appearance.
Face Scan Instructions
The Face Scan Instructions section helps you configure the guidance, visuals, and on-screen text that prepare users for their scan. A clear and friendly onboarding experience ensures accurate results and builds confidence in your AI analysis.
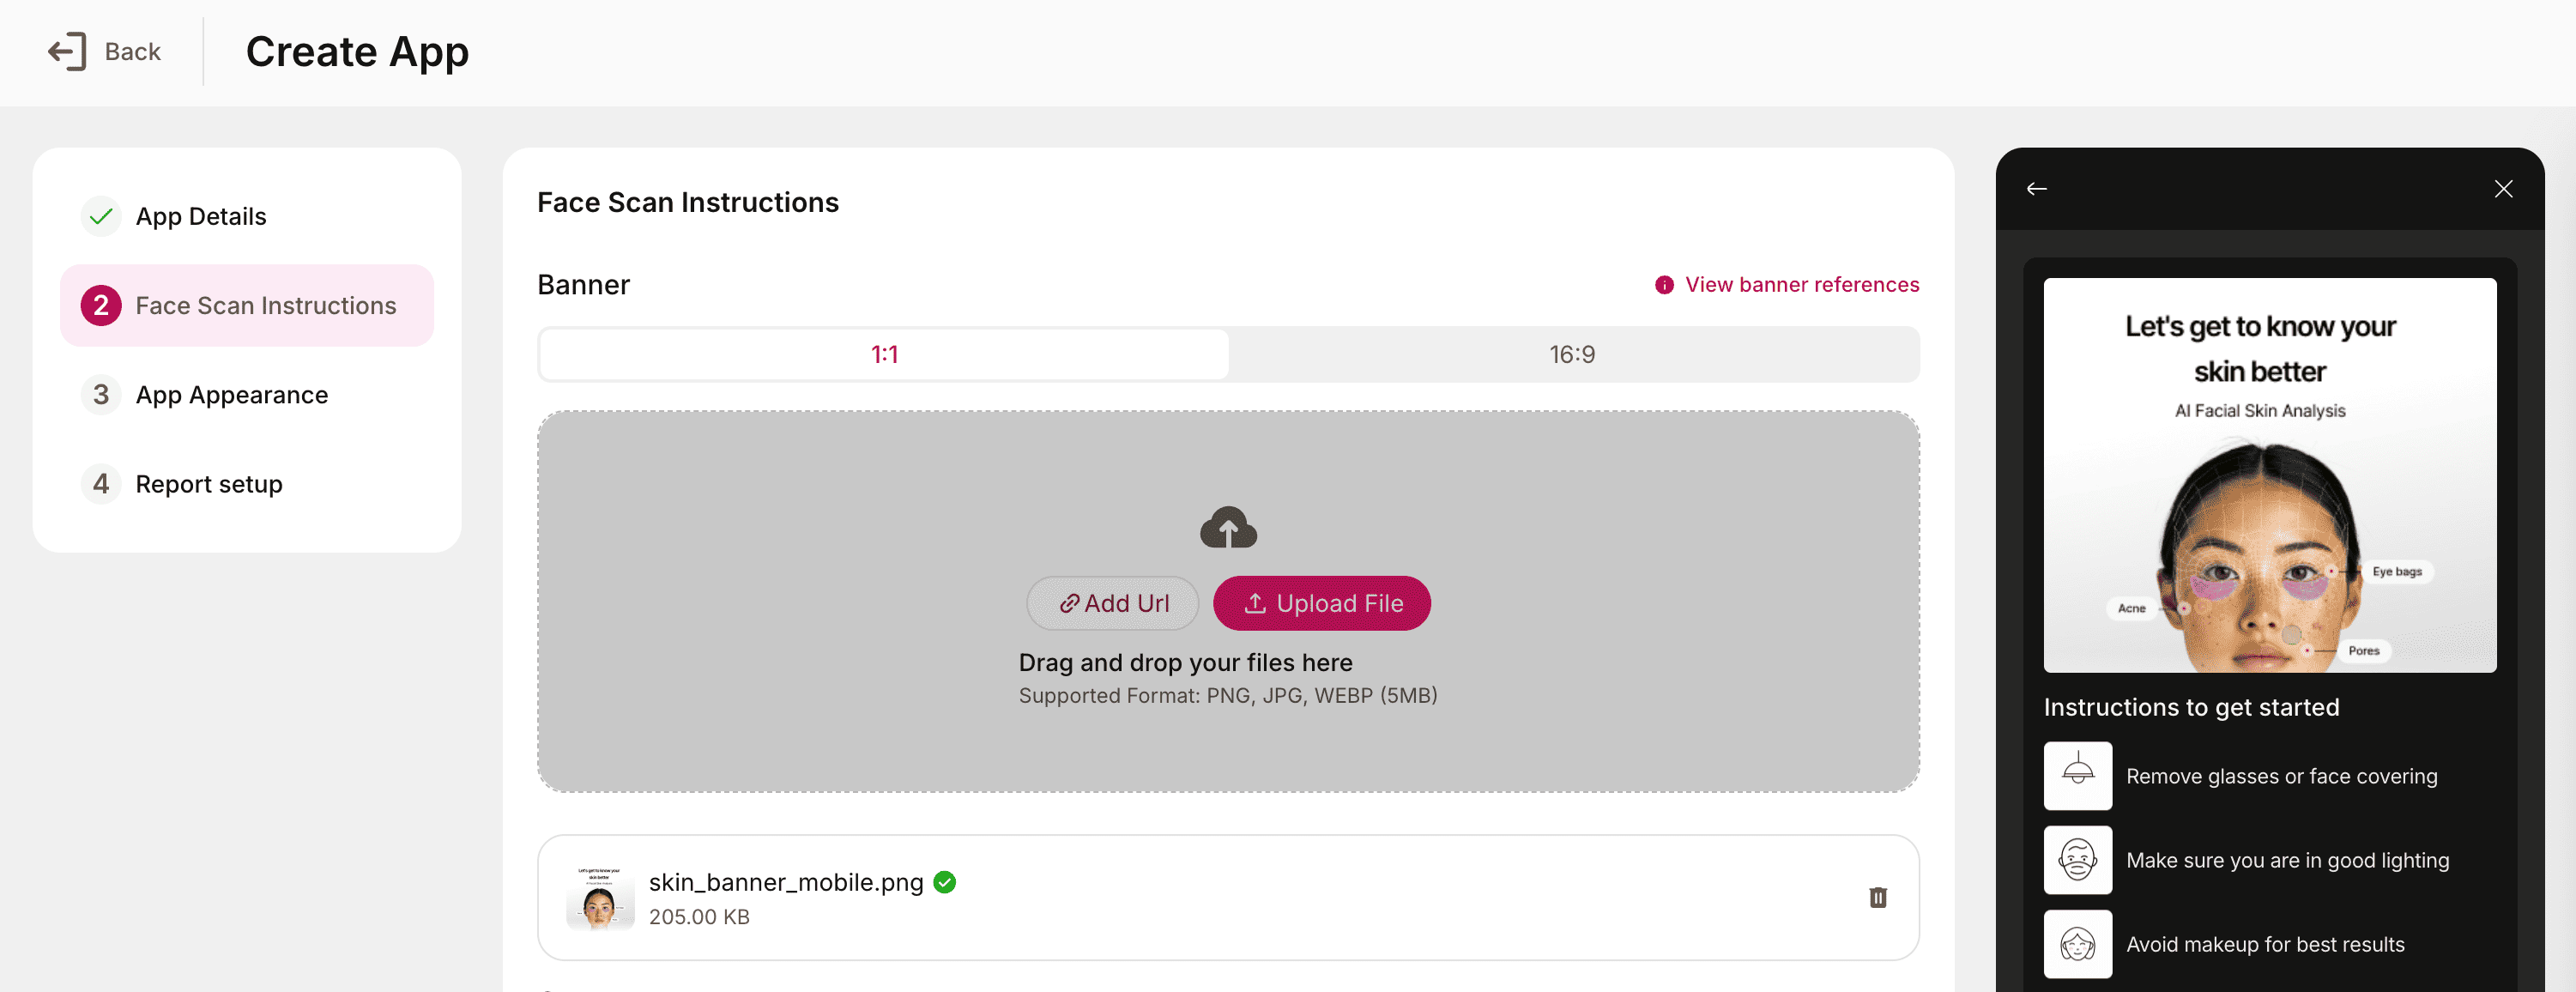
Once the settings under App Details are confirmed, click Next to proceed to the Face Scan Instruction section. This section allows you to customize the instructions and visuals displayed to users before they begin the face scanning process.
Face Scan Instructions set the tone for user engagement. Keep instructions brief, easy to understand, and visually aligned with your brand.
Banner
Upload a custom banner image that appears at the top of the instruction screen. It can feature your brand, app name, or welcoming graphic.
Usage:
- Upload a new image file from one of the following methods:
- Add URL: Paste the direct link to the image.
- Upload File: Select an image from your device.
- Supported aspect ratios: 1:1 and 16:9.
- Supported formats: PNG, JPG, WEBM.
- Maximum file size: 5 MB.
Best practices:
- Use your brand's colors and imagery for a consistent feel.
- Ensure readability if you overlay text on the image.
- Keep it simple and avoid excessive design clutter.
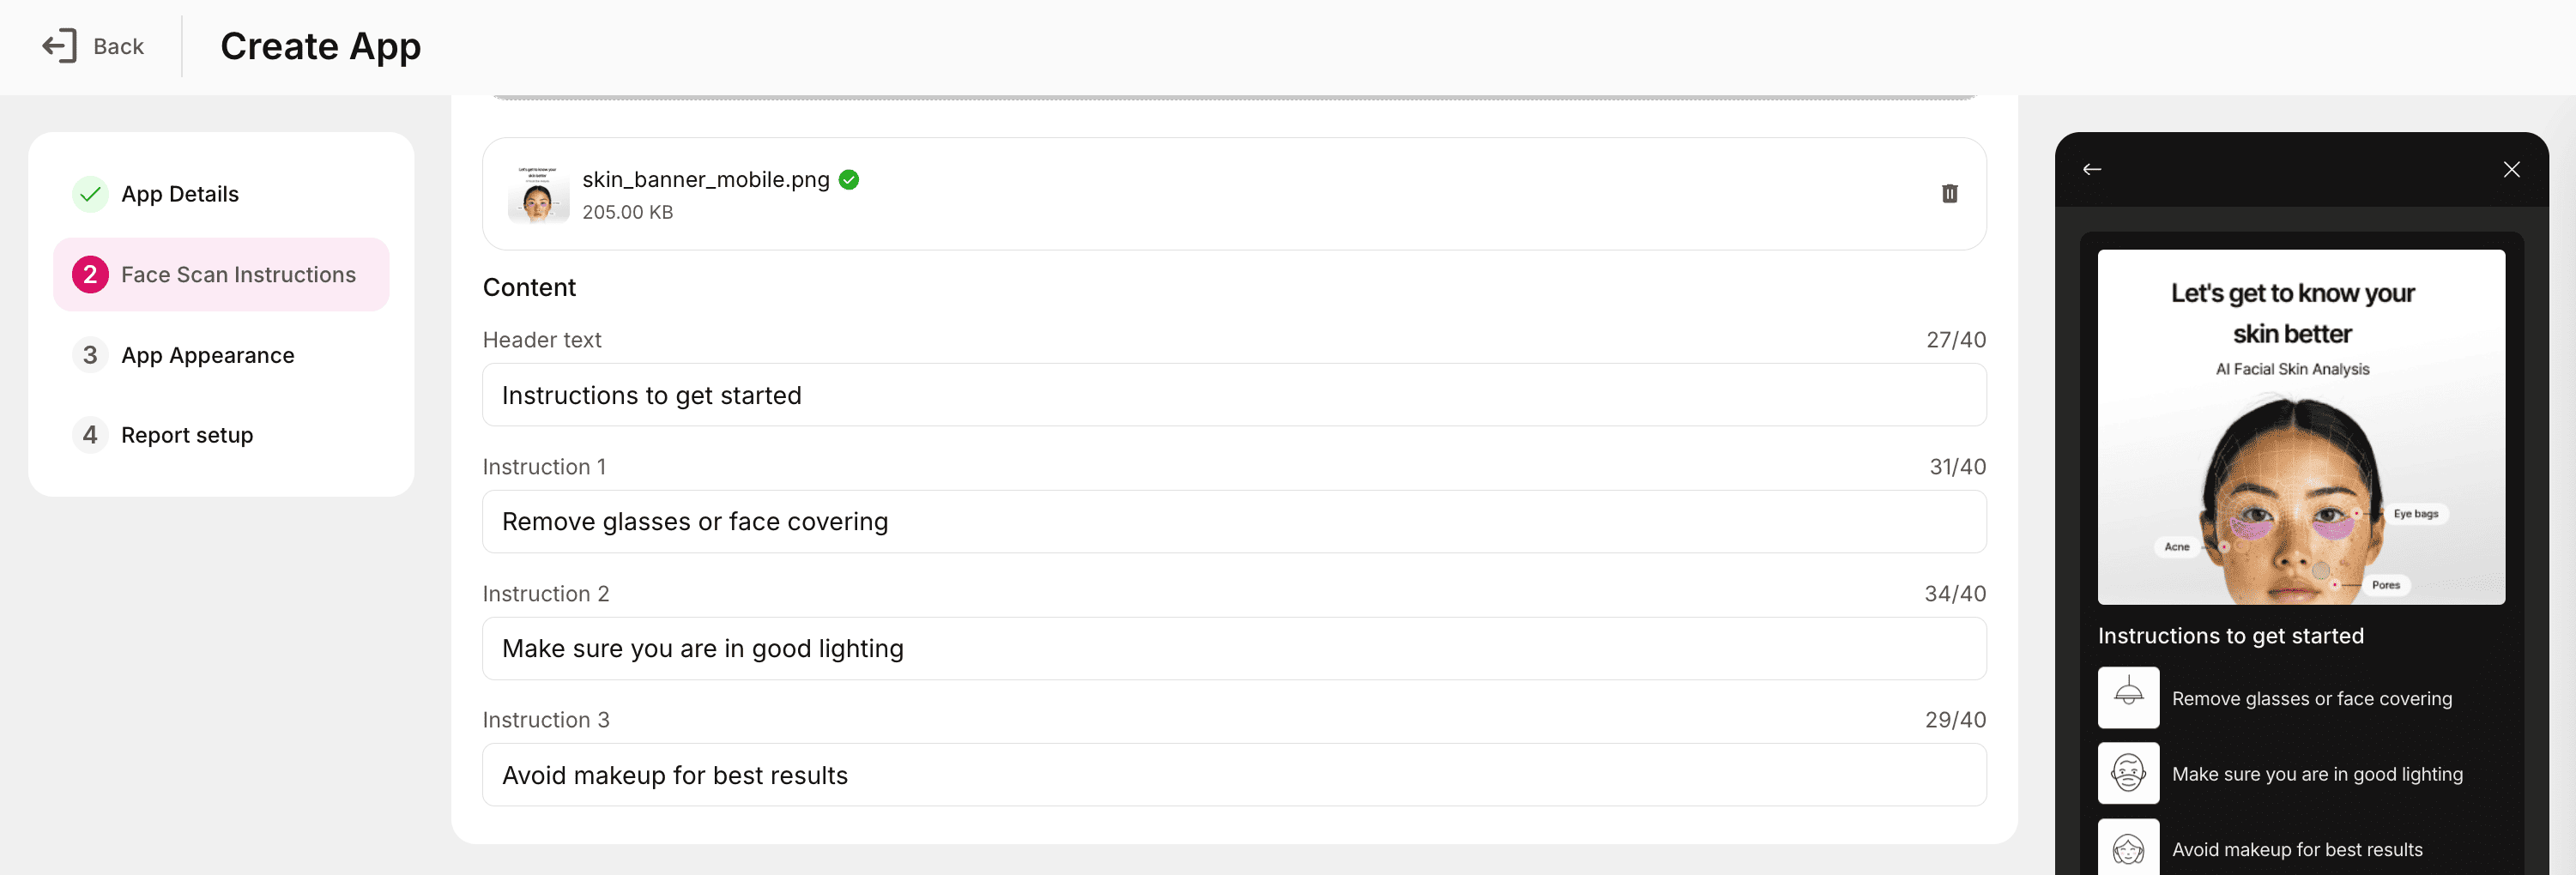
Content
The Content section defines the instructional text displayed to users before they begin the facial scan. This ensures that users understand how to position themselves and prepare for accurate skin analysis results.
Header Text
- The main heading displayed at the top of the instruction screen.
- Typically used to introduce the scanning process (e.g., “Prepare for Your Skin Scan”).
Instruction 1
- The first line of guidance or preparation instruction.
- Example: “Remove glasses or accessories that cover your face.”
Instruction 2
- Provides an additional guideline to improve scan accuracy.
- Example: “Ensure your face is well-lit and free from shadows.”
Instruction 3
- Offers further steps or tips.
- Example: “Avoid makeup for best results.”
Best practices:
- Keep instructions short, clear, and user-friendly.
- Use a consistent tone across all instruction lines.
- Prioritize lighting and positioning guidance, as these directly affect scan accuracy.
- Ensure the header text complements your app branding and aligns with the banner image selected earlier.
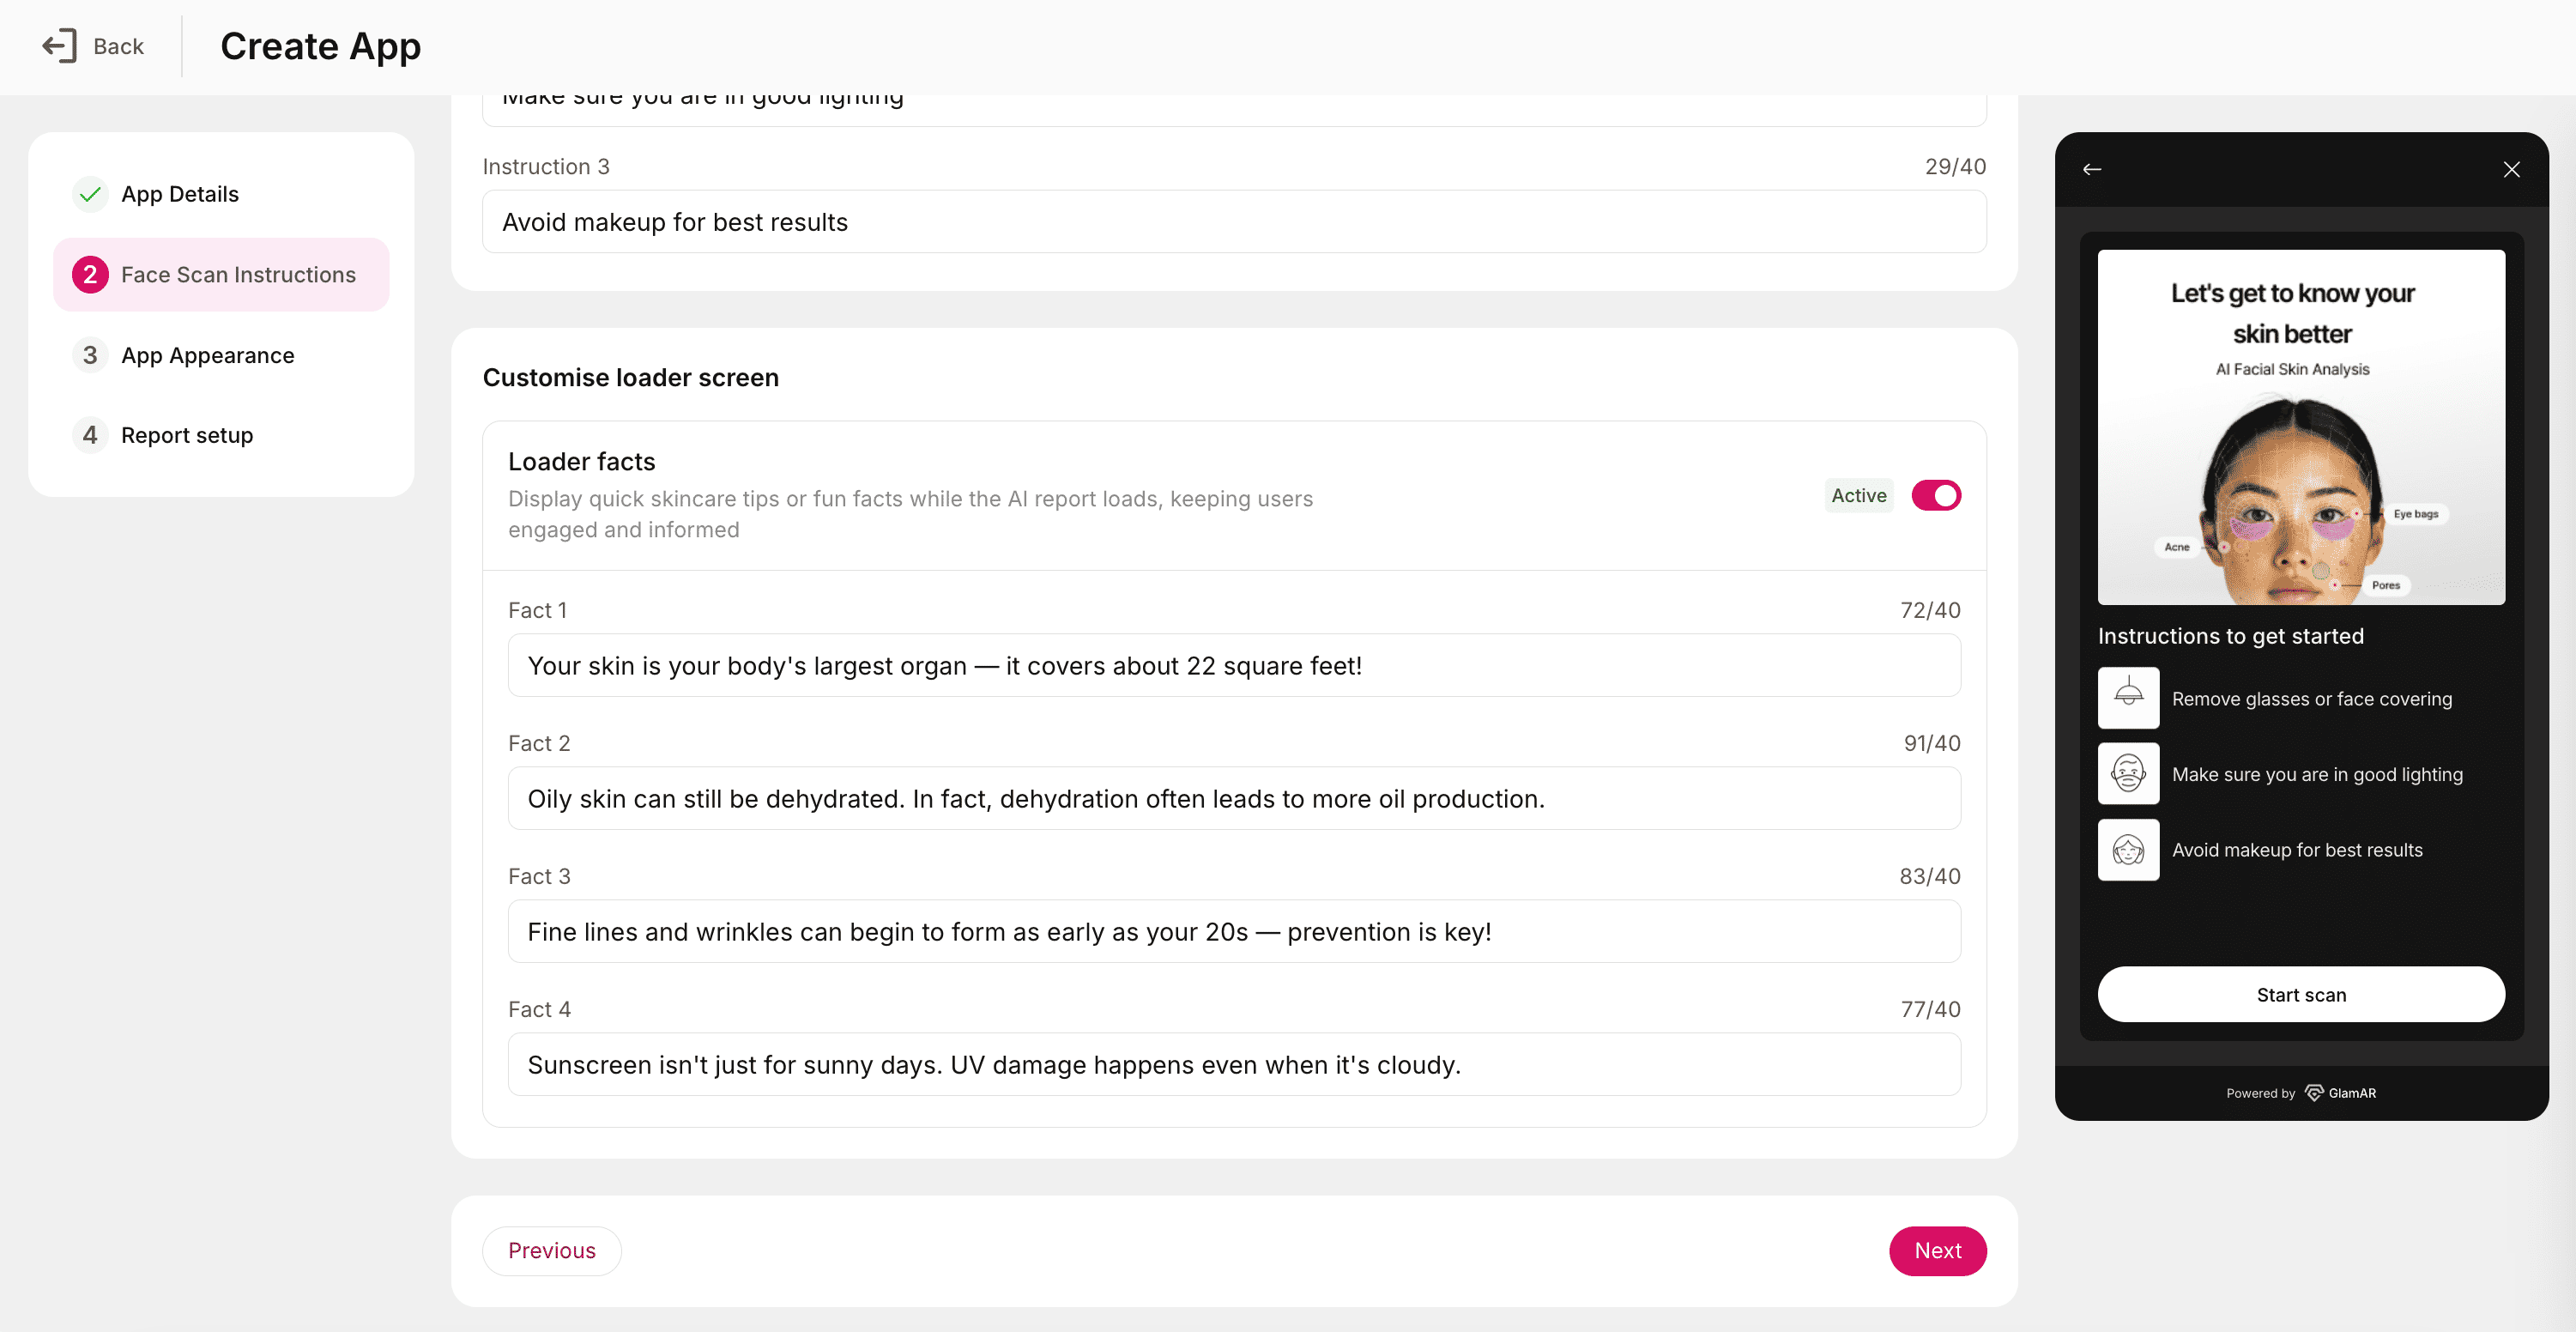
Customise loader screen
The Customise loader screen allows you to keep users engaged while the AI generates the skin analysis report. You can personalize this screen with quick tips or skincare facts that appear during the loading process.
Loader facts
The Loader facts feature displays short skincare tips or fun facts while the analysis report is being processed. These facts help maintain user engagement and deliver educational or brand-related insights during the loading phase. You can choose to enable or disable this feature based on your app’s design preferences.
You can define up to four custom facts to be shown randomly or sequentially while the analysis loads:
- Fact 1: The first tip or skincare fact displayed.
- Example: “Hydrate regularly—water is your skin’s best friend!”
- Fact 2: A second fun fact or insight.
- Example: “Sunscreen is essential even on cloudy days.”
- Fact 3: Add another helpful skincare tip.
- Example: “Regular exfoliation can improve skin texture.”
- Fact 4: Final fact or motivational line for users.
- Example: “A good night’s sleep keeps your skin glowing naturally.”
Best practices:
- Keep facts short, positive, and easy to read.
- Use this space to share brand tips, skincare facts, or promotional messages.
- Avoid overly technical content, this screen is meant to be light and engaging.
- Rotate facts occasionally to keep the experience fresh for returning users.
App Appearance
The App Appearance section controls the visual styling and user interface (UI) of your Skin Analysis app. These settings allow you to align the look and feel of the app with your brand guidelines or preferred design theme.
Typography
Available fonts:
- Inter
- Poppins
- Roboto
- Open Sans
- Lato
- Montserrat
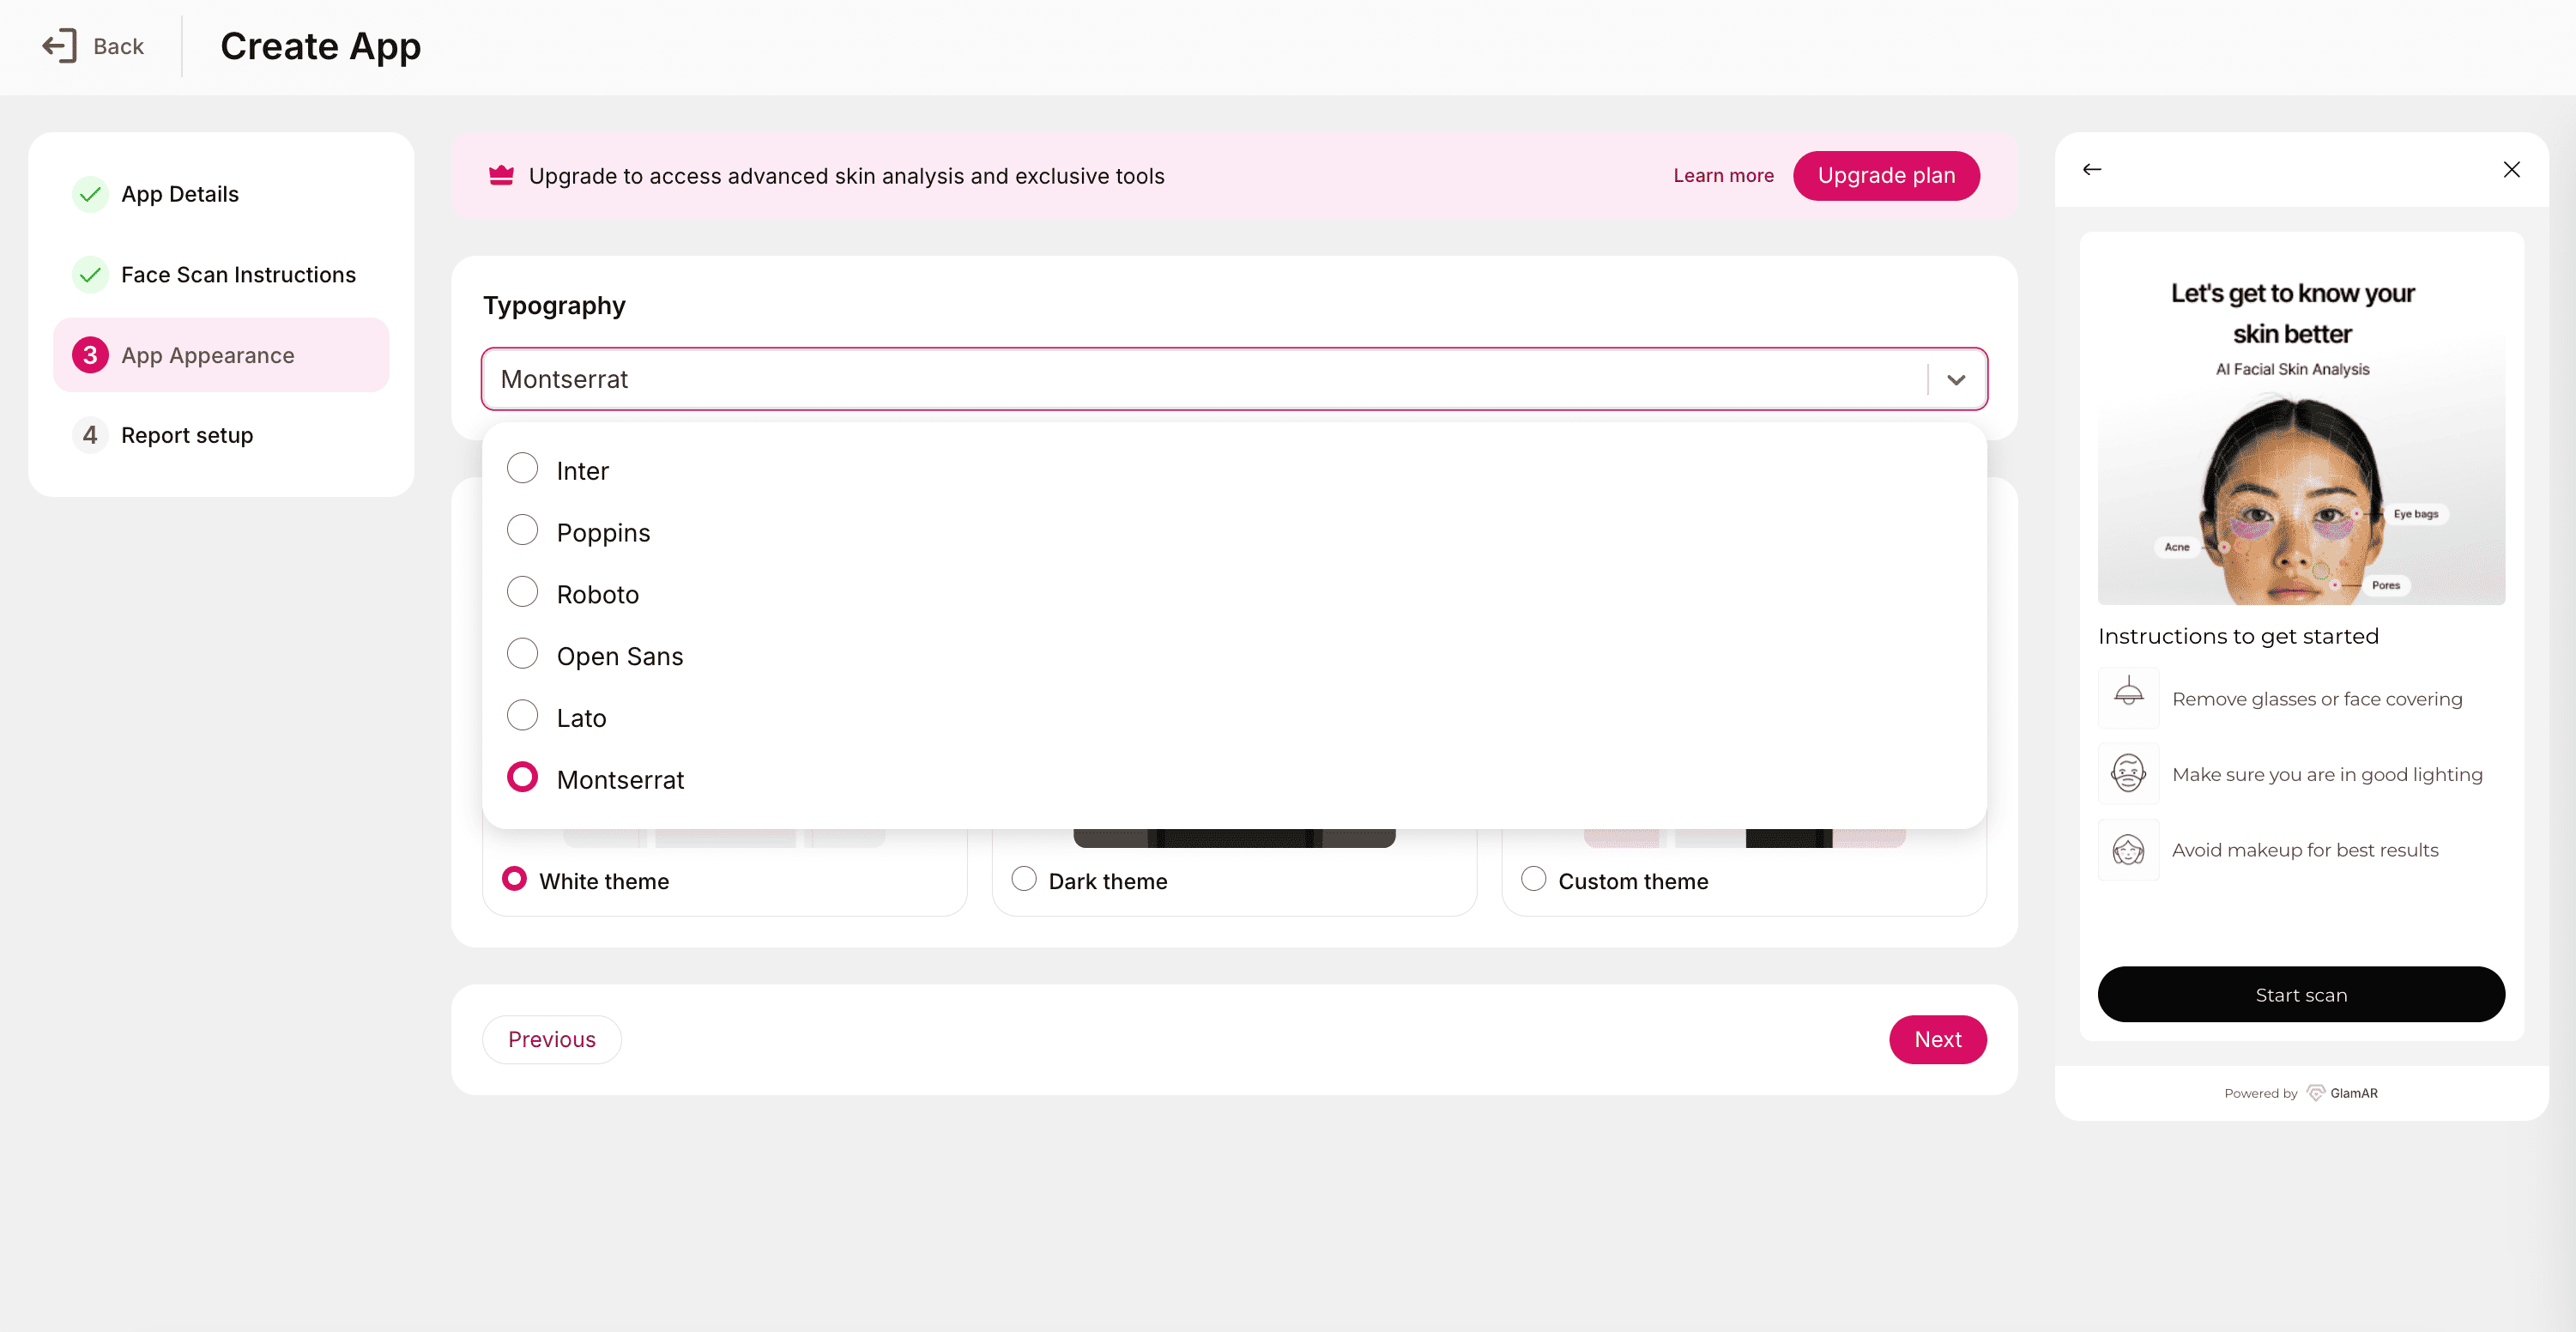
- Select a font that complements your brand identity and ensures readability across devices.
- The chosen font applies globally across the app’s UI, including headers, instructions, and result screens.
Select theme
Customize the app’s color scheme to control the overall visual aesthetic.
Available themes:
- White theme: A clean, light interface ideal for bright and neutral branding.
- Dark theme: A sleek, dark interface suitable for high-contrast, modern designs.
- Custom theme: Enables complete color customization for brand consistency.
If Custom theme is selected, you can modify the following:
- Primary Color: The dominant color used for highlights, buttons, and interactive elements.
- Icon Color: Defines the color of UI icons for better visibility and design harmony.
- Selection Color: Controls the color of selected elements, such as active buttons or toggles.
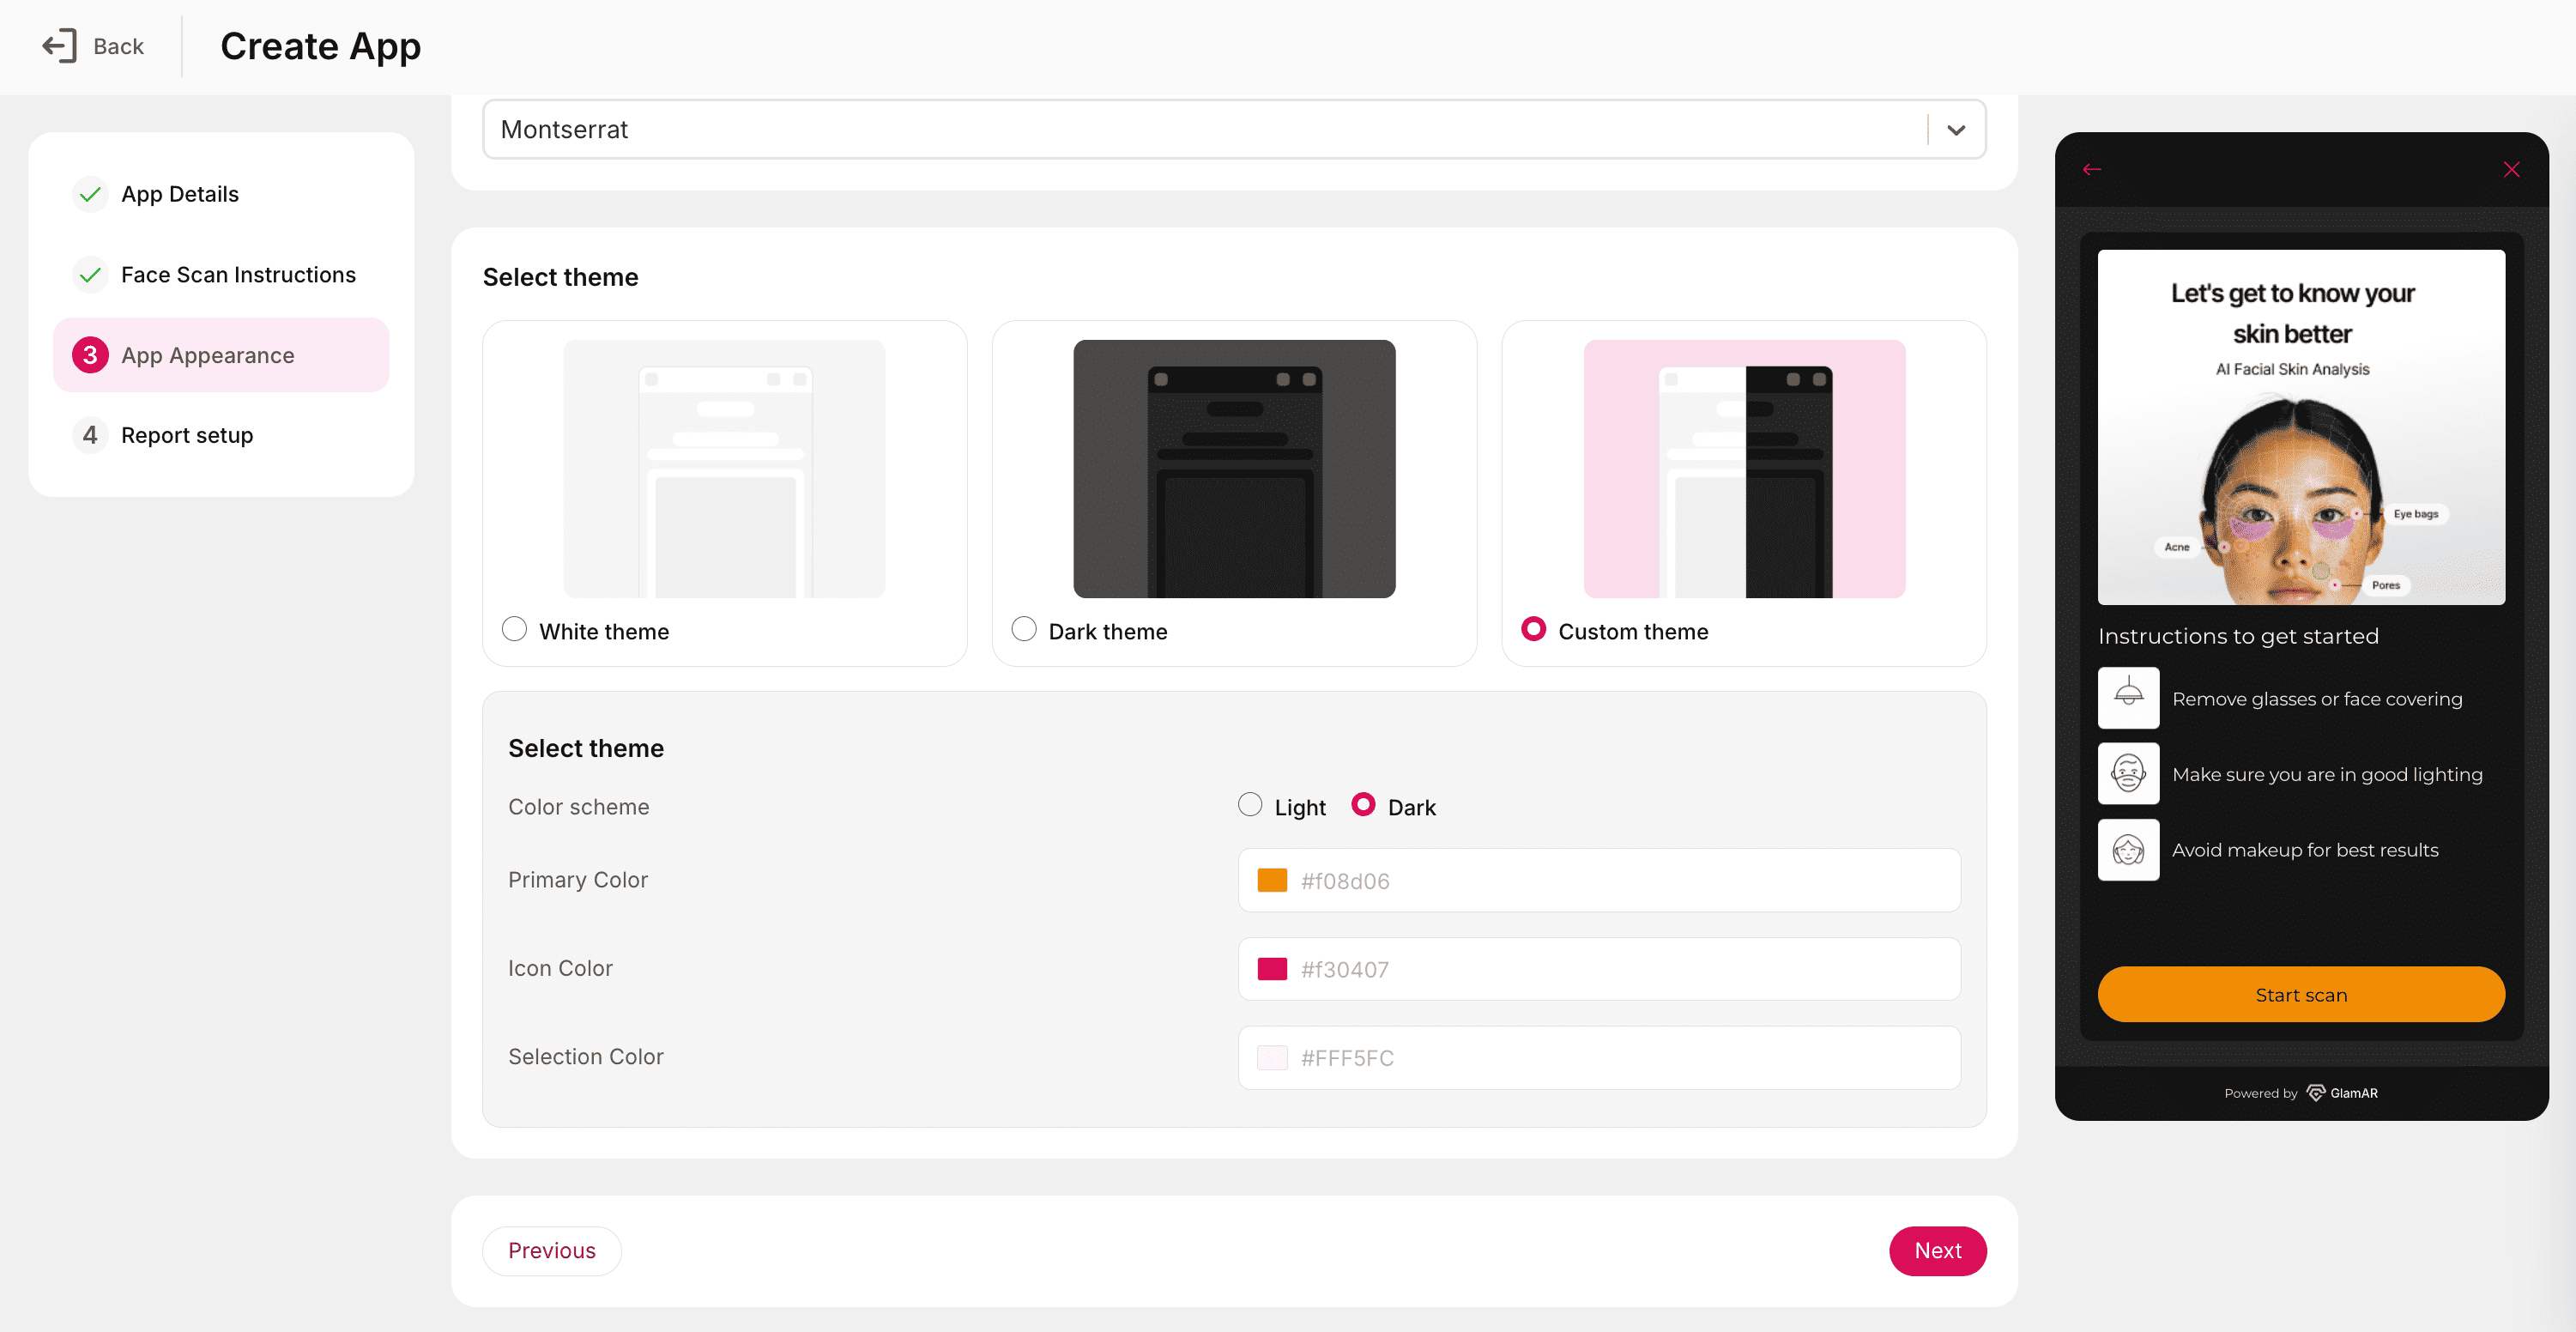
Best practices:
- Use your brand’s primary and accent colors to maintain visual consistency.
- Ensure sufficient contrast between text and background for accessibility.
- Preview changes across both light and dark modes to ensure readability in various environments.
Report and AI Setup
This section determines how GlamAR generates, displays, and enhances user skin analysis reports. It combines the configuration options of the Report Setup and Smart AI Features tabs, allowing you to fully customize the analytical insights and user-facing outputs your SDK delivers.
Report setup
The Report setup section defines how user skin analysis reports are generated, customized, and presented. These settings let you tailor report visuals, included metrics, and advanced AI features to align with your app’s goals and user experience.
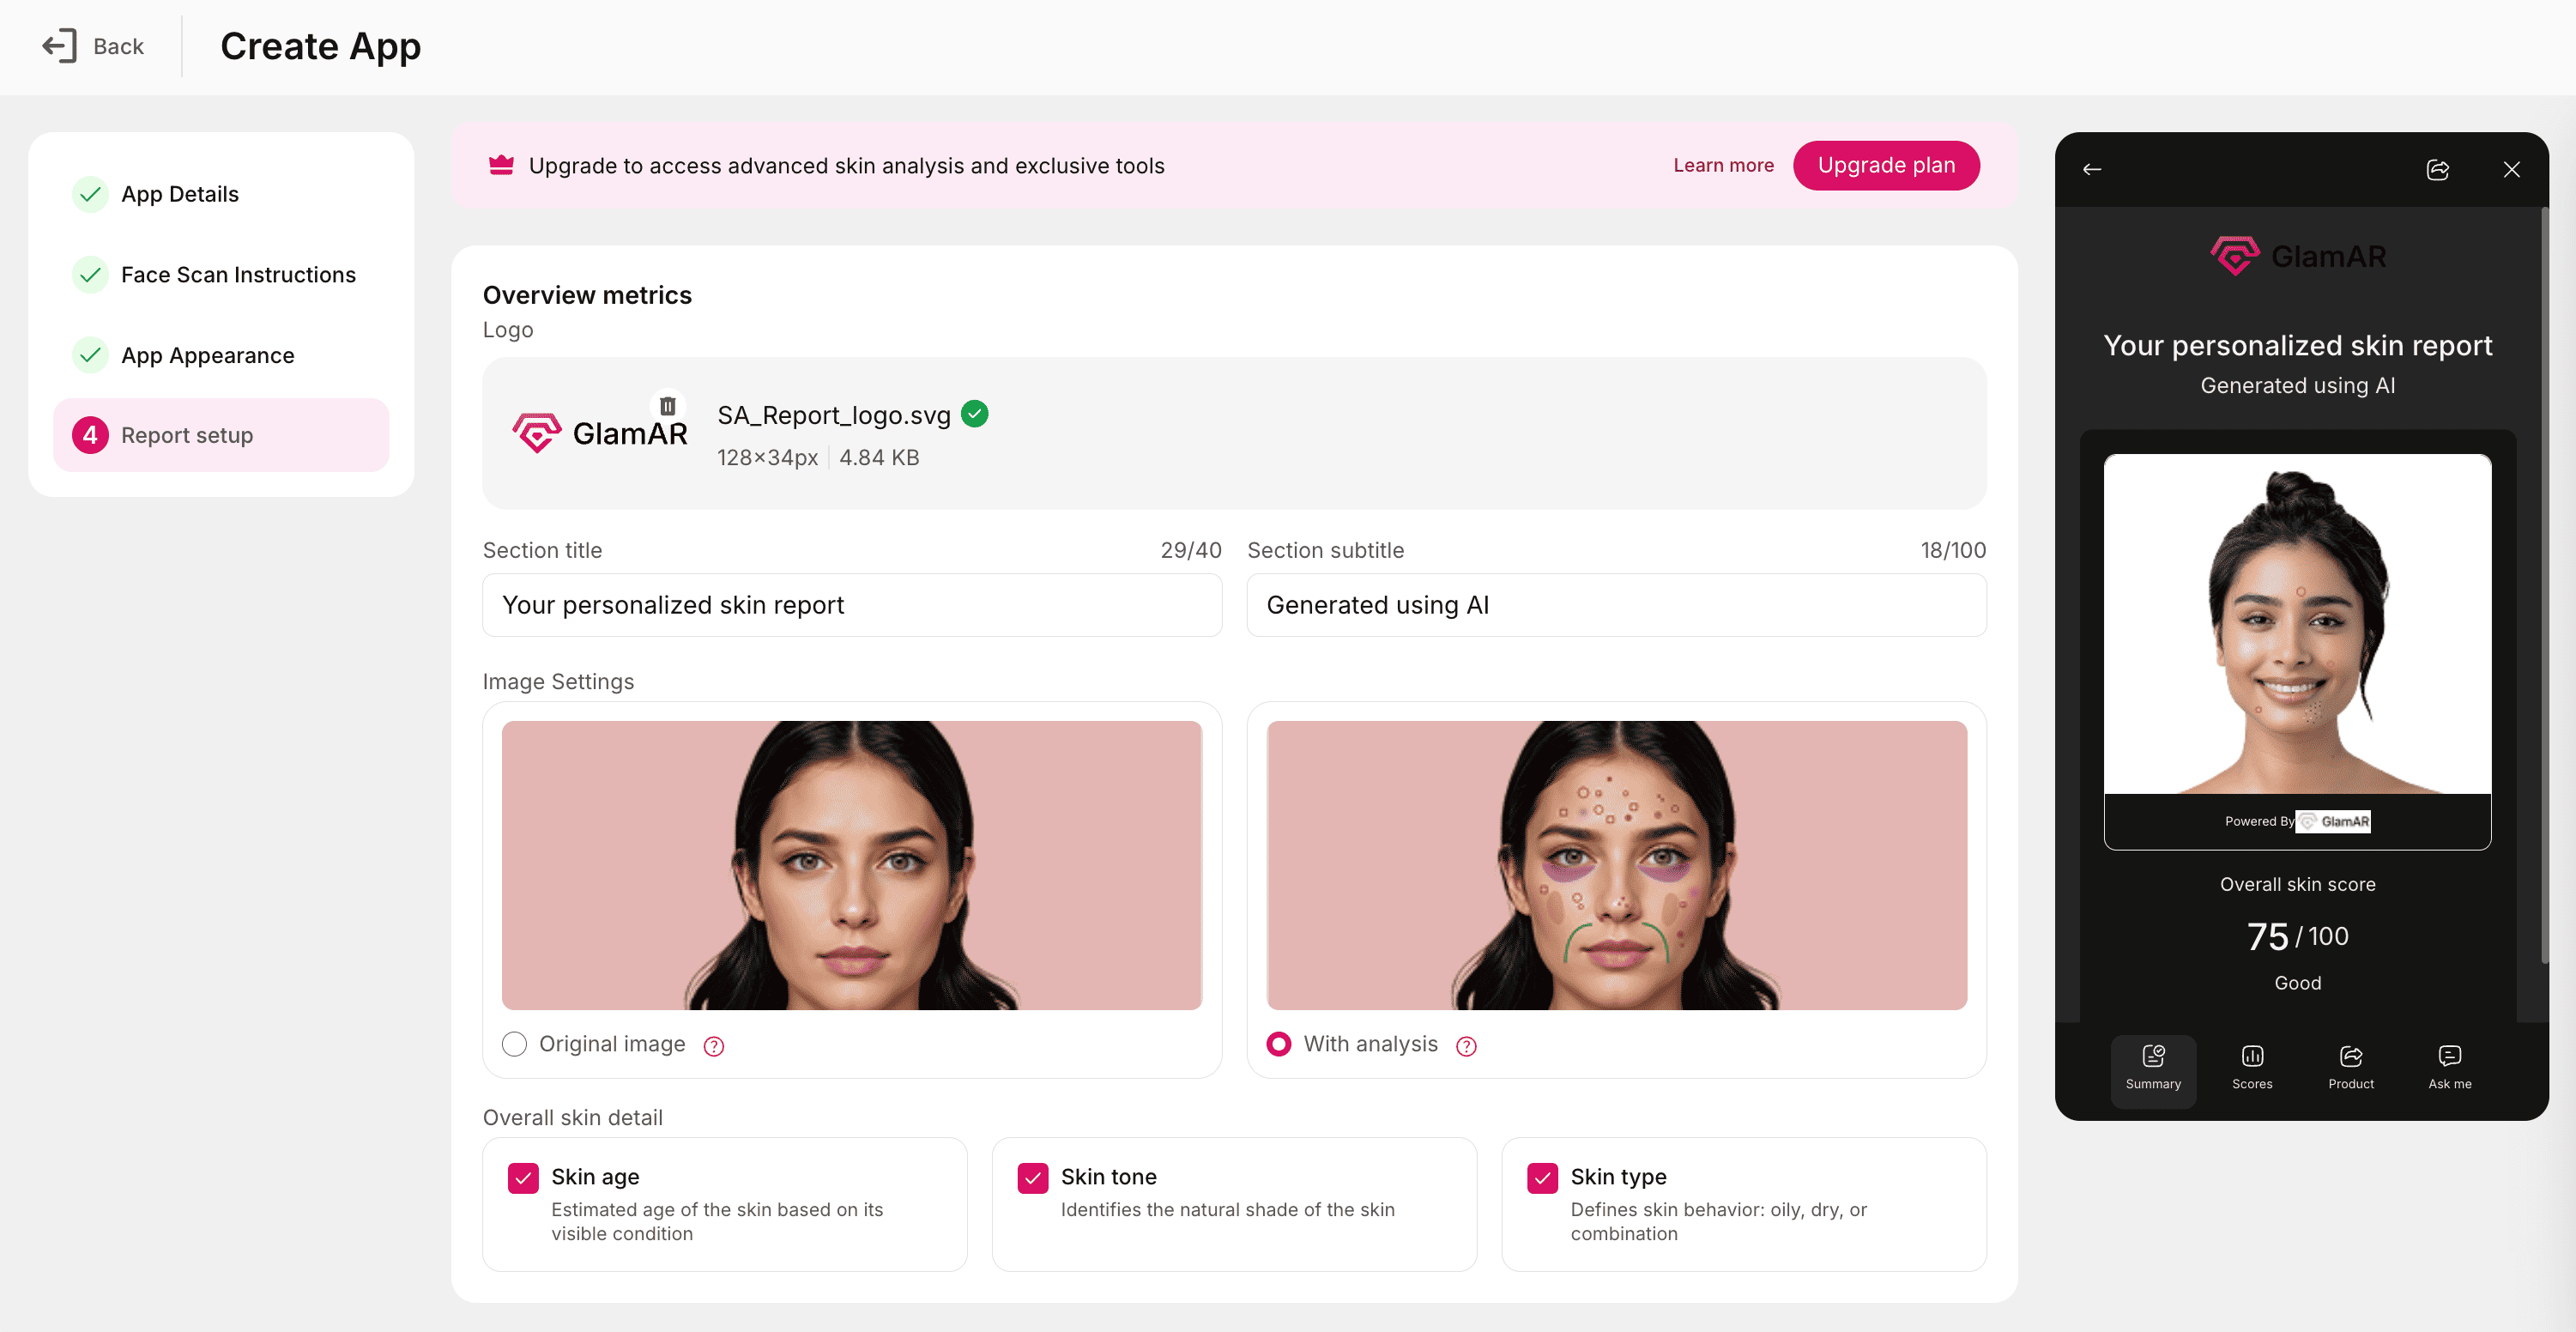
Overview metrics
The Overview Metrics section defines the key elements that appear at the top of the user’s skin analysis report, setting the context for the AI results.
Logo:
- Upload your brand or clinic logo to display it at the top of the report.
- Helps personalize and brand the generated skin report.
- Supported formats: PNG, JPG, WEBP
- Maximum file size: 2 MB
Section title:
- Add a title for the overview section of the report.
- Character limit: 40
Section subtitle:
- Add a subtitle or short tagline that complements the title (e.g., “Your personalized skin health summary”).
- Character limit: 100
Image Settings:
Choose how the user’s captured image appears in the report:
- Original Image: Displays the unedited photo as captured by the user, without annotations.
- With Analysis: Shows the same image annotated with detected skin conditions for quick visualization of problem areas.
Overall skin detail:
You can choose which key metrics appear in the overview section. Select one or more of the following:
- Skin Age: Estimated biological age of the user’s skin based on its condition.
- Skin Tone: Identifies the user’s natural skin shade.
- Skin Type: Categorizes skin behavior as Oily, Dry, or Combination.
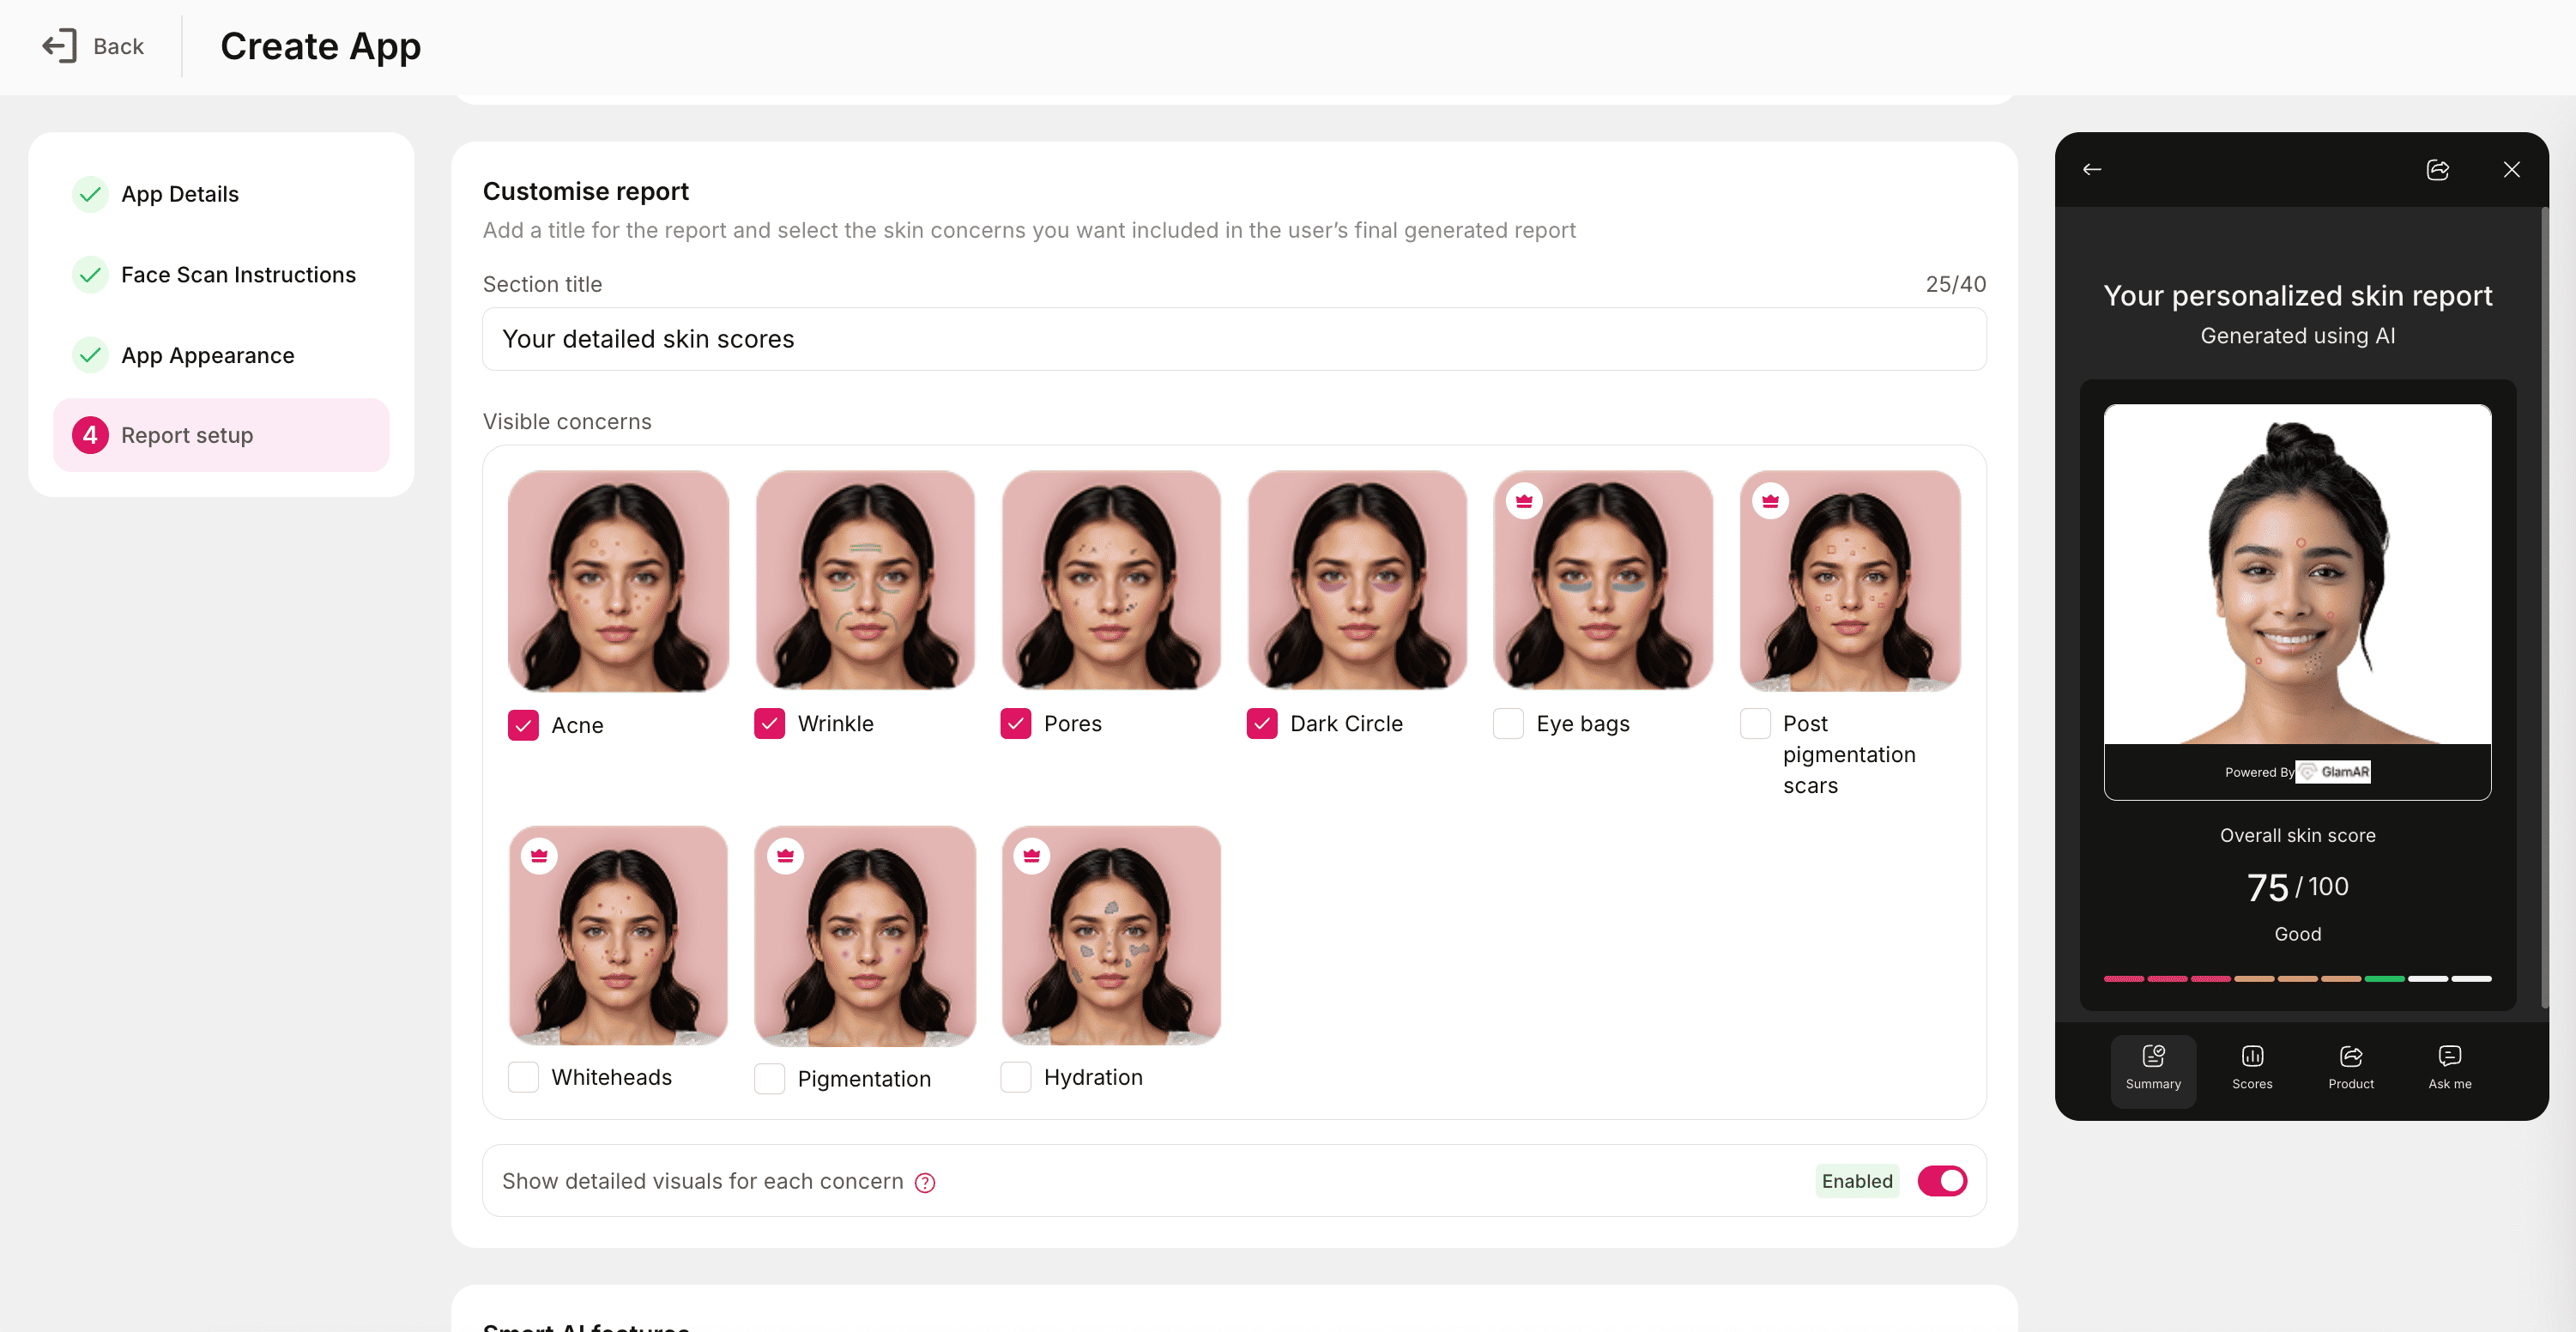
Customize report
This section determines which concerns and parameters are included in the user’s detailed report.
Section Title:
- Enter a title for the report section.
- Character limit: 40
Visible concerns:
Select the specific skin concerns to include in the generated report. Available options for Standard plan are:
- Acne
- Wrinkles
- Pores
- Dark Circles
Available options for Premium plan (for upgraded plan):
- Eye bags
- Post pigmentation scars
- Whiteheads
- Pigmentation
- Hydration
Premium features are unlocked automatically when using an upgraded plan.
Show detailed visuals for each concern
- Enable or disable detailed annotated visuals for each detected skin concern.
- When enabled, the report highlights areas of concern directly on the user’s photo, offering a clear visual context.
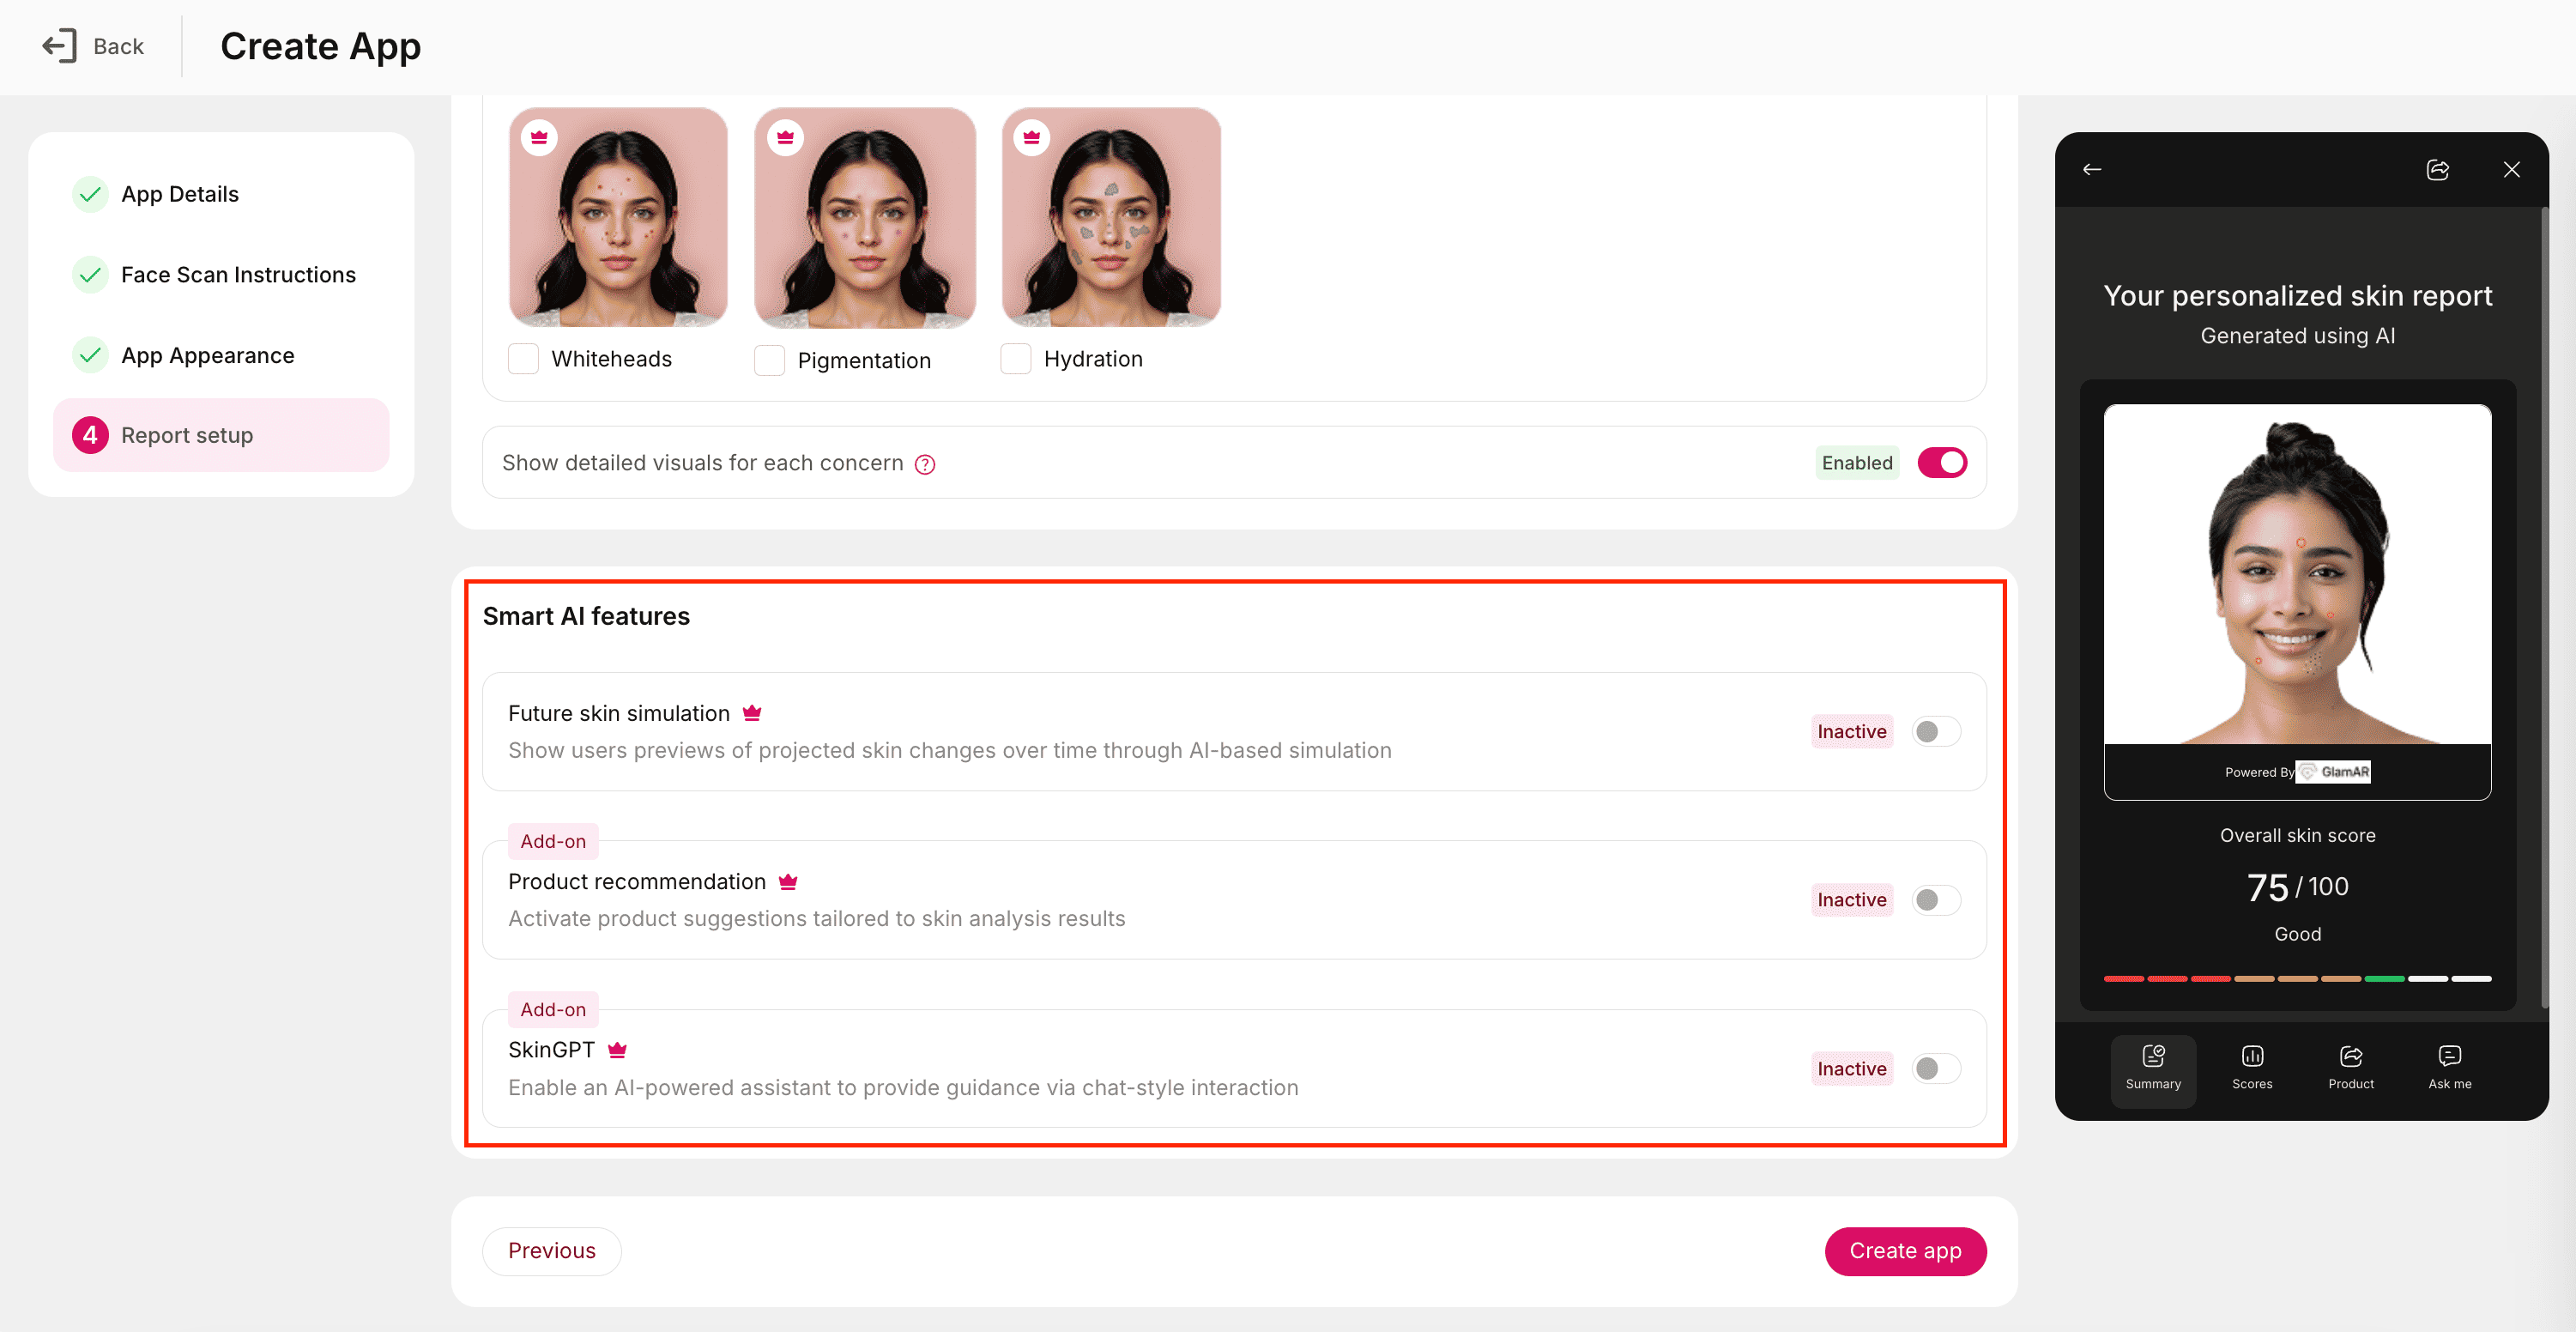
Smart AI Features
The Smart AI Features option unlocks interactive and predictive capabilities that go beyond basic reporting. These tools make the experience more engaging and data-driven.
Future skin simulation
- Provides AI-based projections of how a user’s skin may change over time.
- Visualizes improvement or deterioration trends based on current conditions and lifestyle indicators.
Product recommendation
- Suggests personalized skincare products tailored to the user’s analysis results.
- Product data can be linked to your existing product catalog for seamless recommendations.
SkinGPT
- Enables an AI-powered virtual assistant to guide users through their results.
- Allows chat-style interactions to provide skincare advice, recommendations, and insights.
Best practices:
- Keep titles and subtitles concise to maintain visual clarity in reports.
- Always verify visible concerns and AI features before publishing the report configuration to ensure compatibility with your plan level.
- Regularly review updates to the Algorithm Version to benefit from improvements in detection accuracy and report quality.
See It in Action
Watch a step-by-step walkthrough showing how to create and configure a Skin Analysis app in GlamAR. This demo covers the full flow discussed above and helps you visualize each step before going live.