Managing Apps
This section provides tools to view, edit, and maintain your created AI Facial Skin Analysis apps. From here, you can access app configurations, manage SDK settings, enable advanced features such as recommendations. Each app card under Your Apps offers quick actions which let you preview, edit, or delete apps.
- Preview (▶): The Preview feature allows you to test and experience your Skin Analysis app before deploying or sharing it publicly. It helps verify the app’s functionality, flow, and report generation process in real-time.
When you click the Preview (▶) button on any app card, a popup window appears with two options for accessing the app:- View on Smartphone: A QR code is automatically generated. Scan this QR code using your smartphone’s camera to open and test the app directly on a mobile device. This lets you simulate the end-user experience, perform a live skin analysis, and review how reports are generated on smaller screens.
- Using Share Link: A shareable URL is also displayed in the same window.
You can use this link to preview the app in a web browser or share it with team members, testers, or clients for review.
Clicking the link launches the Skin Analysis app, allows users to start a facial scan, analyze results, and generate a full Skin Analysis report.
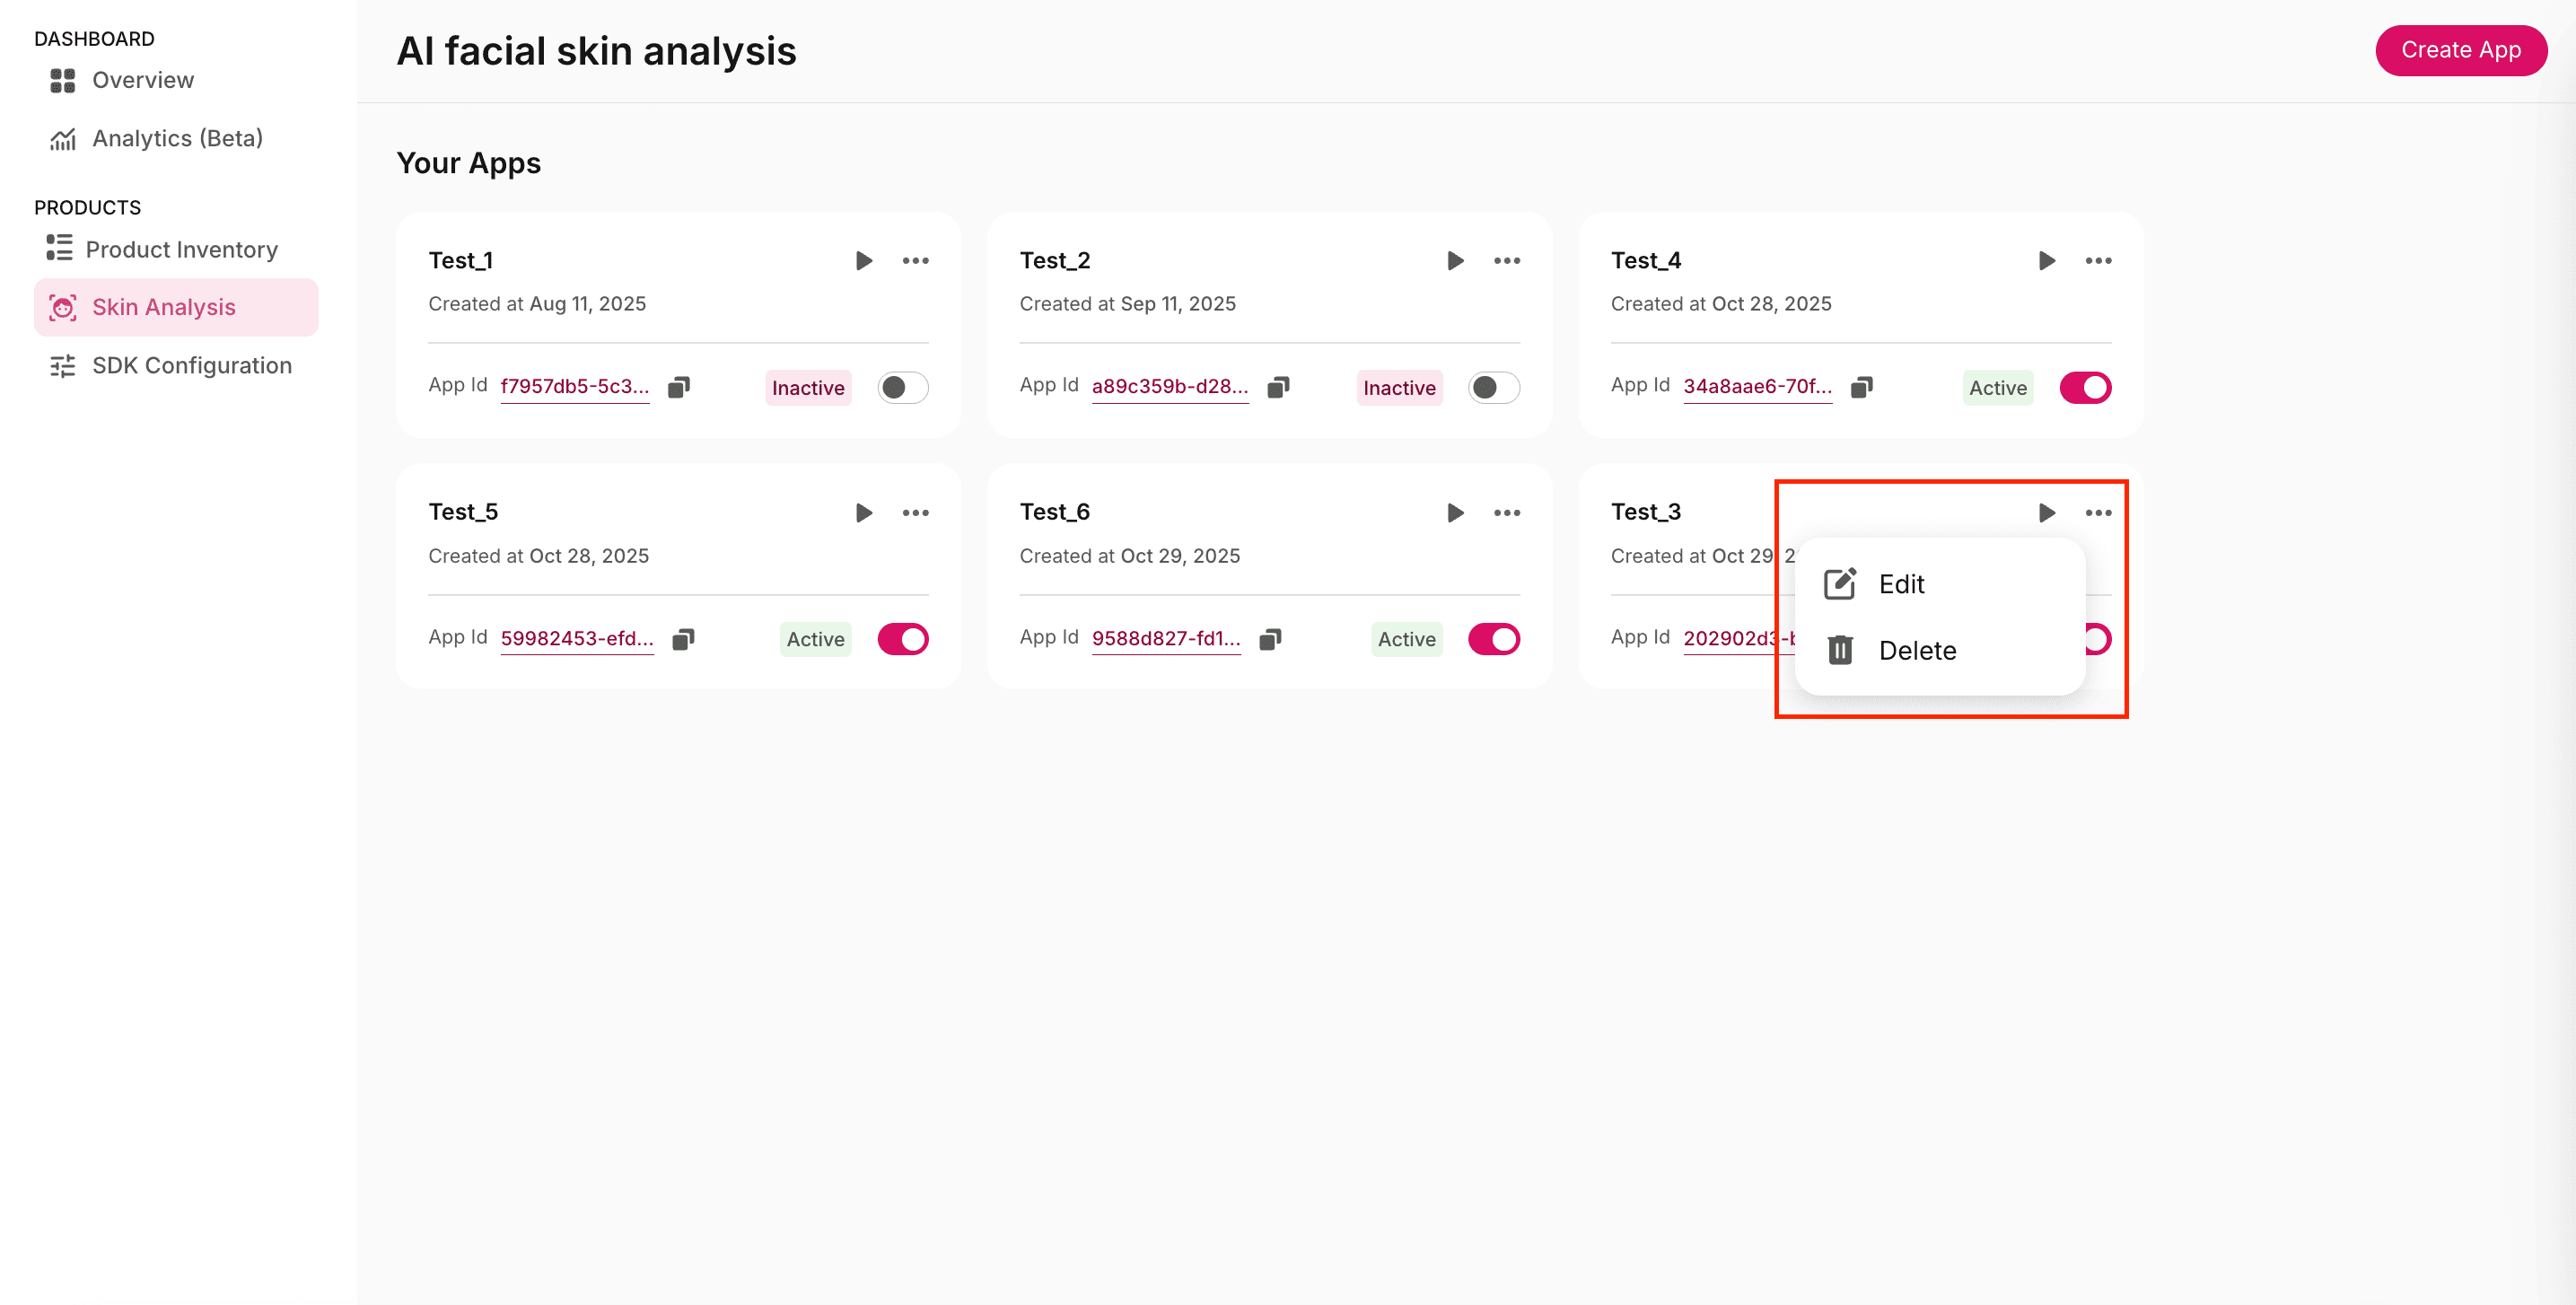
- Options (⋯): Each app card in the Your Apps section includes an ellipsis (⋯) menu in the top-right corner. Clicking this icon opens a list of management actions that let you modify or remove your Skin Analysis apps:
- Edit: Modify app configurations such as data storage, report parameters, or recommendations. We’ll discuss editing apps in detail in the next section.
- Delete: Permanently remove the app from your account. Once deleted, the app and its associated configurations cannot be recovered.
- App activation status: Each app card includes a status toggle to mark the app as Active or Inactive. Active apps display an Active label and are available for preview, testing, and sharing. Inactive apps display an Inactive label and are temporarily disabled.
You can toggle an app’s status anytime to control its availability without deleting it.
Use activation toggles to manage which apps are live for testing or client demos.
Editing the App
This section allows you to view, manage, and modify configurations, reports, and other advanced settings associated with the selected Skin Analysis app.
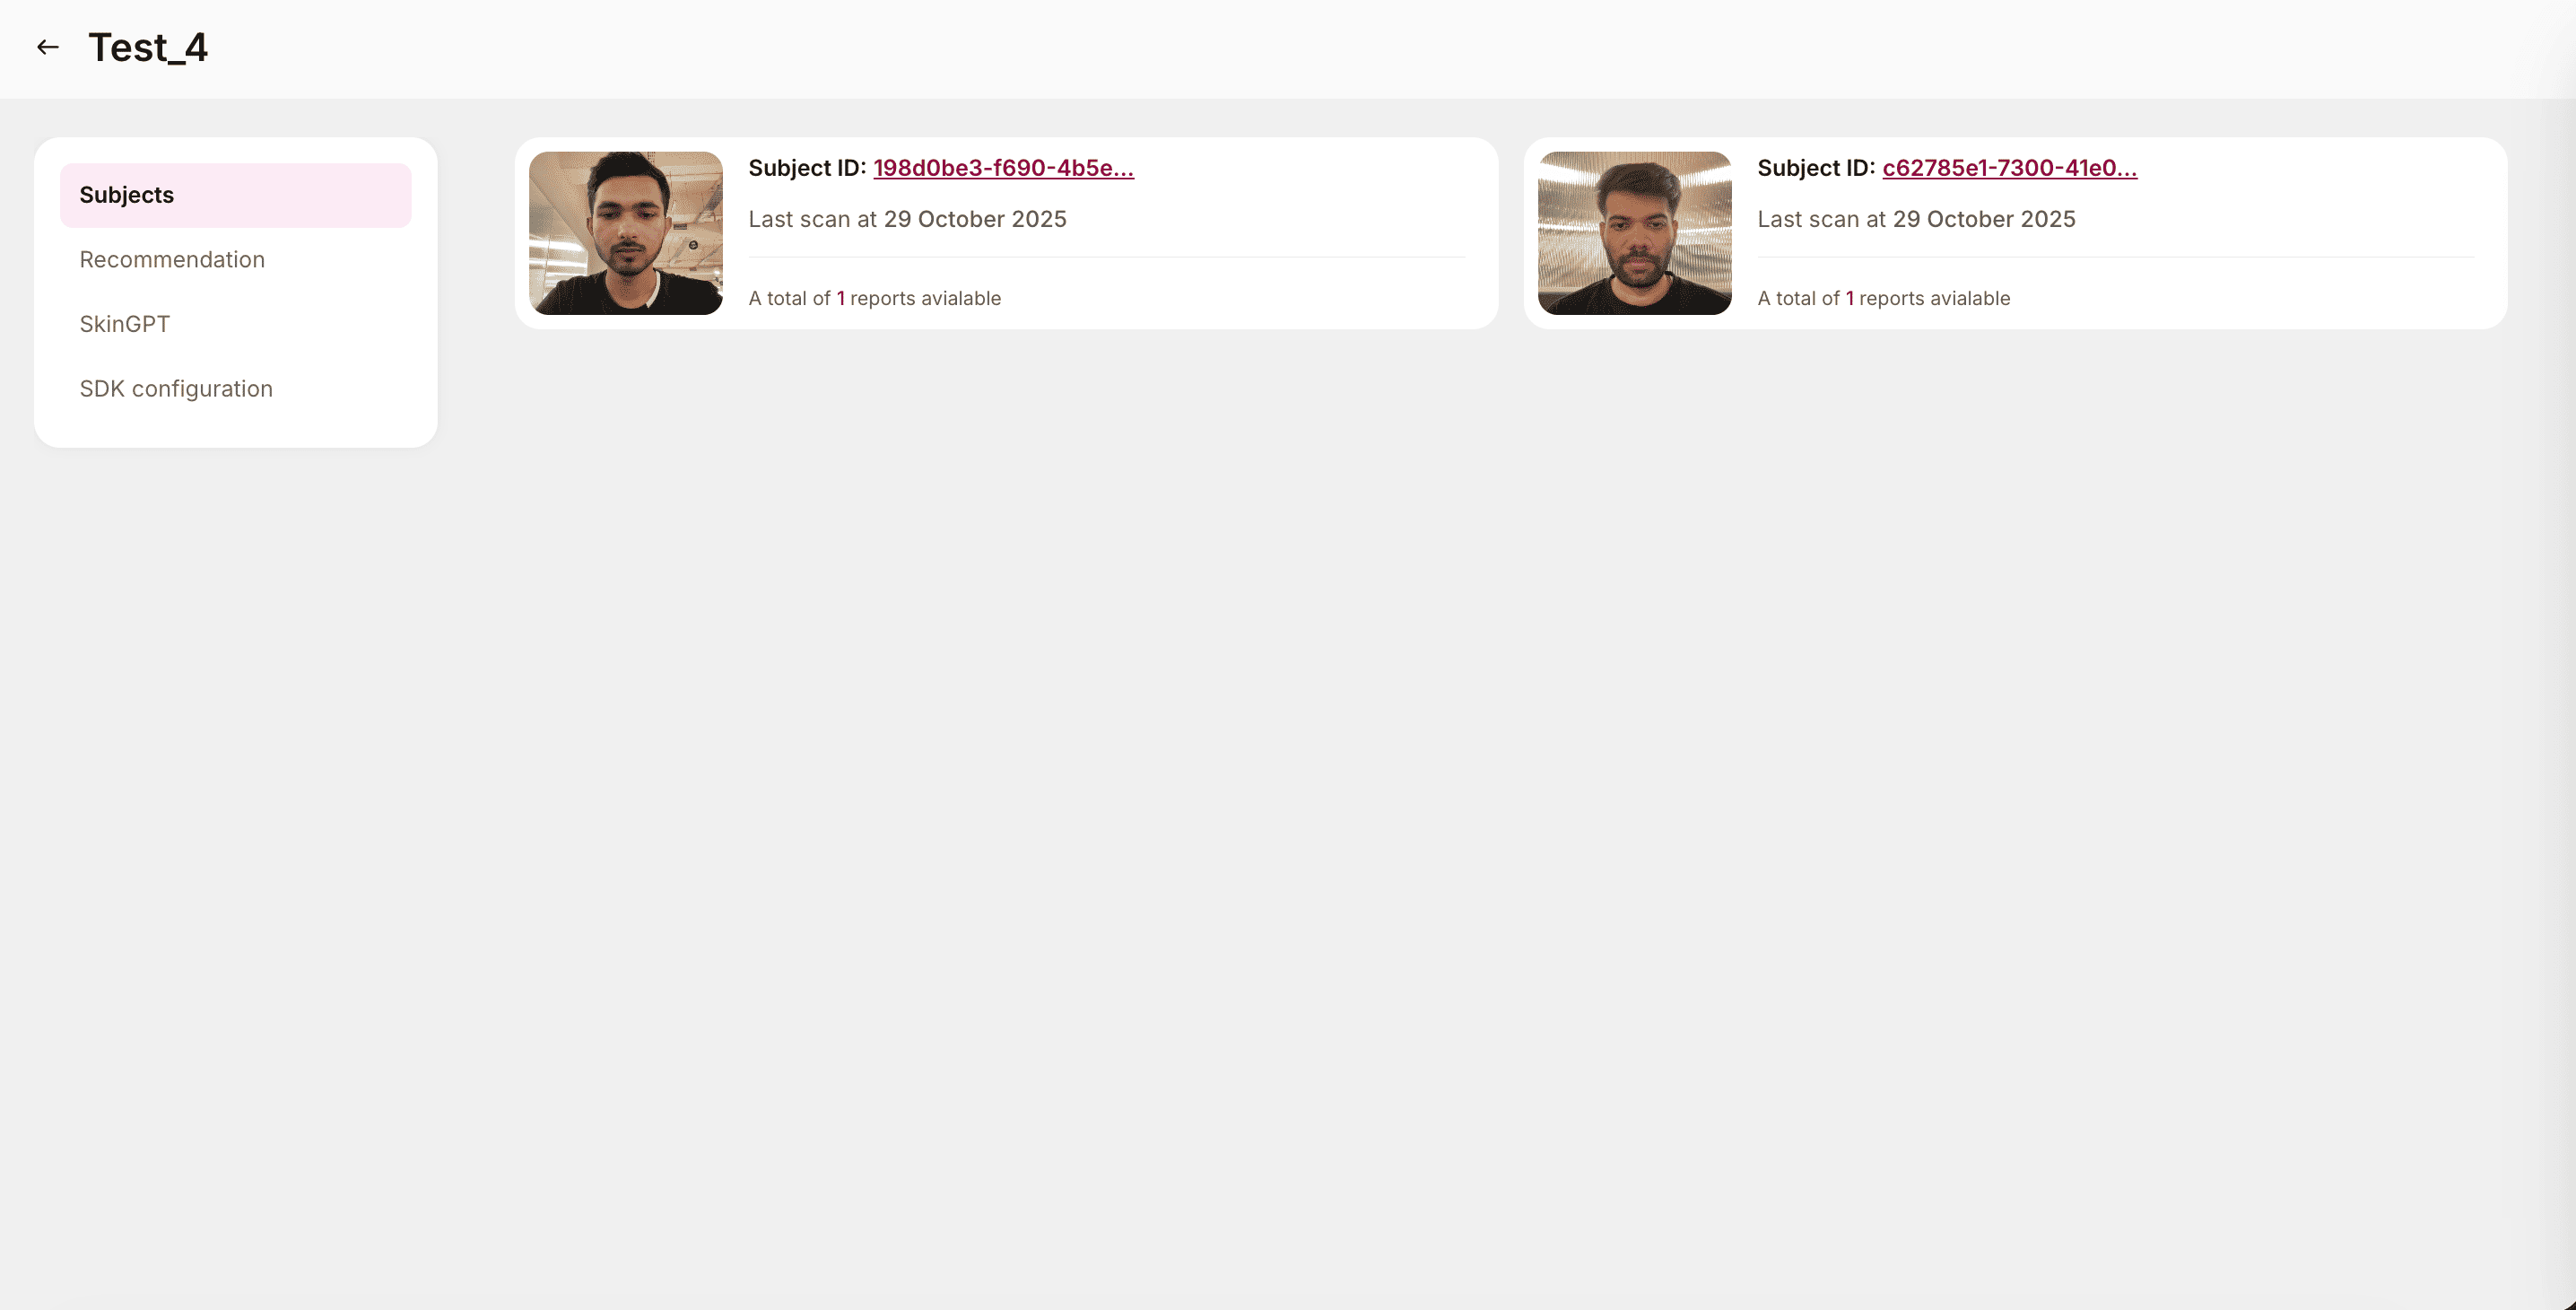
Subjects
The Subjects tab provides a complete list of all skin scan reports generated through your Skin Analysis app. Every time a user completes a scan, GlamAR automatically creates a Subject entry, making it easy for you to track, review, and manage individual results. Each Subject is assigned a unique Subject ID, ensuring every scan session remains identifiable and traceable.
This section acts as the central record of all analysis activities, whether you're monitoring usage, reviewing scan quality, performing audits, or exporting reports for internal review. From here, you can open detailed reports, download them for offline use, or remove outdated or test scans to keep your data organized.
Viewing reports:
- The list of reports is organized by subjects, with each entry shown as a report card.
- Click on any report card or the Subject ID to open and view the detailed Skin Analysis Report.
- The report includes detailed metrics, detected skin conditions, annotated images, and other analytical data for that specific scan.
Downloading reports:
- Within each report card, users have the option to download the complete report.
- The downloaded report can be used for offline reference, sharing with clients, or internal review.
- Reports are typically exported in a standard format (e.g., PDF) that includes all selected report parameters and visuals configured earlier in the Report Setup section.
Deleting reports:
- To remove a report, click the bin icon located at the top-right corner of the respective report card.
- A confirmation dialog will appear before deletion. Once confirmed, the report is permanently deleted and cannot be recovered.
Recommendation
The Recommendation module acts as a curated product mapping system, linking skin issues to relevant products. Once configured, GlamAR’s AI model analyzes skin parameters (like acne, wrinkles, and pores) and returns tailored product suggestions directly in the final skin analysis report.
Additionally, you can import product data in bulk to streamline setup and make sure that recommendations remain accurate and comprehensive.
Importing Product Data
You can populate product recommendations in two ways:
-
CSV Upload (currently supported)
- Click the Import button to upload a CSV file containing product details.
- A file selection window will appear, select the file from your device.
- The system will validate the data and populate the table.
- Supported File Type: CSV
- Maximum File Size: 5 MB
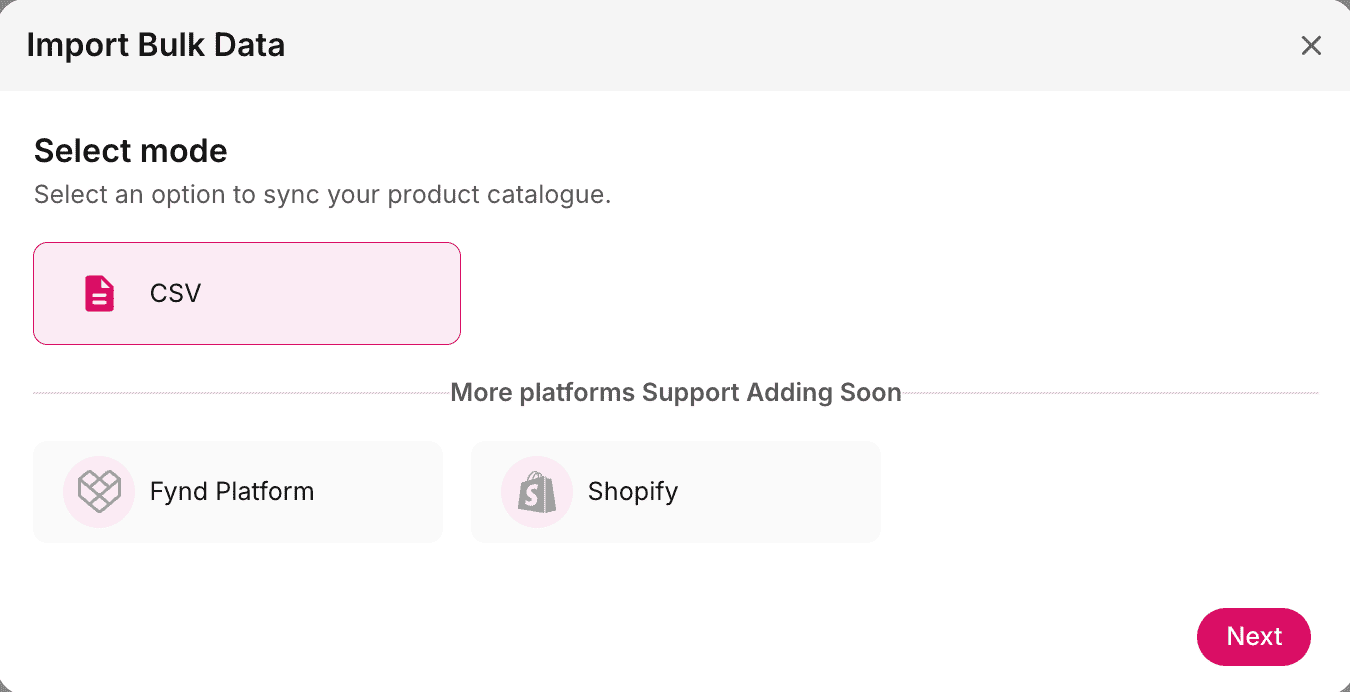
- Future Integrations (coming soon)
- Product catalogs can also be imported directly from platforms such as Fynd Platform and Shopify.
- These integrations will allow automated synchronization of product data, reducing manual maintenance.
Recommendation table
Once product data is imported, it appears in a structured table that allows you to review, manage, and refine each entry. This table provides a quick snapshot of essential product attributes and how they map to the AI recommendation engine. Each column plays a specific role in ensuring accurate matching and high-quality recommendations.
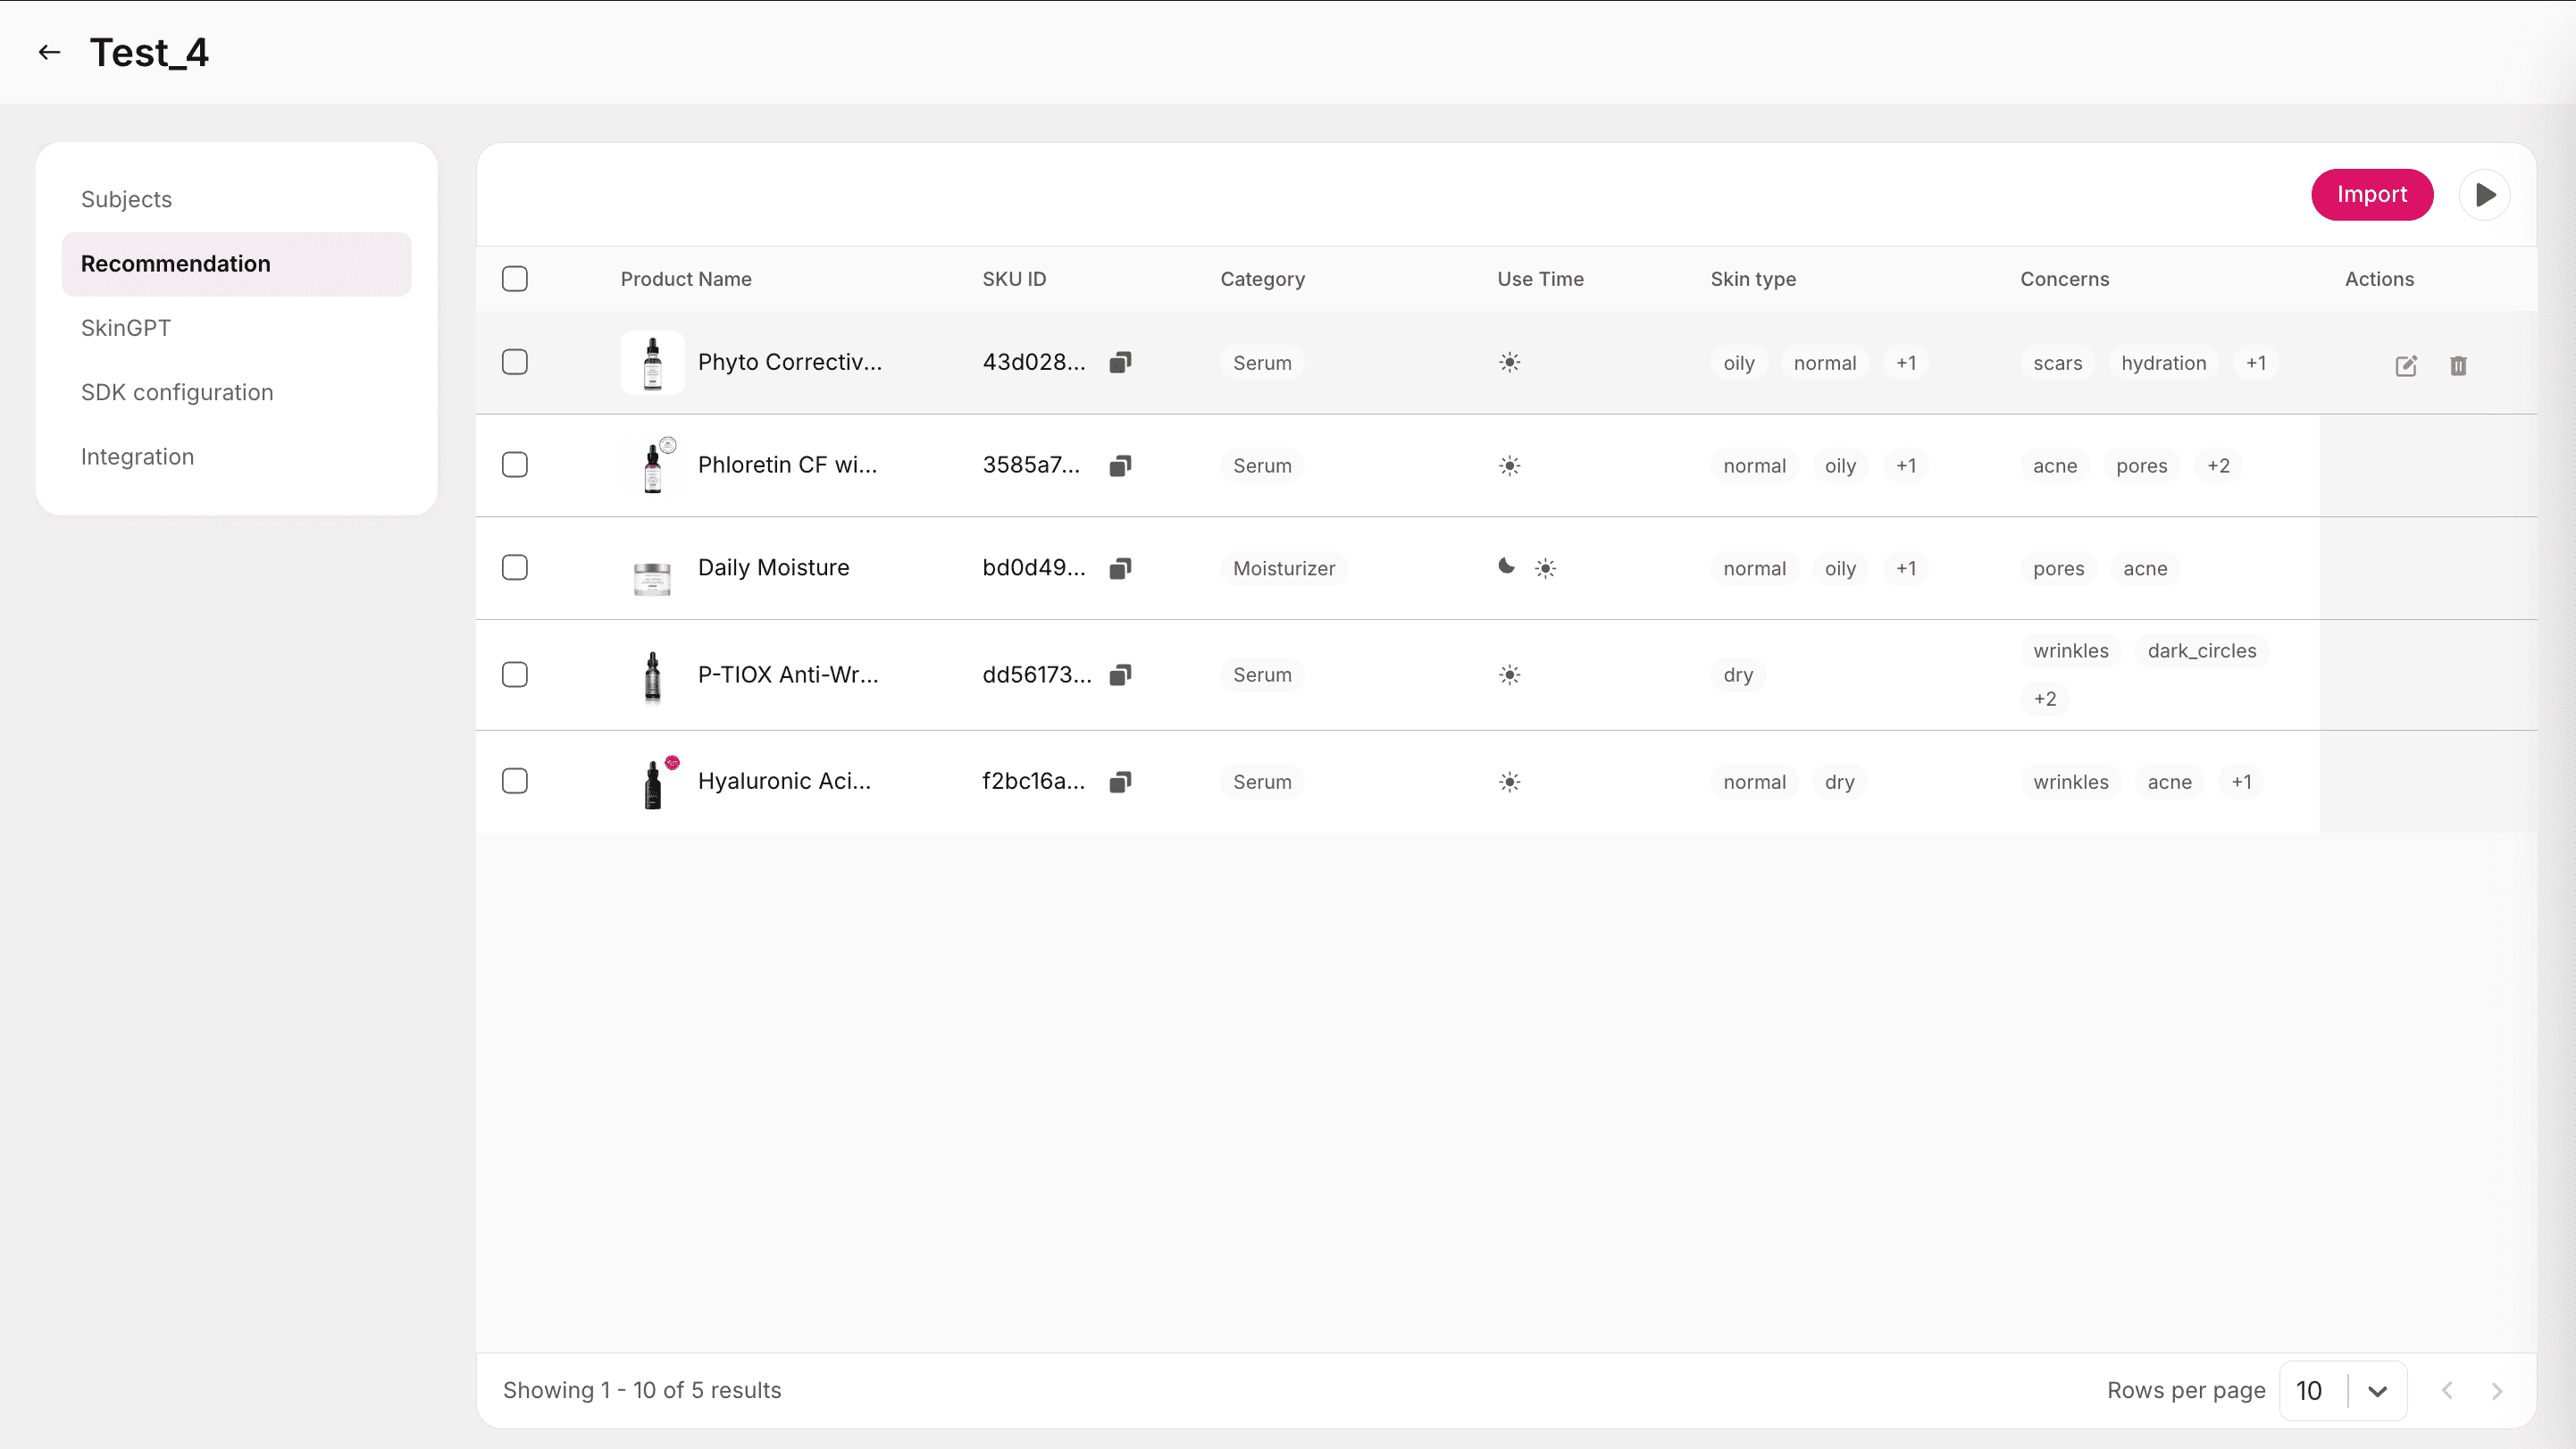
| Column | Description |
|---|---|
| Product Name | Shows the name of the product exactly as it will appear in user reports. A clear, descriptive name helps users quickly recognize the product. |
| SKU ID | A permanent, unique identifier used for tracking and internal mapping. Once uploaded, SKU IDs cannot be changed, and GlamAR uses them as the anchor for all product-level operations. |
| Category | Defines the product type (e.g., Cleanser, Serum, Moisturizer), helping the AI match skin concerns to the correct solution category. Accurate categories improve the relevance of recommendations. |
| Use Time | Indicates when the product is intended to be used. Morning, Night, or Anytime. This helps the AI avoid suggesting conflicting routines (e.g., recommending retinol in the morning). |
| Skin Type | Specifies which skin types the product is suited for, such as Oily, Dry, Combination, or Sensitive. Providing accurate skin type metadata greatly enhances recommendation precision. |
| Concerns | Lists the specific skin issues the product targets, such as Acne, Wrinkles, or Pigmentation. These fields directly influence the AI's decision-making and are among the most important for matching. |
| Actions | Allows you to edit or delete each product entry. Use this to refine product details, correct metadata, or remove outdated products from the recommendation pool. |
Testing recommendations
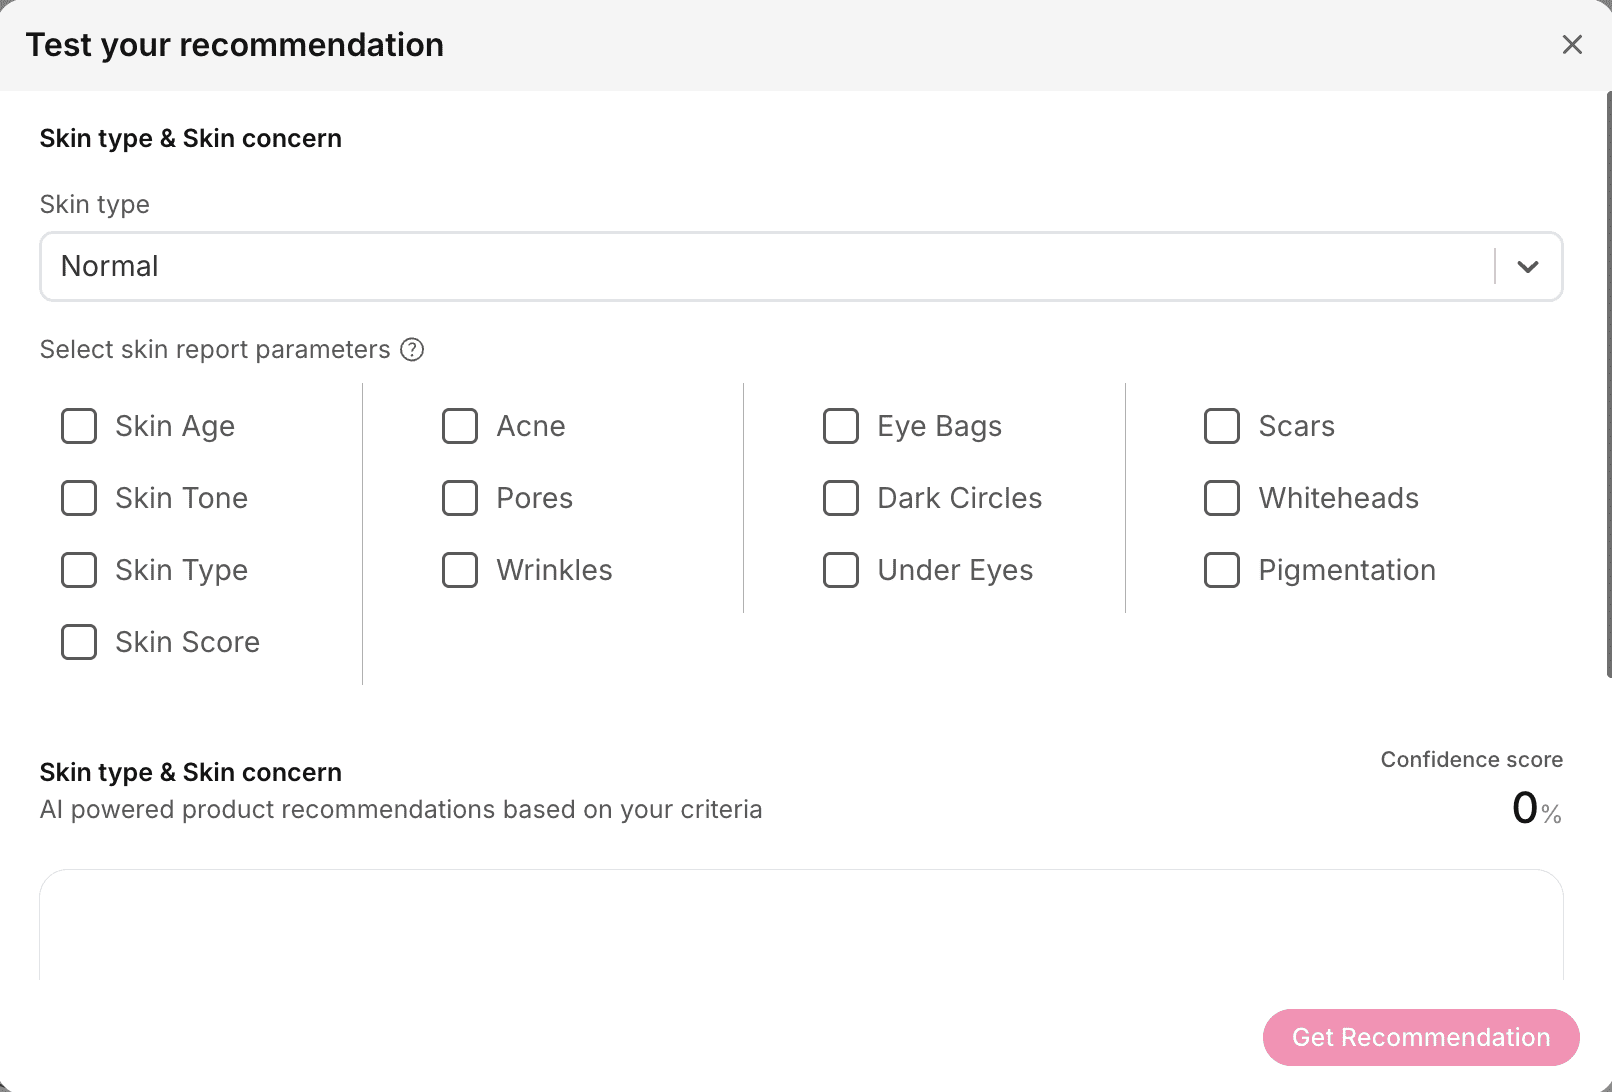
Next to the Import button (at the top-right of the table) is a Play button, which lets you preview and simulate how GlamAR’s AI model generates product recommendations. This feature is especially useful for validating your product metadata before publishing changes. It allows you to test different skin profiles and immediately see which products the AI selects, along with their confidence scores.
When you click the Play button:
- A popup window opens with input options.
- Select your Skin Type from the available choices:
- Normal
- Oily
- Dry
- Combination
- Sensitive
- Select the specific skin parameters and issues to include in the analysis, such as:
- Skin Age
- Skin Tone
- Skin Type
- Skin Score
- Acne
- Pores
- Wrinkles and more
- Click Get Recommendations.
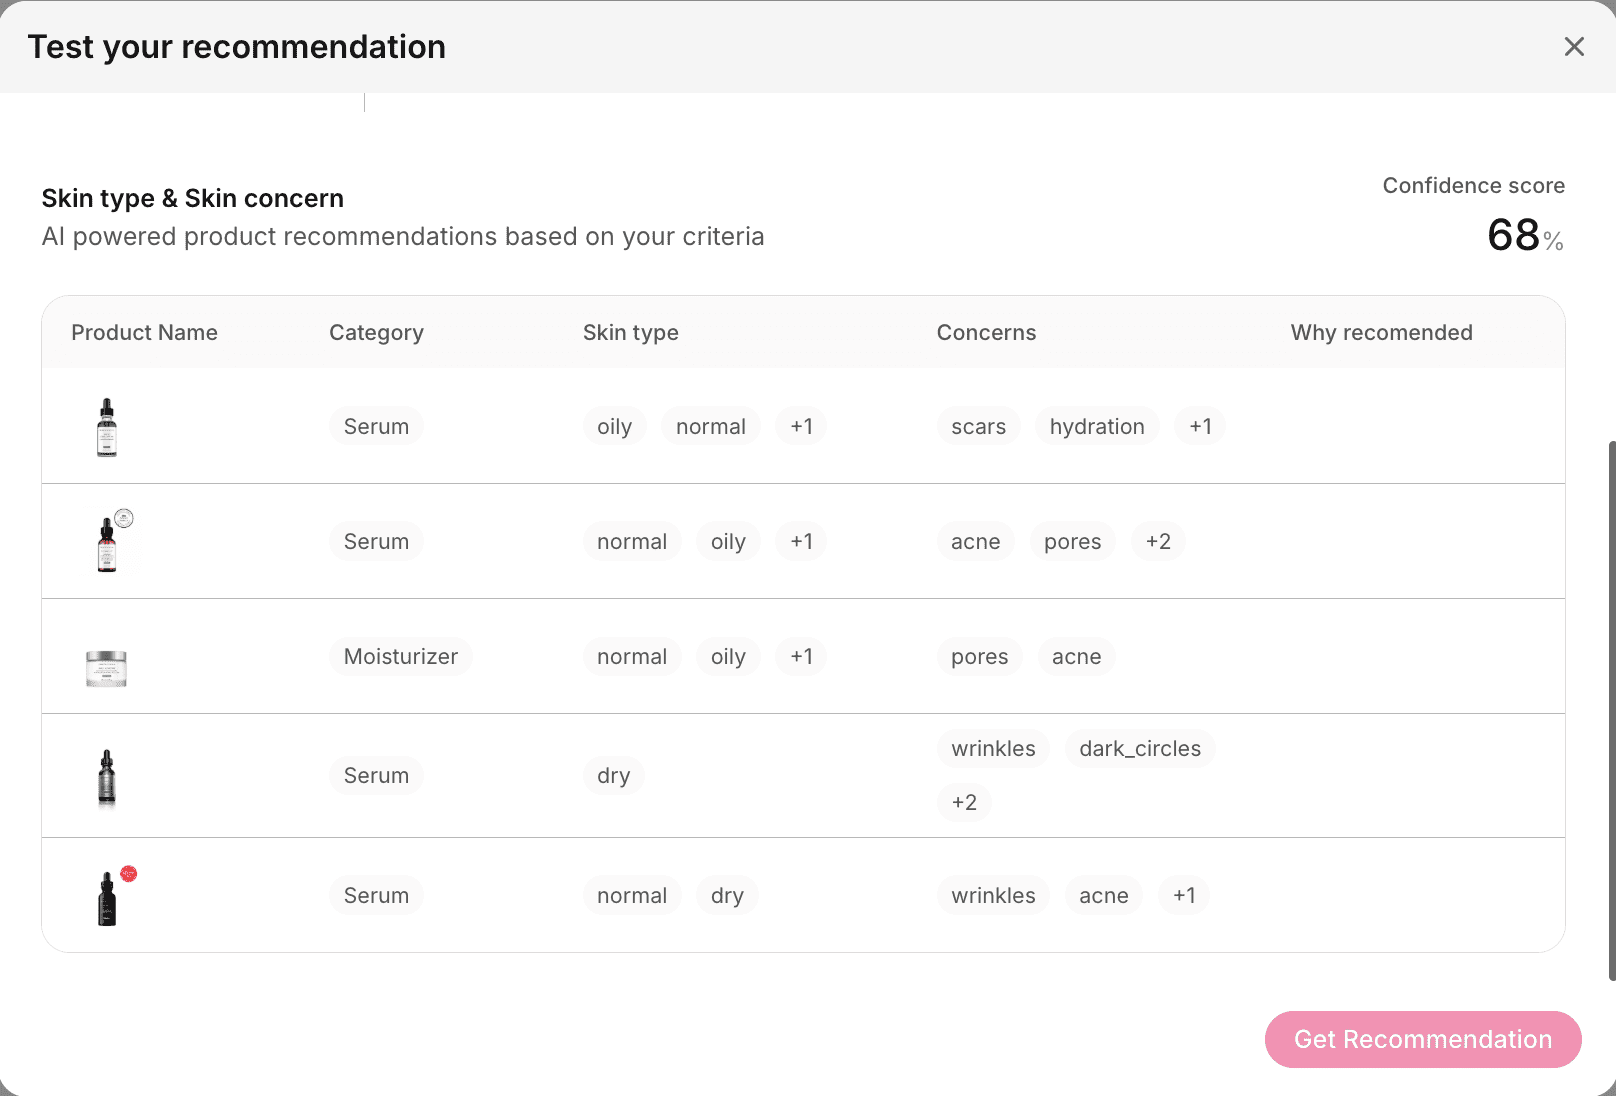
The system then lists all relevant products that match the selected criteria. Each product suggestion is accompanied by a confidence score (in %), which represents the AI’s confidence in the recommendation’s relevance to the user’s skin profile.
Best practices:
- Keep your product catalog updated to ensure recommendations remain accurate and aligned with current inventory.
- Regularly test recommendations using the Play button to evaluate AI performance and mapping accuracy.
- Use descriptive product names and categories to help the AI deliver more precise results.
- Ensure the CSV file adheres to the correct format and includes complete information (Product Name, SKU ID, Category, etc.) for seamless import.
Editing product entries
Each entry in the Recommendation table can be individually edited to update or refine product information. Editing helps ensure that product details, targeting parameters, and metadata remain accurate for AI-driven recommendations.
When you click the edit icon in the Actions column of a product entry, an editing panel opens with the following grouped options:
Basic Details
This section includes core product information used to display items inside skin analysis reports and to manage your catalog efficiently. Several of these fields also influence how GlamAR’s AI model evaluates and recommends products, especially when paired with skin concerns.
SKU ID (Required / Non-editable after upload)
The SKU ID uniquely identifies each product in your catalog and is used internally to link recommendations, analytics, and performance data. Because this field must remain constant across uploads, choose a clear and consistent SKU format. Once imported, SKU IDs cannot be changed.
Product Name (Required)
This is the name shown to users in recommendations. Use descriptive, easy-to-read names that clearly differentiate variants (e.g., “Hydrating Cleanser - Fragrance Free” instead of internal codes). Consistent naming conventions improve overall user clarity.
Product Image (Required)
A product image is necessary for displaying the recommendation visually. Use a clean, clear photograph of the actual product packaging. Square images (1:1 ratio) provide the best balance and prevent distortion in the report layout.
Product URL
This link opens when a user clicks on a recommended product inside their skin report. Use direct, product-specific URLs so users land exactly where they can read more or purchase the item. This improves conversion rates and reduces navigation friction.
Currency, MRP and Selling Price
These pricing fields define the product’s cost and value positioning.
- Currency: Enter the currency code (USD, INR, AED, etc.).
- MRP: The official retail price.
- Selling Price: The current price after discounts or promotions.
Accurate pricing helps GlamAR showcase correct value comparisons and can influence how the AI weighs certain recommendations, especially if multiple products meet the same concern criteria.
Brand Name
The brand field indicates which company or product line a product belongs to. Keeping brand names consistent across entries helps maintain a clean visual presentation and allows the AI to associate credibility or relevance based on your internal brand positioning.
Category (AI-Enhanced)
The category defines the product’s functional type, such as Cleanser, Serum, Toner, Moisturizer, Mask, etc.
This field has a strong impact on AI recommendations. The AI uses categories to identify which products are appropriate for specific concerns. For example:
- Acne-prone users may be shown anti-acne serums or clarifying cleansers.
- Users with pigmentation may receive Vitamin C serums.
- Dryness concerns often map to hydrating moisturizers.
Use standard skincare categories to ensure the most accurate recommendations.
Performance and Feedback
The Performance and Feedback fields help GlamAR understand how well each product performs within your catalog. These values influence how the AI prioritizes products when multiple options address the same skin concern. Well-maintained feedback fields improve the quality, ordering, and relevance of recommendations seen by the user.
Popularity Score
The popularity score reflects how well a product performs relative to others in your catalog. This can be based on sales volume, user engagement, or internal ranking systems. A higher score tells the AI that users tend to prefer this product, which can lead to it being shown more prominently when recommended. For example, two moisturizers that target dryness may both be eligible, but the one with a higher popularity score is more likely to appear first.
Keep the scoring consistent across your catalog, use a 1–5 range.
Average Rating
This represents the aggregated rating users have given the product on your platform (e.g., 4.5/5). Higher ratings can improve a product’s visibility within GlamAR recommendations, especially when several products address the same concern.
Ratings also help users trust recommendations since they provide a familiar quality indicator. Even if you don’t currently track user ratings externally, you may assign internal quality scores to help the AI understand general product sentiment.
Details
The Details section contains descriptive attributes that help users understand the nature, purpose, and formulation of each product. While not all fields directly influence the AI model, these details contribute to a richer, more informative recommendation card and help maintain a polished, professional appearance in the final report. Completing these fields thoroughly ensures users have enough context to evaluate whether a product suits their needs.
Description
The product description provides a short summary about what the product does and why it’s beneficial. This text appears in the final recommendation, helping users quickly understand the product’s purpose without leaving the report. Use concise, benefit-focused language, for example:
“Soothing, hydrating gel-serum that cools sensitivity & strengthens barrier post-procedure.”
A well-written description improves readability and user engagement, especially when your catalog contains several similar products.
Keywords (AI-Enhanced)
Keywords are short tags that describe product attributes, benefits, or key ingredients. These fields directly help GlamAR’s AI understand the product’s characteristics and improve its ability to match products to specific skin concerns.
Examples include: “hydrating,” “vitamin c,” “anti-acne,” “fragrance-free,” “brightening.”
Including strong, relevant keywords is one of the easiest ways to boost AI recommendation accuracy. Aim for 5–7 meaningful keywords per product.
Size / Volume
This field indicates the quantity of the product, such as 20 ml, 50 ml, or 100 ml. Displaying this information helps users understand product value and prevents confusion, especially when similar products come in multiple sizes.
Use standard units to maintain consistency across your catalog.
Packaging Style
Packaging style describes the physical form of the product such as bottle, tube, jar, pump, or dropper.
Although this field is not AI-enhanced, it improves the user experience by highlighting attributes that many shoppers care about. For example, pump dispensers may appeal to users who prioritize hygiene, while tubes may be preferred for travel.
Providing this detail also helps your catalog feel more complete and professional.
Usage and Targeting
The Usage and Targeting fields are some of the most influential elements in determining how GlamAR’s AI matches products to each user's skin concerns and routine needs. These fields describe who the product is for and how it should be used. Supplying accurate and complete values here significantly improves the precision and trustworthiness of recommendations.
AM/PM (AI-Enhanced)
This field specifies when the product should be used, Morning, Night, or Both.
GlamAR uses this information to avoid suggesting routines that conflict with common skincare rules (such as recommending retinol during the day).
Assign usage timing thoughtfully:
- AM examples: Vitamin C, Sunscreen, Lightweight gels
- PM examples: Retinol, Night creams, Exfoliants
- Both: Moisturizers, cleansers, soothing serums
Including this ensures recommendations align with safe and effective skincare practices.
Skin Type (AI-Enhanced)
Indicates which skin types the product is suitable for Oily, Dry, Normal, Sensitive, or Combination.
This is one of the most important matching fields for GlamAR’s AI. Accurate skin type mapping helps the system avoid unsuitable suggestions (e.g., heavy creams for oily skin).
You can assign multiple skin types when appropriate, such as for mild, hydration-focused products.
Using the standard values from your CSV ensures compatibility.
Concerns (AI-Enhanced)
Lists the specific skin concerns the product addresses. Examples include:
- Acne
- Wrinkles
- Pigmentation
- Pores
- Hydration
- Dark Circles
- Eye Bags
This field signals to the AI which problems the product claims to solve.
It directly influences ranking and confidence scoring, a product with the right concern tags is more likely to appear in the final recommendation.
Be accurate and conservative. Avoid tagging every concern just to increase visibility. This weakens the AI’s matching logic.
Genders
Specifies the intended audience: Male, Female, or Unisex.
Although not AI-enhanced, it helps refine the user experience when presenting products from gender-specific skincare lines.
If your products are broadly applicable, set the value to Unisex.
Description and Metadata
The Description and Metadata fields add structure, nuance, and clarity to your product catalog. While some of these fields may not directly influence the AI model, they help GlamAR present a more complete, organized, and context-rich recommendation experience. They also play a role in grouping related products and highlighting important formulation characteristics that users often look for.
Group SKU (AI-Enhanced)
Group SKU connects products that belong to the same family or variant line.
For example, a hydrating moisturizer available in 50 ml and 100 ml formats should share the same Group SKU.
This helps GlamAR understand product relationships and improves the AI’s ability to:
- Recommend the most relevant variant
- Avoid suggesting duplicate items
- Maintain consistency in product families
Using Group SKU is especially helpful in large catalogs where multiple variants exist.
Product Label (AI-Enhanced)
Product Labels act like category tags or badges that characterize the product, such as Bestseller, New Launch, Dermatologist Recommended, Anti-Aging, or For Sensitive Skin.
GlamAR uses these labels to enrich the product representation and improve sorting logic.
Labels also appear visually in user-facing recommendations, helping products stand out and build trust.
Choose labels that reflect real marketing positions or clinical claims.
Fragrance Free / Alcohol Free / Paraben Free
These boolean fields (Yes/No) indicate important formulation details that matter to many users, especially those with sensitive or reactive skin.
Including these fields:
- Helps users quickly identify products compatible with their needs
- Adds transparency and clarity
- Improves the perceived safety of the recommendation
Even though these fields aren’t directly AI-enhanced, they meaningfully improve user satisfaction.
pH Level
Represents the product’s pH value, which can be helpful for categories like cleansers, exfoliants, or toners.
Maintaining a consistent, standard pH (such as 5.5 for gentle cleansers) can be meaningful for recommendations tailored to sensitive or acne-prone skin.
Users may not see this value prominently, but including it contributes to a more detailed and trustworthy catalog entry.
AI-Enhanced Fields in Product Recommendations
Some fields in the product catalog are marked with an AI icon in the UI. These fields can be partially or fully populated using GlamAR’s AI enrichment tools. AI-enhanced fields help improve the completeness, consistency, and accuracy of your product metadata.
What AI-Enhanced means:
- GlamAR can assist in generating or suggesting values for these fields.
- They are not mandatory, but filling them improves recommendation quality.
- If left empty, GlamAR may still function but confidence scores may be lower.
Examples of AI-Enhanced fields:
- Category
- Concerns
- Keywords
- Brand Name
- Product Label
- Group SKU
- Skin Type
AI-enhanced fields are especially valuable if you upload a large catalog and want GlamAR to assist you in enriching product metadata quickly.
Even when AI can fill fields for you, review and adjust the values to ensure they match your internal product standards.
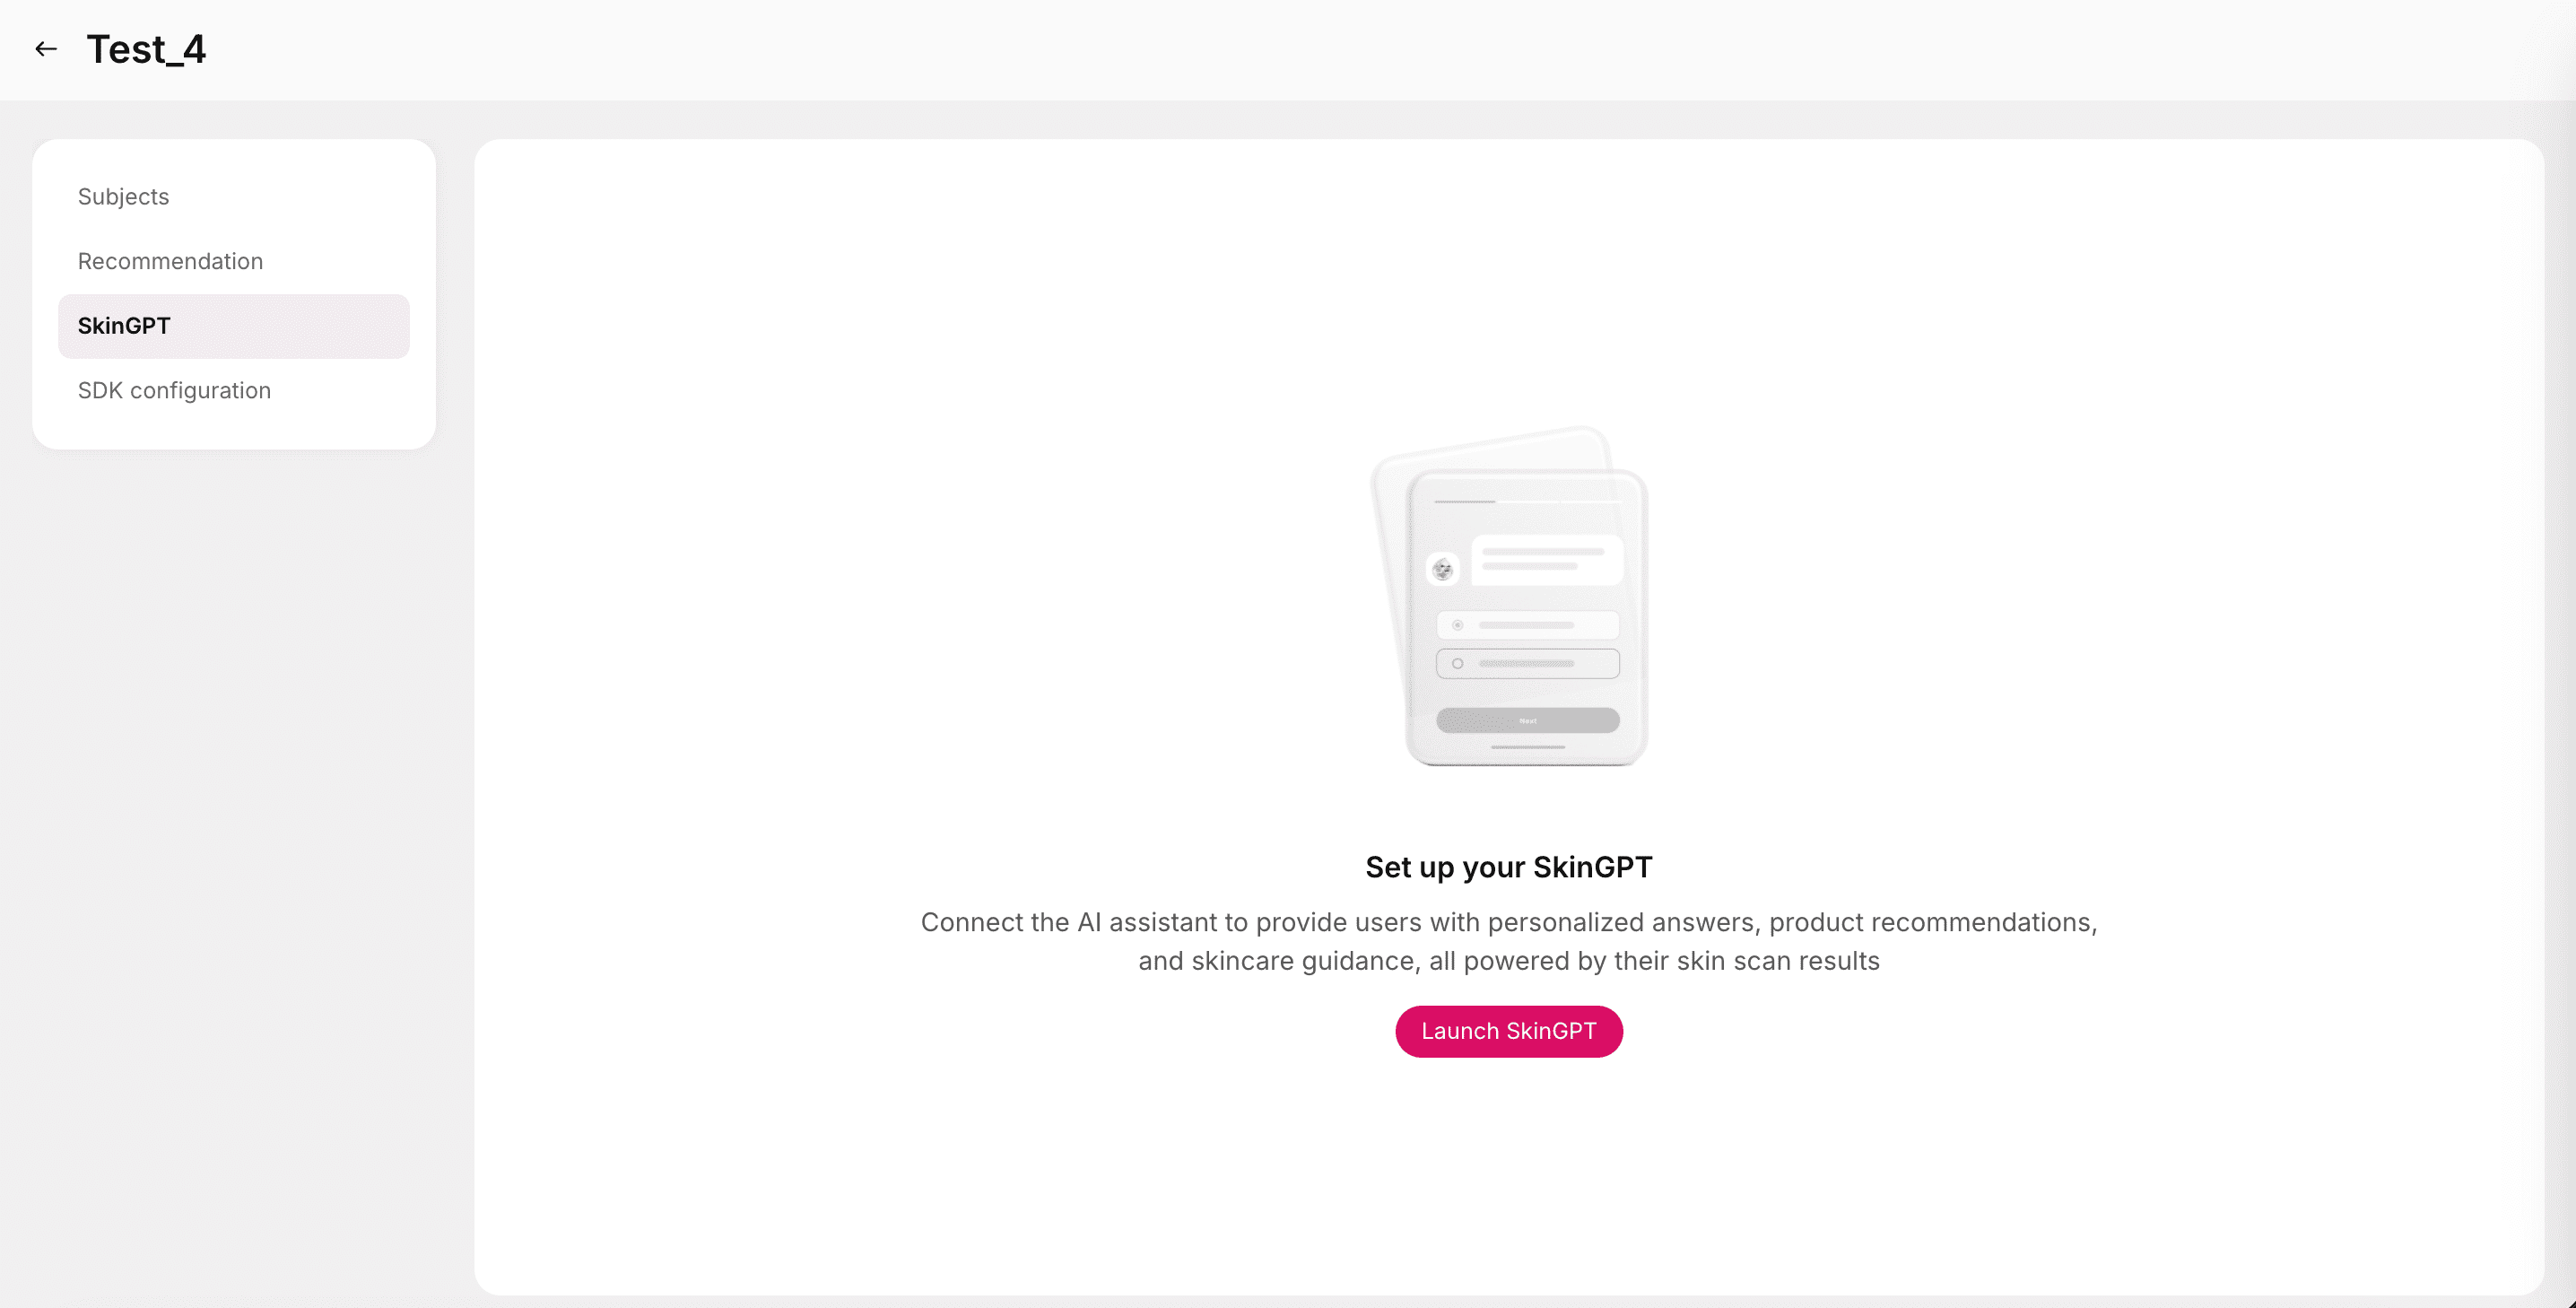
SkinGPT
SkinGPT is an AI-powered virtual skincare assistant that provides personalized responses, product recommendations, and expert guidance, all based on the user’s individual skin scan results. By connecting the AI assistant to your Skin Analysis app, you can offer users an engaging, conversational experience that delivers tailored insights and suggestions in real time.
SkinGPT uses data from the user’s skin analysis, including detected conditions, skin type, tone, and concerns to generate intelligent, context-aware replies.
Users can ask questions about their results, learn more about their skin health, and receive actionable advice or product recommendations directly within the app.
Setup
To begin configuring your AI skincare assistant, click the Launch SkinGPT button. This opens the SkinGPT setup, where you can define your assistant’s appearance, personality, and user interaction behavior.
Basic Info
These settings help personalize the branding and identity of your SkinGPT assistant.
- Logo: Upload a logo to represent your brand within the chat interface.
- Supported formats: PNG, JPEG, WEBP
- Maximum file size: 1 MB
- Recommended aspect ratio: 1:1
- SkinGPT Name: Provide a custom name for your AI assistant. This name will appear at the top of the chat window and in messages, helping users recognize your brand’s voice.
Define Persona
This section defines your SkinGPT’s behavior and tone of communication. Use this space to describe how your assistant should interact with users.
- Write a detailed description of your business, brand identity, and how SkinGPT should behave during conversations.
- Maximum character limit: 5,000
A well-defined persona ensures your AI delivers consistent, brand-aligned conversations.
Welcome Content
Customize how SkinGPT greets users and initiates interaction for a seamless, engaging experience.
- Title: The main greeting or headline (e.g., “Welcome to your personal skincare assistant!”).
- Welcome Subtitle: A short, supportive line that encourages users to start chatting (e.g., “Ask me anything about your skin analysis report.”).
- Conversation Starters: Add example questions or prompts to help users begin the conversation.
Example: “What does my skin report say?” or “Recommend a moisturizer for oily skin.” - Auto Suggestions: Toggle to enable or disable to control whether dynamic follow-up questions or recommendations appear after each SkinGPT response.
When enabled, the AI automatically generates context-based suggestions to guide the next steps in the chat.
Best practices:
- Keep your persona description focused on your target audience’s tone and needs.
- Ensure conversation starters are relevant to your skin analysis workflow and frequently asked questions.
- Use a high-quality logo with a transparent background for professional visual consistency.
- Test SkinGPT’s greeting and flow through the preview feature before going live.
SDK Configuration
The SDK Configuration section consolidates all configuration options necessary to fine-tune how your Skin Analysis app integrates and operates within the GlamAR SDK environment.
Most of the options available here have already been discussed in detail under:
- App Details
- Face Scan Instructions
- App Appearance
- Report Setup
All previously configured settings such as typography, themes, data storage, and report customization are accessible here for quick updates or review without navigating back to individual tabs.
Advance settings
The Advance settings tab provides deeper control over your app’s user interface (UI) and behavior. These settings allow you to toggle certain UI components and adjust SDK behavior directly via configuration or code.
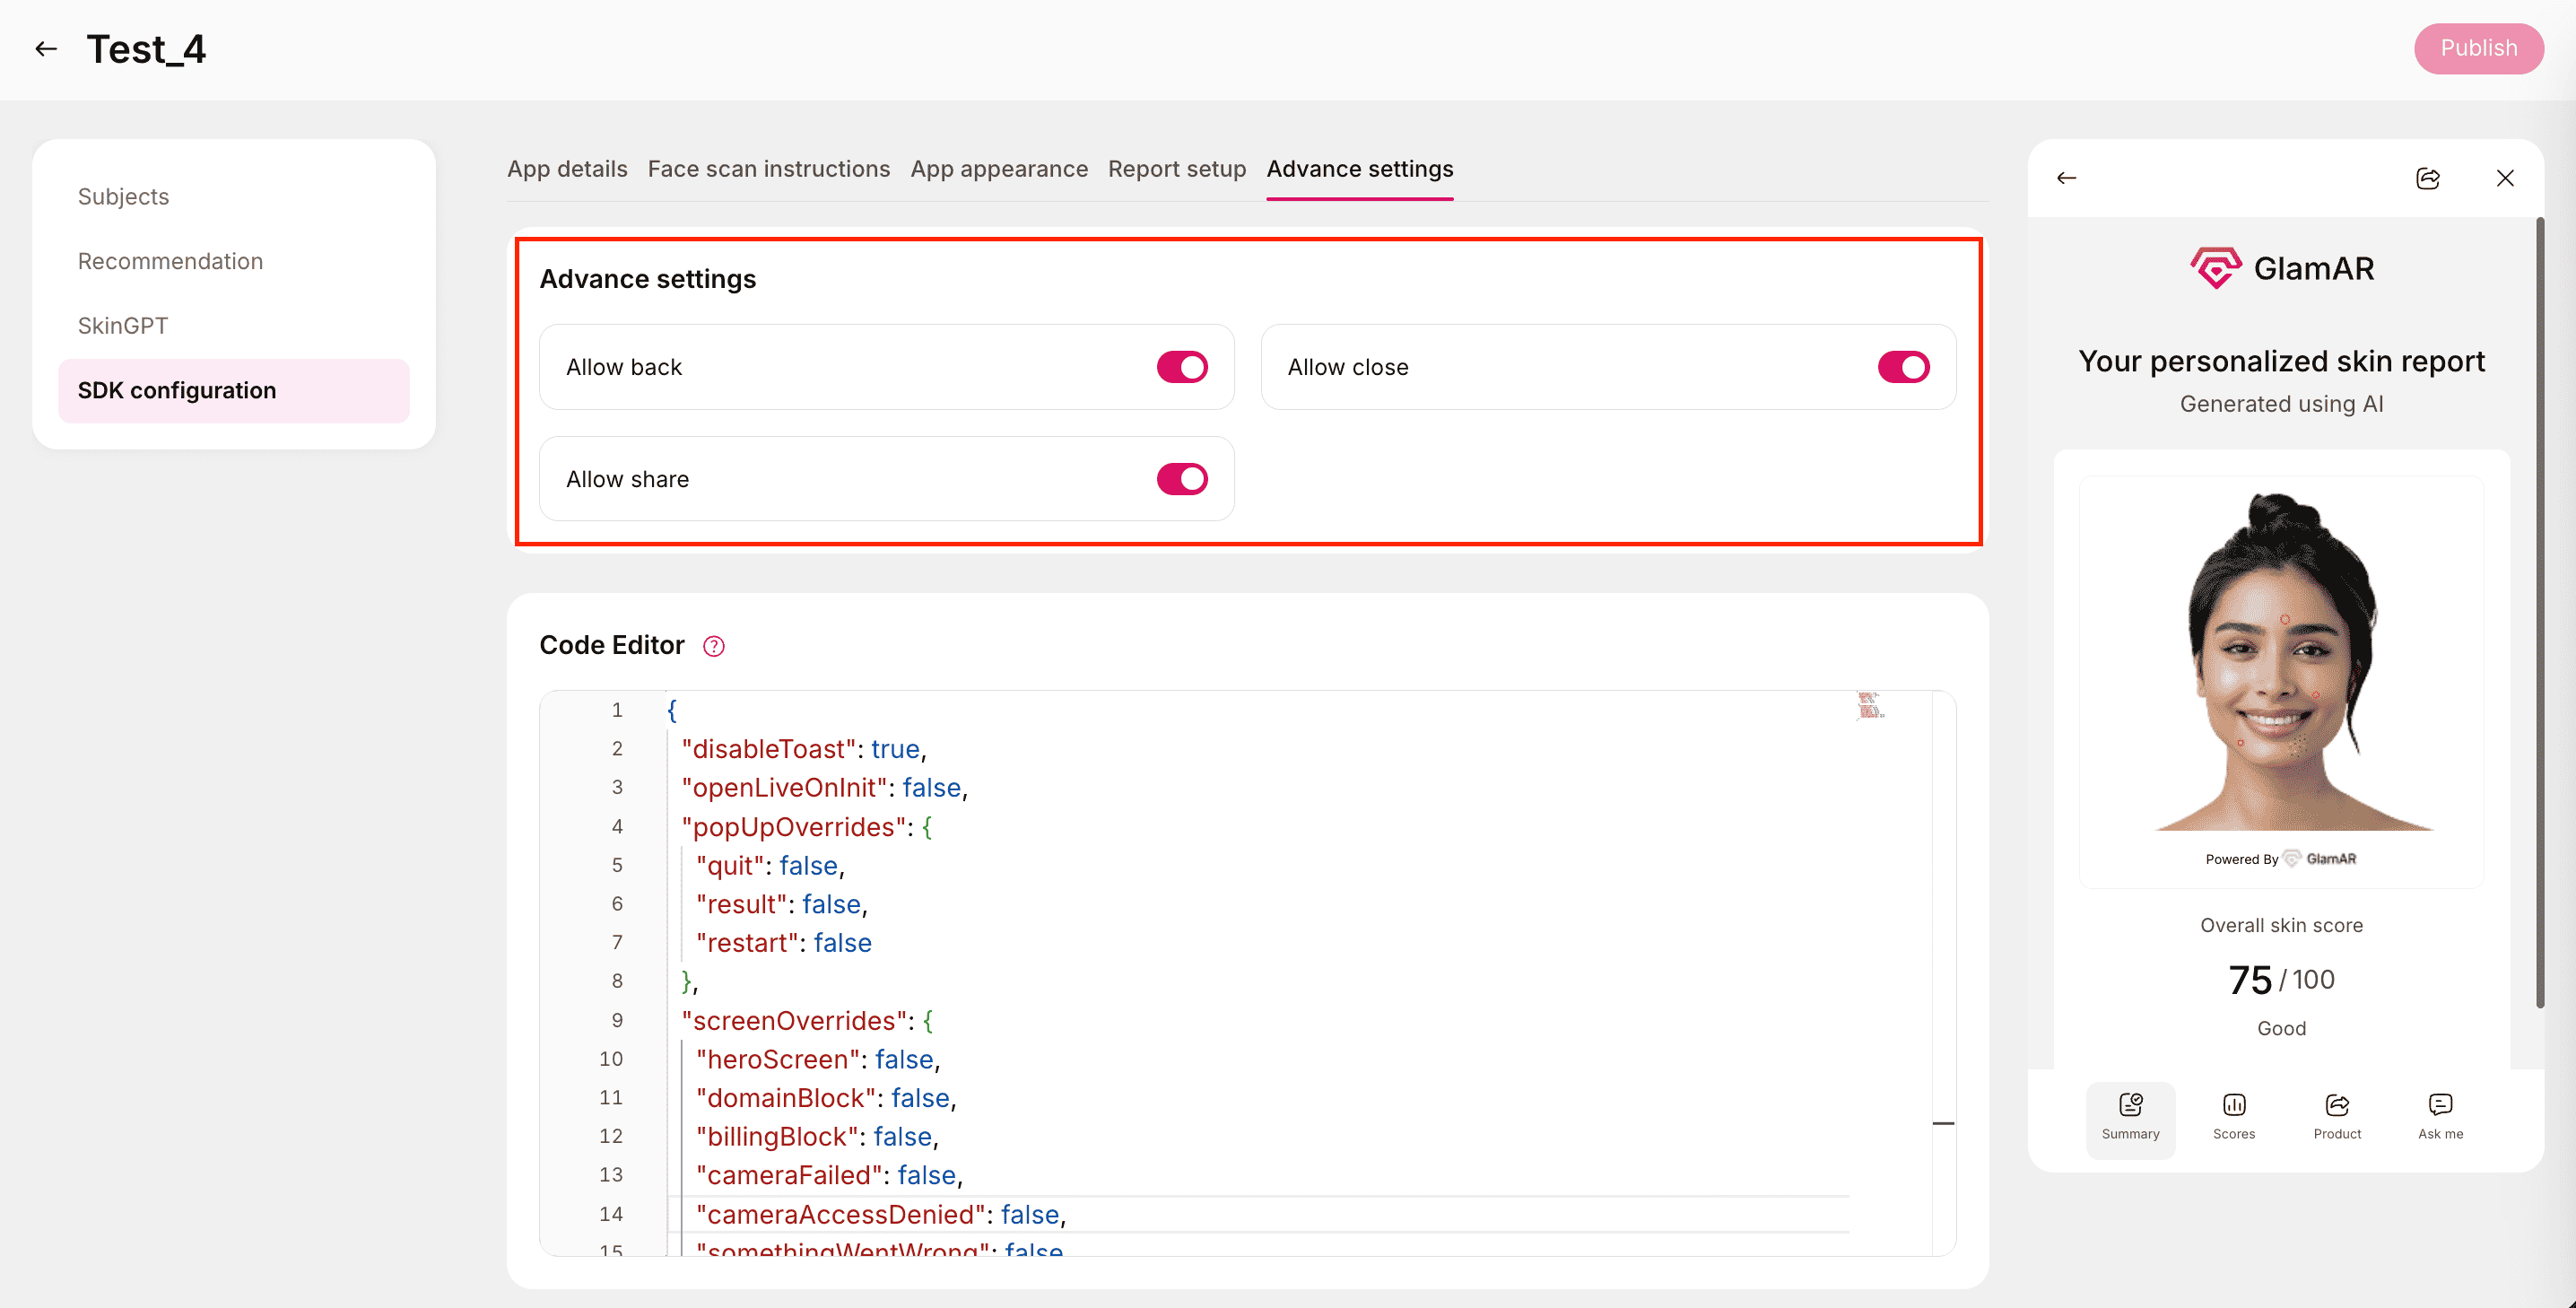
You can enable or disable key user interface actions using simple toggles:
- Allow back: Toggle on/off to show or hide the back navigation option within the try-on or analysis window.
- Allow close: Toggle on/off to include or remove the close (exit) button in the interface.
- Allow share: Toggle on/off to enable users to share their analysis results or reports.
These toggles are primarily used to tailor the in-app experience, controlling navigation and interaction availability.
Code Editor
For developers or advanced users, the Code Editor provides direct access to the SDK’s configuration JSON. You can modify behavioral and UI-level parameters here to customize the app experience further.
Parameters:
| Parameter | Type | Default Value | Description |
|---|---|---|---|
disableToast | Boolean | true | Controls the display of toast notifications. When set to true, the system hides minor pop-up messages (e.g., info or error alerts). |
openLiveOnInit | Boolean | false | Determines whether the live camera view should automatically open when the app initializes. Set to true to start the live view immediately on load. |
popUpOverrides.quit | Boolean | false | Controls whether the Quit Confirmation popup appears when users try to exit the app. When set to true, the popup is disabled. |
popUpOverrides.result | Boolean | false | Toggles the Results Summary popup that appears after completing an analysis. When true, this popup is disabled. |
popUpOverrides.restart | Boolean | false | Determines whether the Restart Confirmation popup appears. If true, the popup will be disabled, allowing instant restart. |
screenOverrides.heroScreen | Boolean | false | Enables or disables the Hero Screen (intro or splash screen) displayed when the app starts. When set to true, this screen is skipped. |
screenOverrides.domainBlock | Boolean | false | Controls whether the Domain Restriction screen appears if the current domain is not whitelisted. When true, this screen will be bypassed. |
screenOverrides.billingBlock | Boolean | false | Determines whether the Billing Block screen appears (shown when subscription or billing issues occur). When true, this screen is suppressed. |
screenOverrides.cameraFailed | Boolean | false | Toggles the Camera Failed error screen, which appears when the device camera cannot initialize or connect. When true, this screen will be disabled. |
screenOverrides.cameraAccessDenied | Boolean | false | Controls whether the Camera Access Denied message is shown when user permissions are not granted. When true, the warning is hidden. |
screenOverrides.somethingWentWrong | Boolean | false | Toggles the fallback Something Went Wrong error screen, displayed for unexpected runtime or SDK-level errors. When true, the screen is disabled. |
- Use
trueto disable popups or screens andfalseto keep them enabled. - It’s generally recommended to keep error and access-related screens enabled (
false) for debugging or troubleshooting purposes. - The toast notifications and popups can be re-enabled easily without requiring a full SDK redeployment, simply toggle the parameters and save.
- Test your configuration changes using the Preview option before publishing to production.
Publishing the Changes
Once all configurations and edits are complete, you can make your updates live by clicking the Publish button located at the top-right corner of the interface.

What happens on publish?
- The latest changes made to your Skin Analysis app, including updates in App Details, Face Scan Instructions, App Appearance, Report Setup, and SDK Configuration, are saved and deployed.
- Publishing ensures that all adjustments become immediately active across the live environment and accessible through both Share Links and QR Codes.
- Review all configurations before publishing to avoid overwriting active settings.
- Publishing replaces the current live version with the newly updated configuration.
- Once published, you can preview and test the live version again using the Play (Preview) button under Managing Existing Apps.
See It in Action
Watch a step-by-step walkthrough showing how to manage the Skin Analysis app in GlamAR. This demo covers the full flow discussed above and helps you visualize each step before going live.