AI Facial Skin Analysis
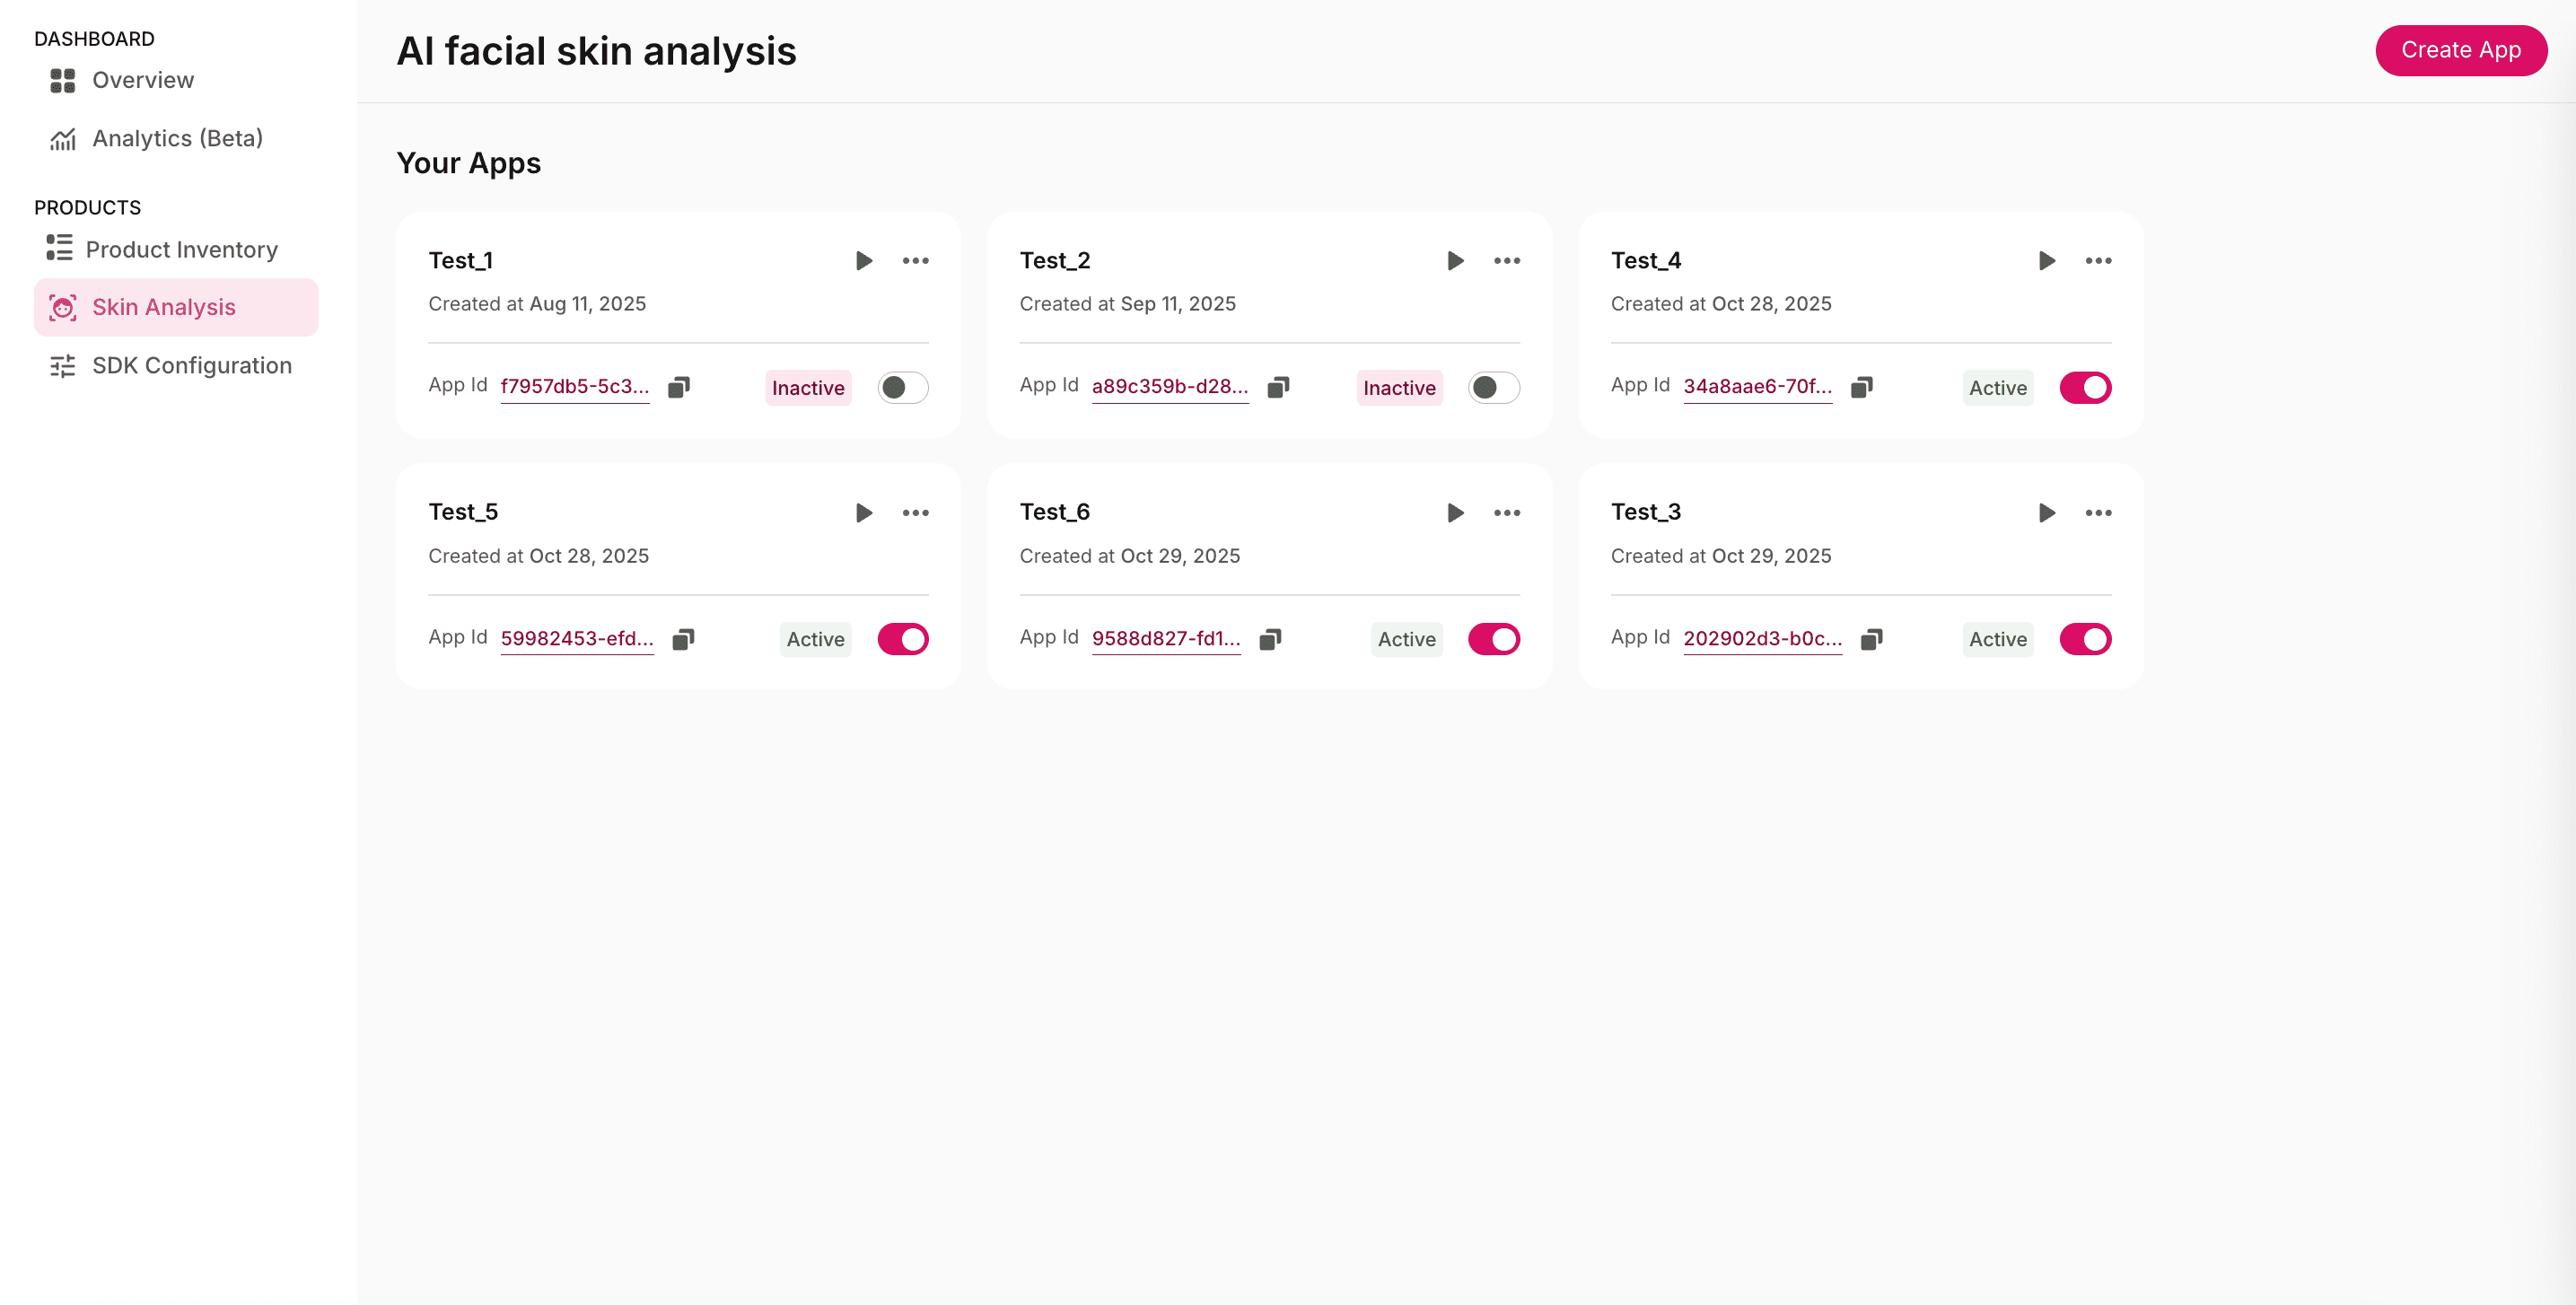
The Skin Analysis section allows you to create and manage AI Facial Skin Analysis apps powered by GlamAR’s deep learning and computer vision technology.
To access this section, click Skin Analysis from the left navigation pane. Here, you’ll see all your existing apps listed under Your Apps. Each app card displays basic information and quick actions.
Creating an App
To create a new app, click the Create App button and a configuration page opens with several setup options. These settings define how your Skin Analysis app behaves, stores data, and interacts with other environments.
App Details
The App Details section contains the following configuration options:
| Settings | Description |
|---|---|
| App Name | Enter a unique name for your Skin Analysis app. The name appears in the Your Apps list and helps identify the app. |
| Data Storage | Choose how long user data will be stored for reporting or insights. Options: None, 1 Year, or 3 Years. Data is stored securely and in compliance with privacy laws (e.g., GDPR). |
| Allowed Domains | Specify the list of websites where the AI Facial Skin Analysis can be embedded. Separate multiple URLs with commas. Requests from unlisted domains will be blocked. |
| SDK Version | Select the SDK version for your app. The latest version is 2.0.0. Always review release notes before switching versions and complete required code updates to avoid integration issues. |
| Algorithm Version | Defines which AI model version is used for analysis. The latest version offers improved accuracy and detection performance. |
| Language Support | Currently supports English. More languages will be added in future releases. |
| Watermark | Enable or disable the GlamAR watermark displayed on captured images. Disabling requires a premium plan. |
Face Scan Instructions
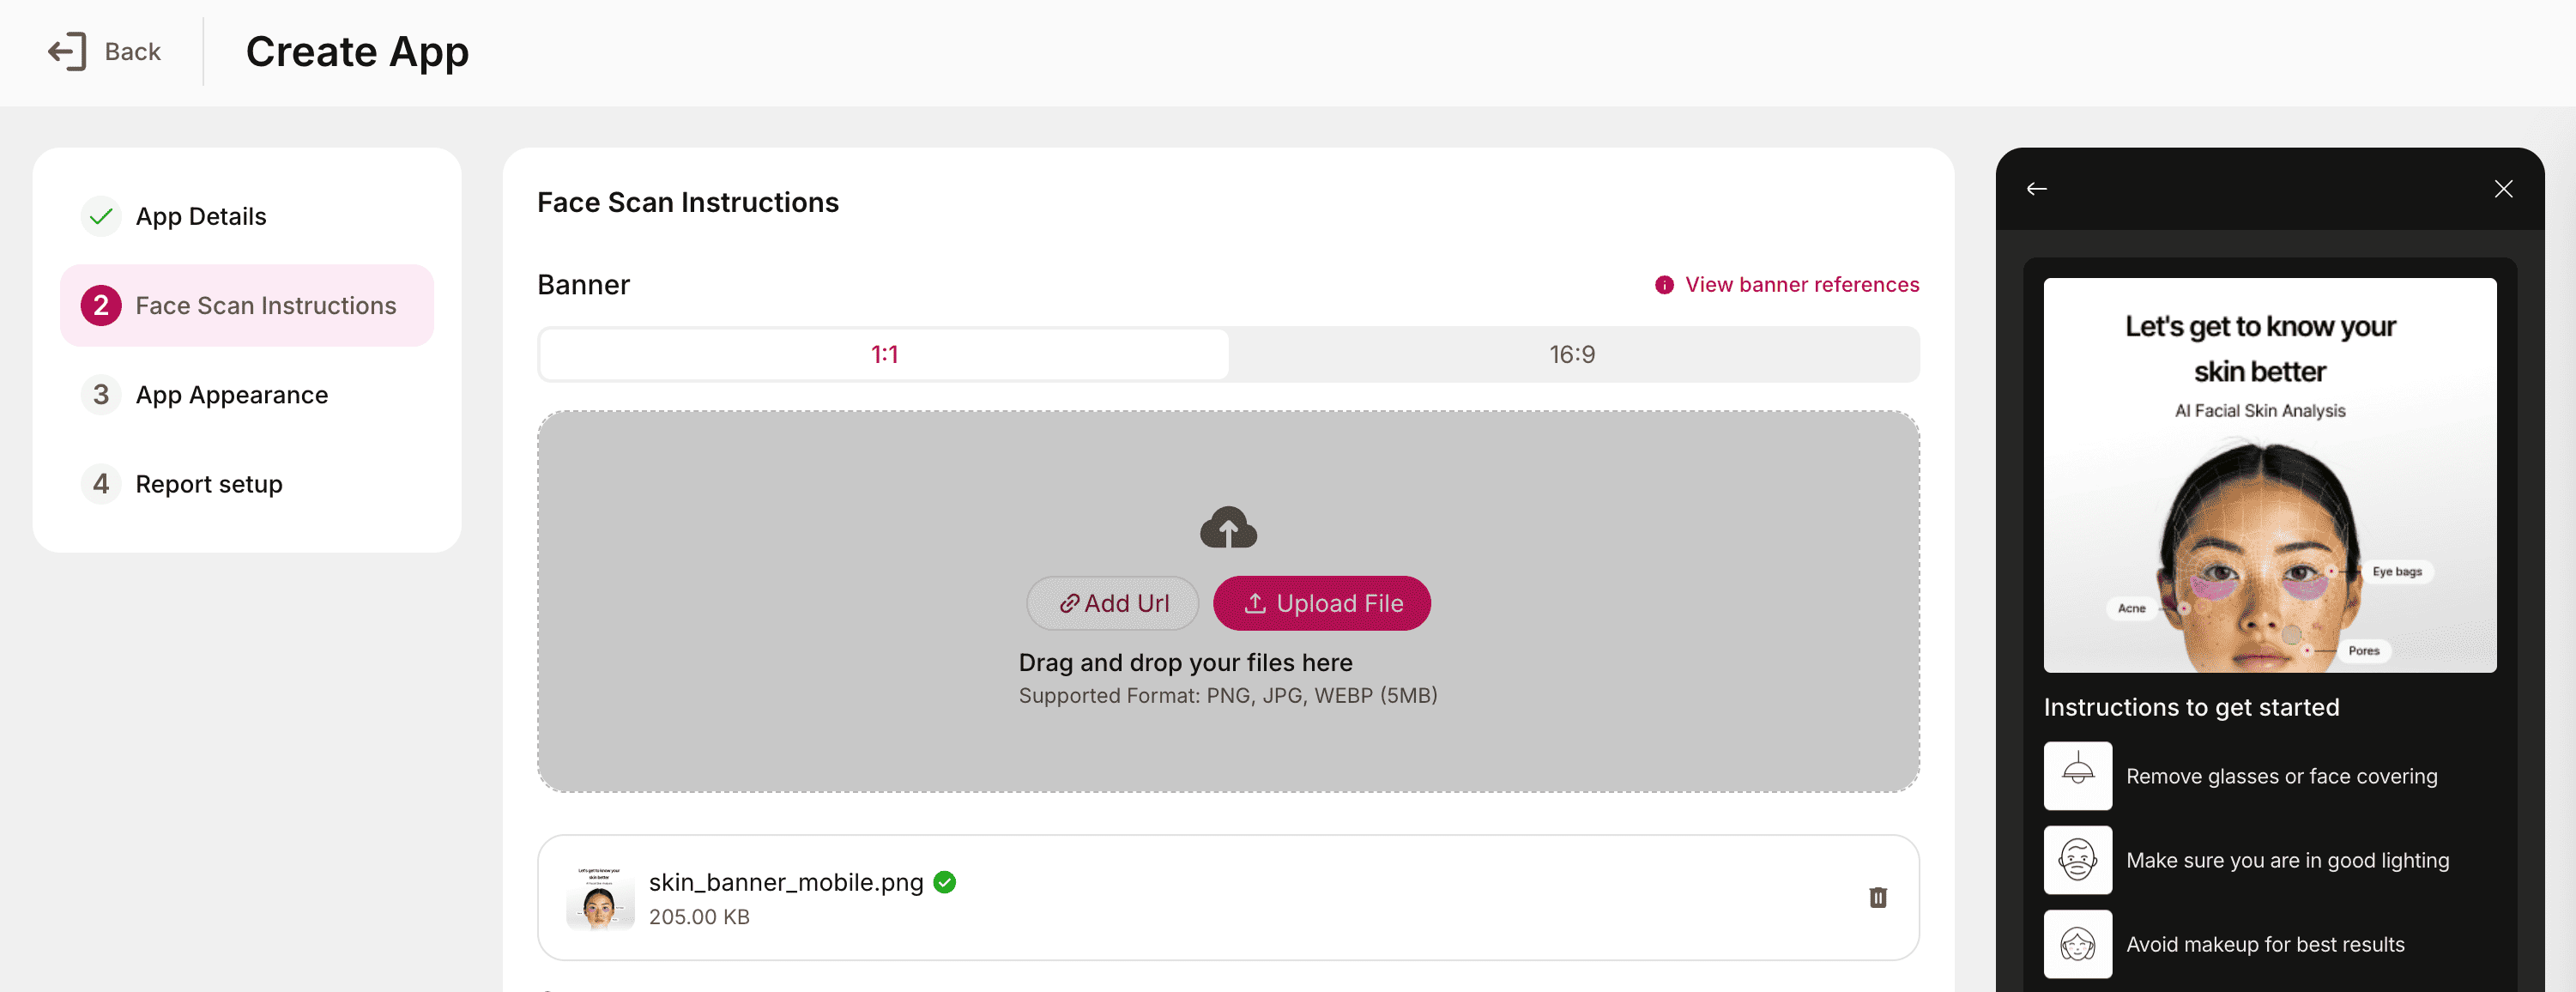
Once the settings under App Details are confirmed, click Next to proceed to the Face Scan Instruction section. This section allows you to customize the instructions and visuals displayed to users before they begin the face scanning process.
Banner
Allows you to customize the banner image displayed in the console window. You can replace the default banner with any image that aligns with your brand or personal preference.
Usage:
- Upload a new image file from one of the following methods:
- Add URL: Paste the direct link to the image.
- Upload File: Select an image from your device.
- Supported aspect ratios: 1:1 and 16:9.
- Supported formats: PNG, JPG, WEBM.
- Maximum file size: 5 MB.
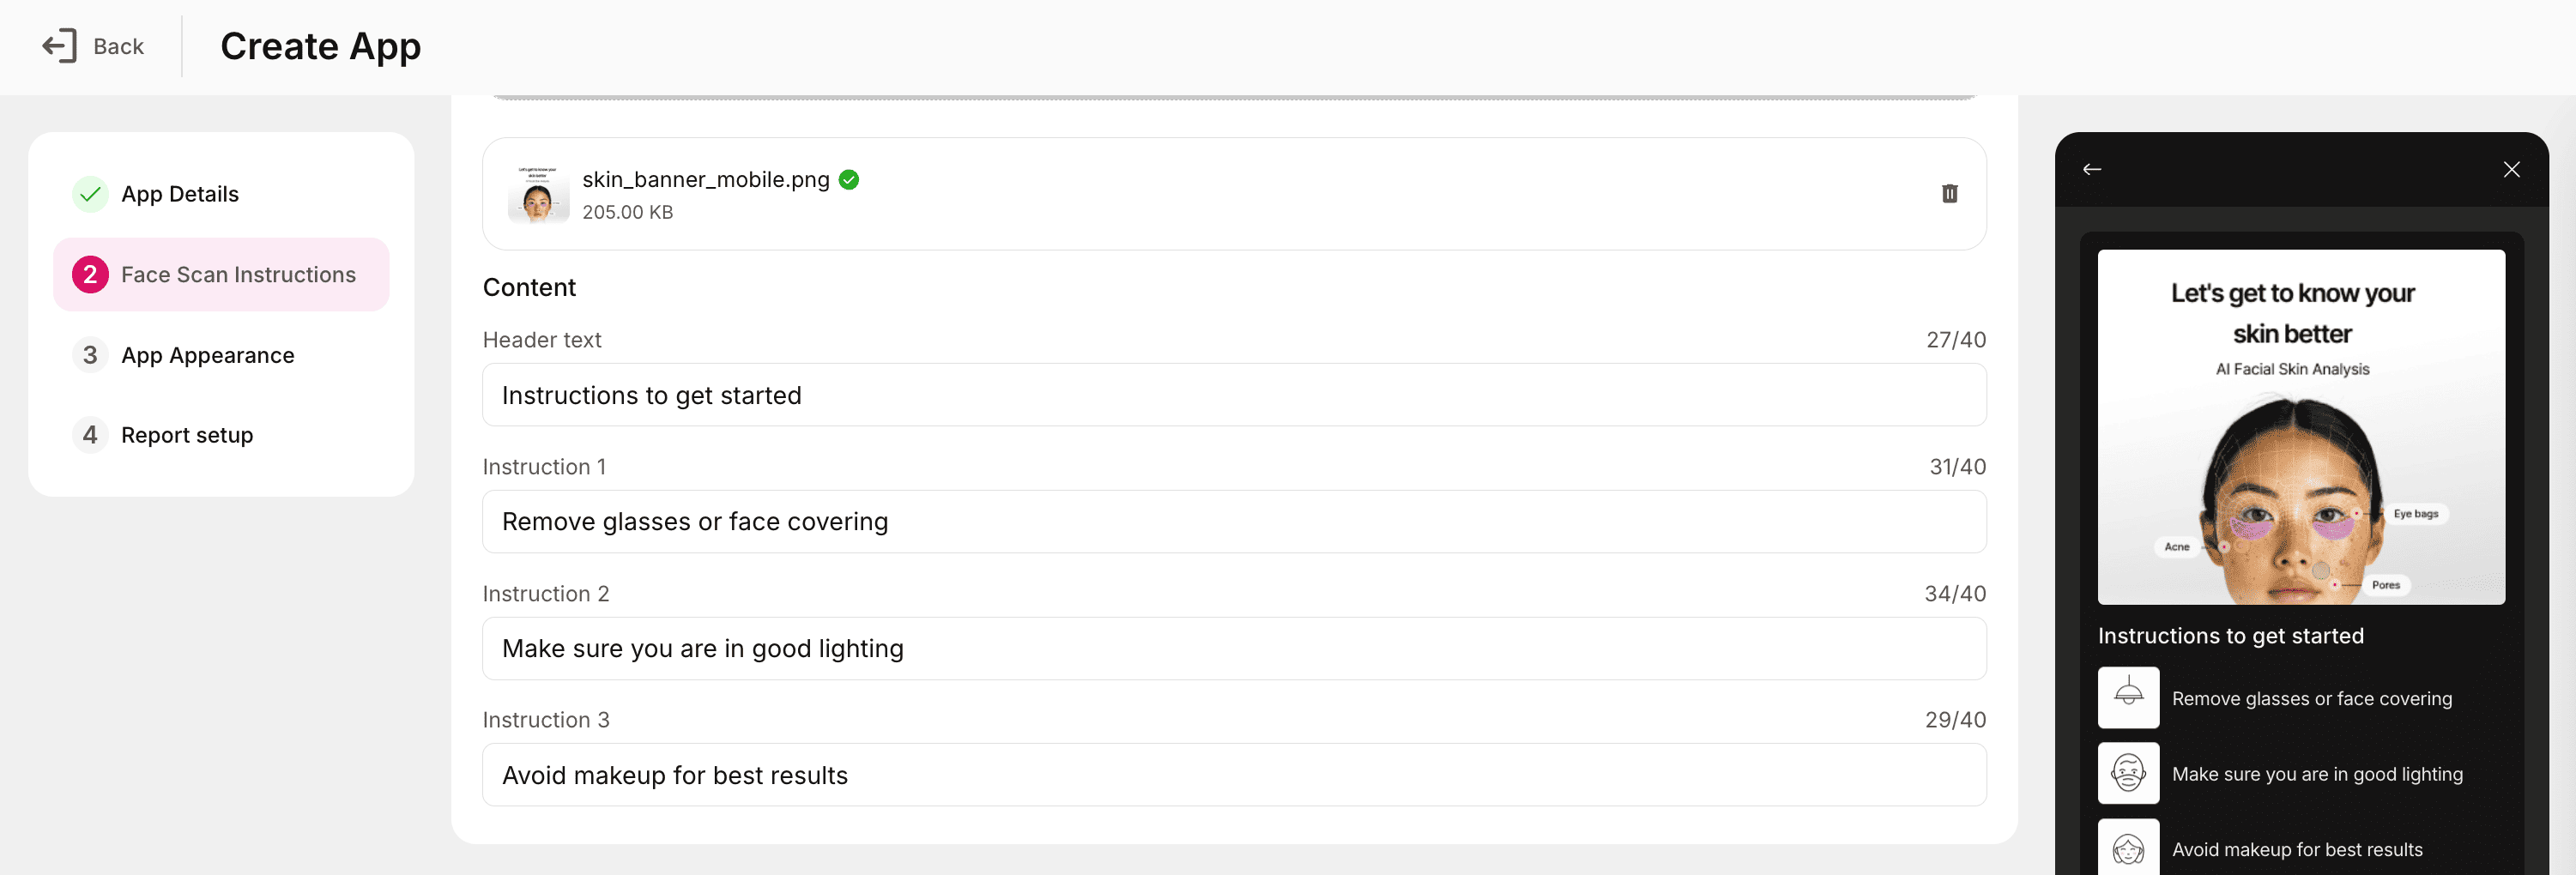
Content
The Content section defines the instructional text displayed to users before they begin the facial scan. This ensures that users understand how to position themselves and prepare for accurate skin analysis results.
Header Text
- The main heading displayed at the top of the instruction screen.
- Typically used to introduce the scanning process (e.g., “Prepare for Your Skin Scan”).
Instruction 1
- The first line of guidance or preparation instruction.
- Example: “Remove glasses or accessories that cover your face.”
Instruction 2
- Provides an additional guideline to improve scan accuracy.
- Example: “Ensure your face is well-lit and free from shadows.”
Instruction 3
- Offers further steps or tips.
- Example: “Avoid makeup for best results.”
Best practices:
- Keep instructions short, clear, and user-friendly.
- Use a consistent tone across all instruction lines.
- Prioritize lighting and positioning guidance, as these directly affect scan accuracy.
- Ensure the header text complements your app branding and aligns with the banner image selected earlier.
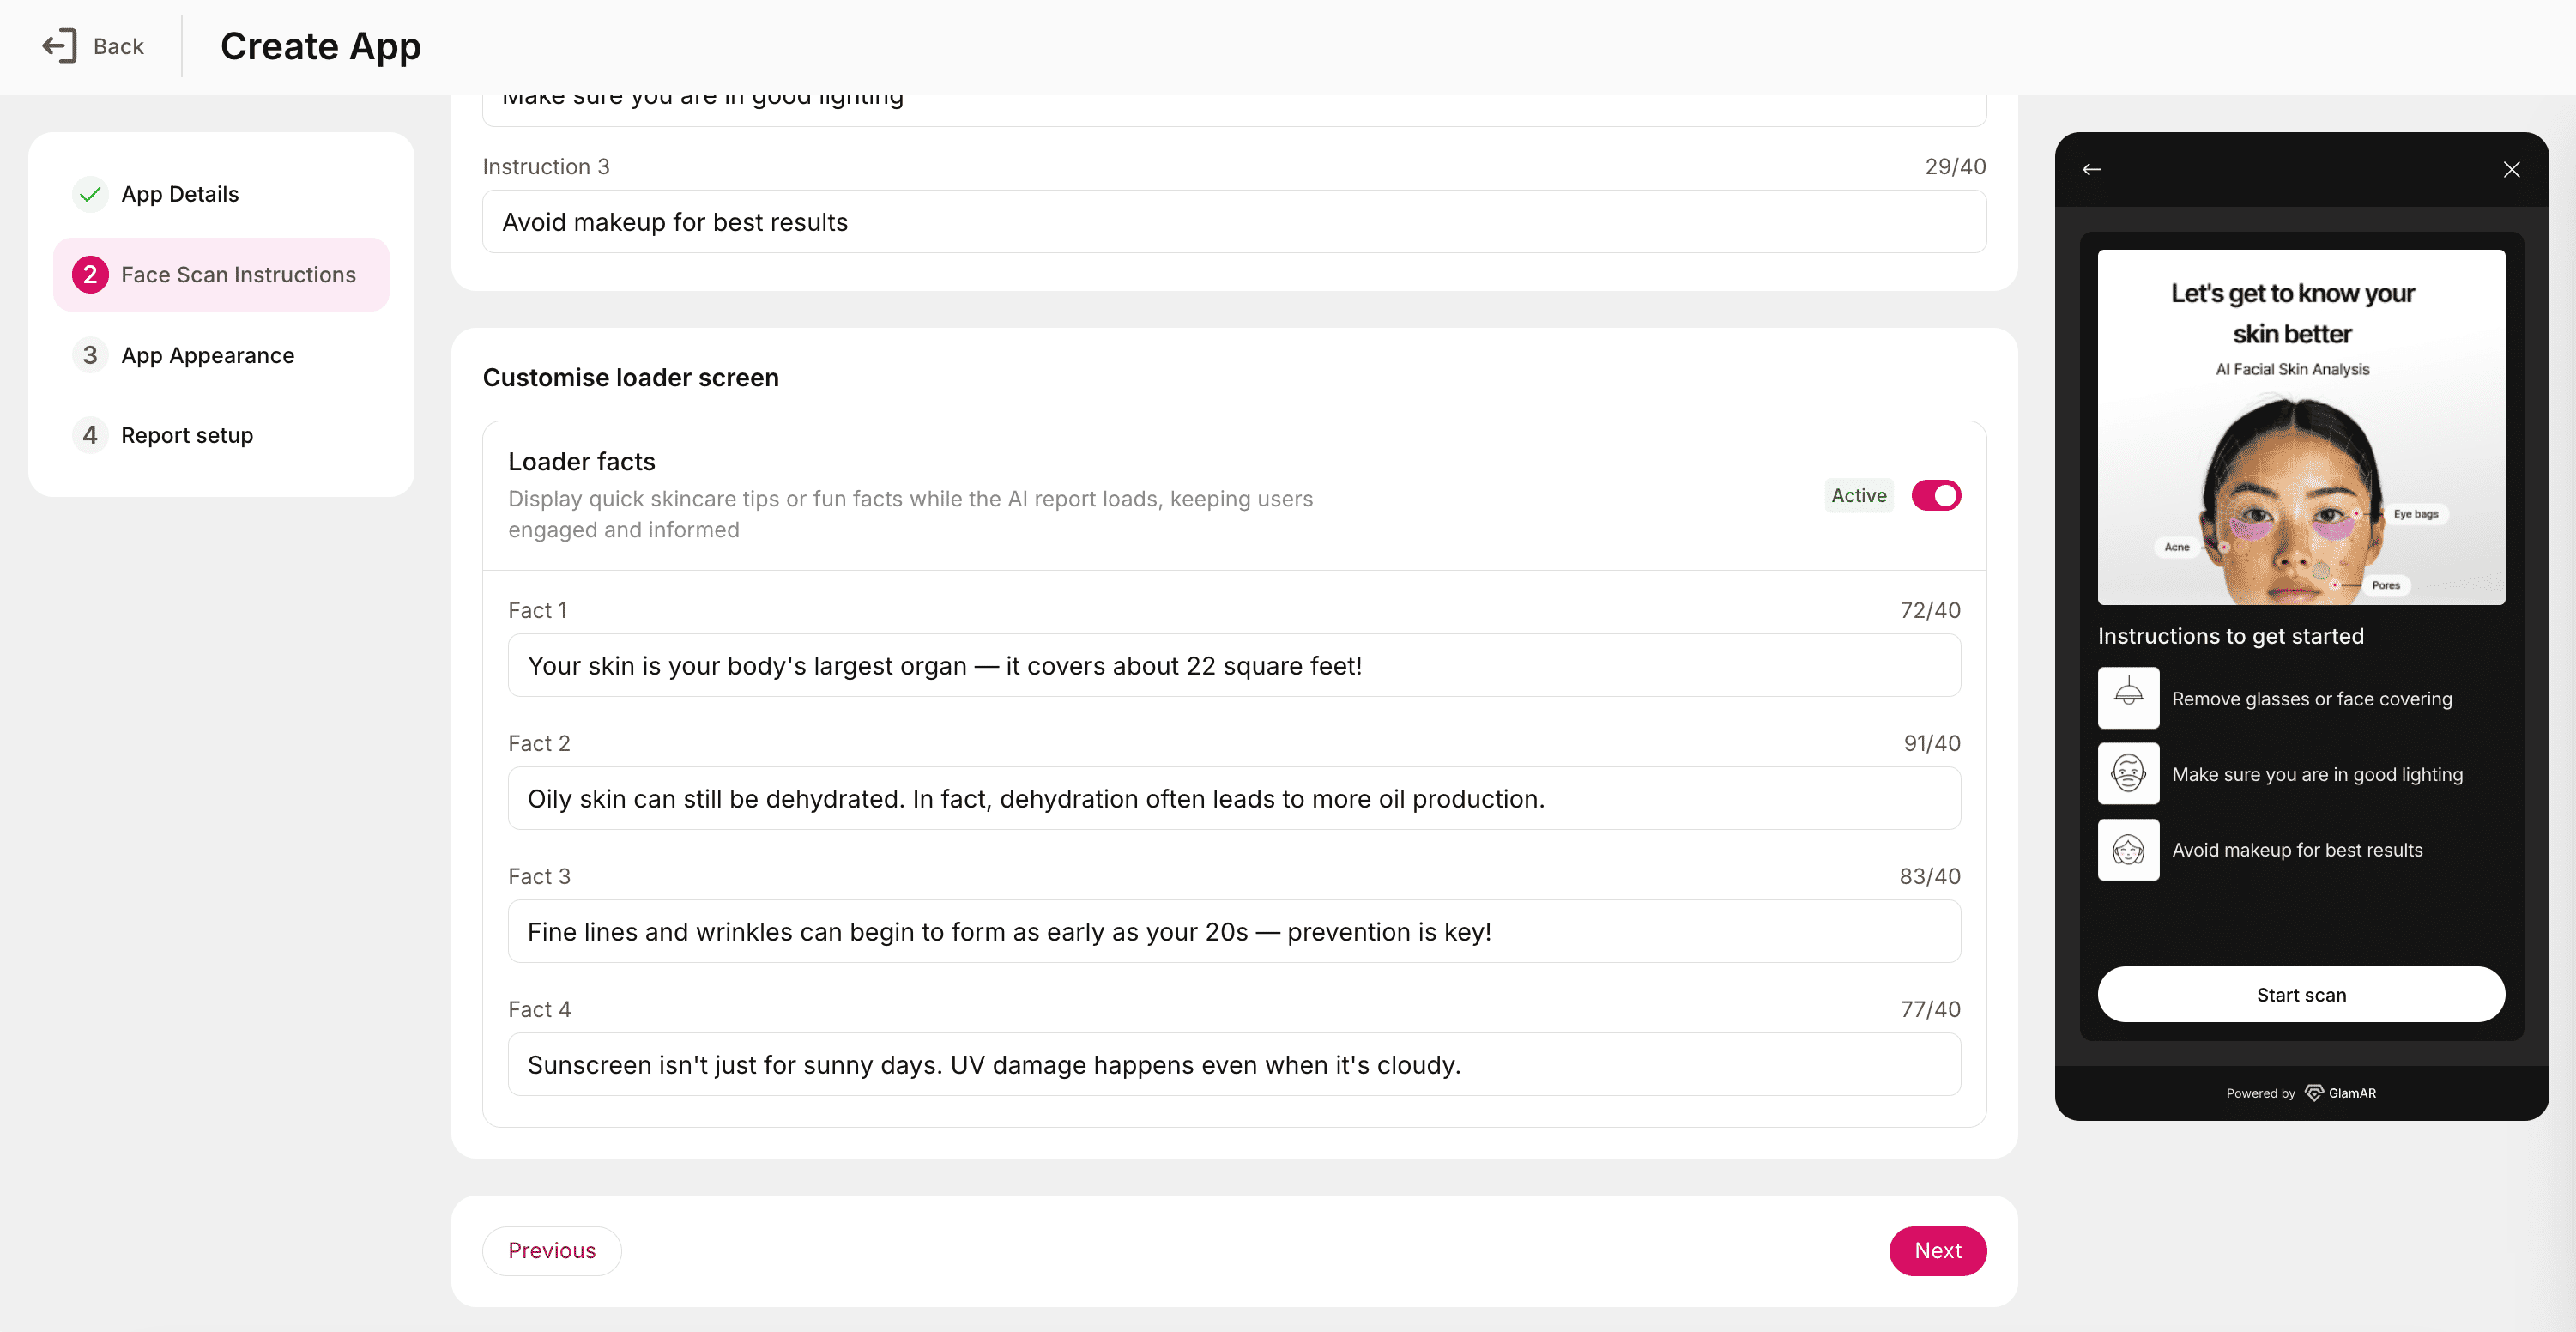
Customise loader screen
The Customise loader screen allows you to keep users engaged while the AI generates the skin analysis report. You can personalize this screen with quick tips or skincare facts that appear during the loading process.
Loader facts
The Loader facts feature displays short skincare tips or fun facts while the analysis report is being processed. These facts help maintain user engagement and deliver educational or brand-related insights during the loading phase. You can choose to enable or disable this feature based on your app’s design preferences.
You can define up to four custom facts to be shown randomly or sequentially while the analysis loads:
- Fact 1: The first tip or skincare fact displayed.
- Example: “Hydrate regularly—water is your skin’s best friend!”
- Fact 2: A second fun fact or insight.
- Example: “Sunscreen is essential even on cloudy days.”
- Fact 3: Add another helpful skincare tip.
- Example: “Regular exfoliation can improve skin texture.”
- Fact 4: Final fact or motivational line for users.
- Example: “A good night’s sleep keeps your skin glowing naturally.”
Best practices:
- Keep facts short, positive, and easy to read.
- Use this space to share brand tips, skincare facts, or promotional messages.
- Avoid overly technical content, this screen is meant to be light and engaging.
- Rotate facts occasionally to keep the experience fresh for returning users.
App Appearance
The App Appearance section controls the visual styling and user interface (UI) of your Skin Analysis app. These settings allow you to align the look and feel of the app with your brand guidelines or preferred design theme.
Typography
Available fonts:
- Inter
- Poppins
- Roboto
- Open Sans
- Lato
- Montserrat
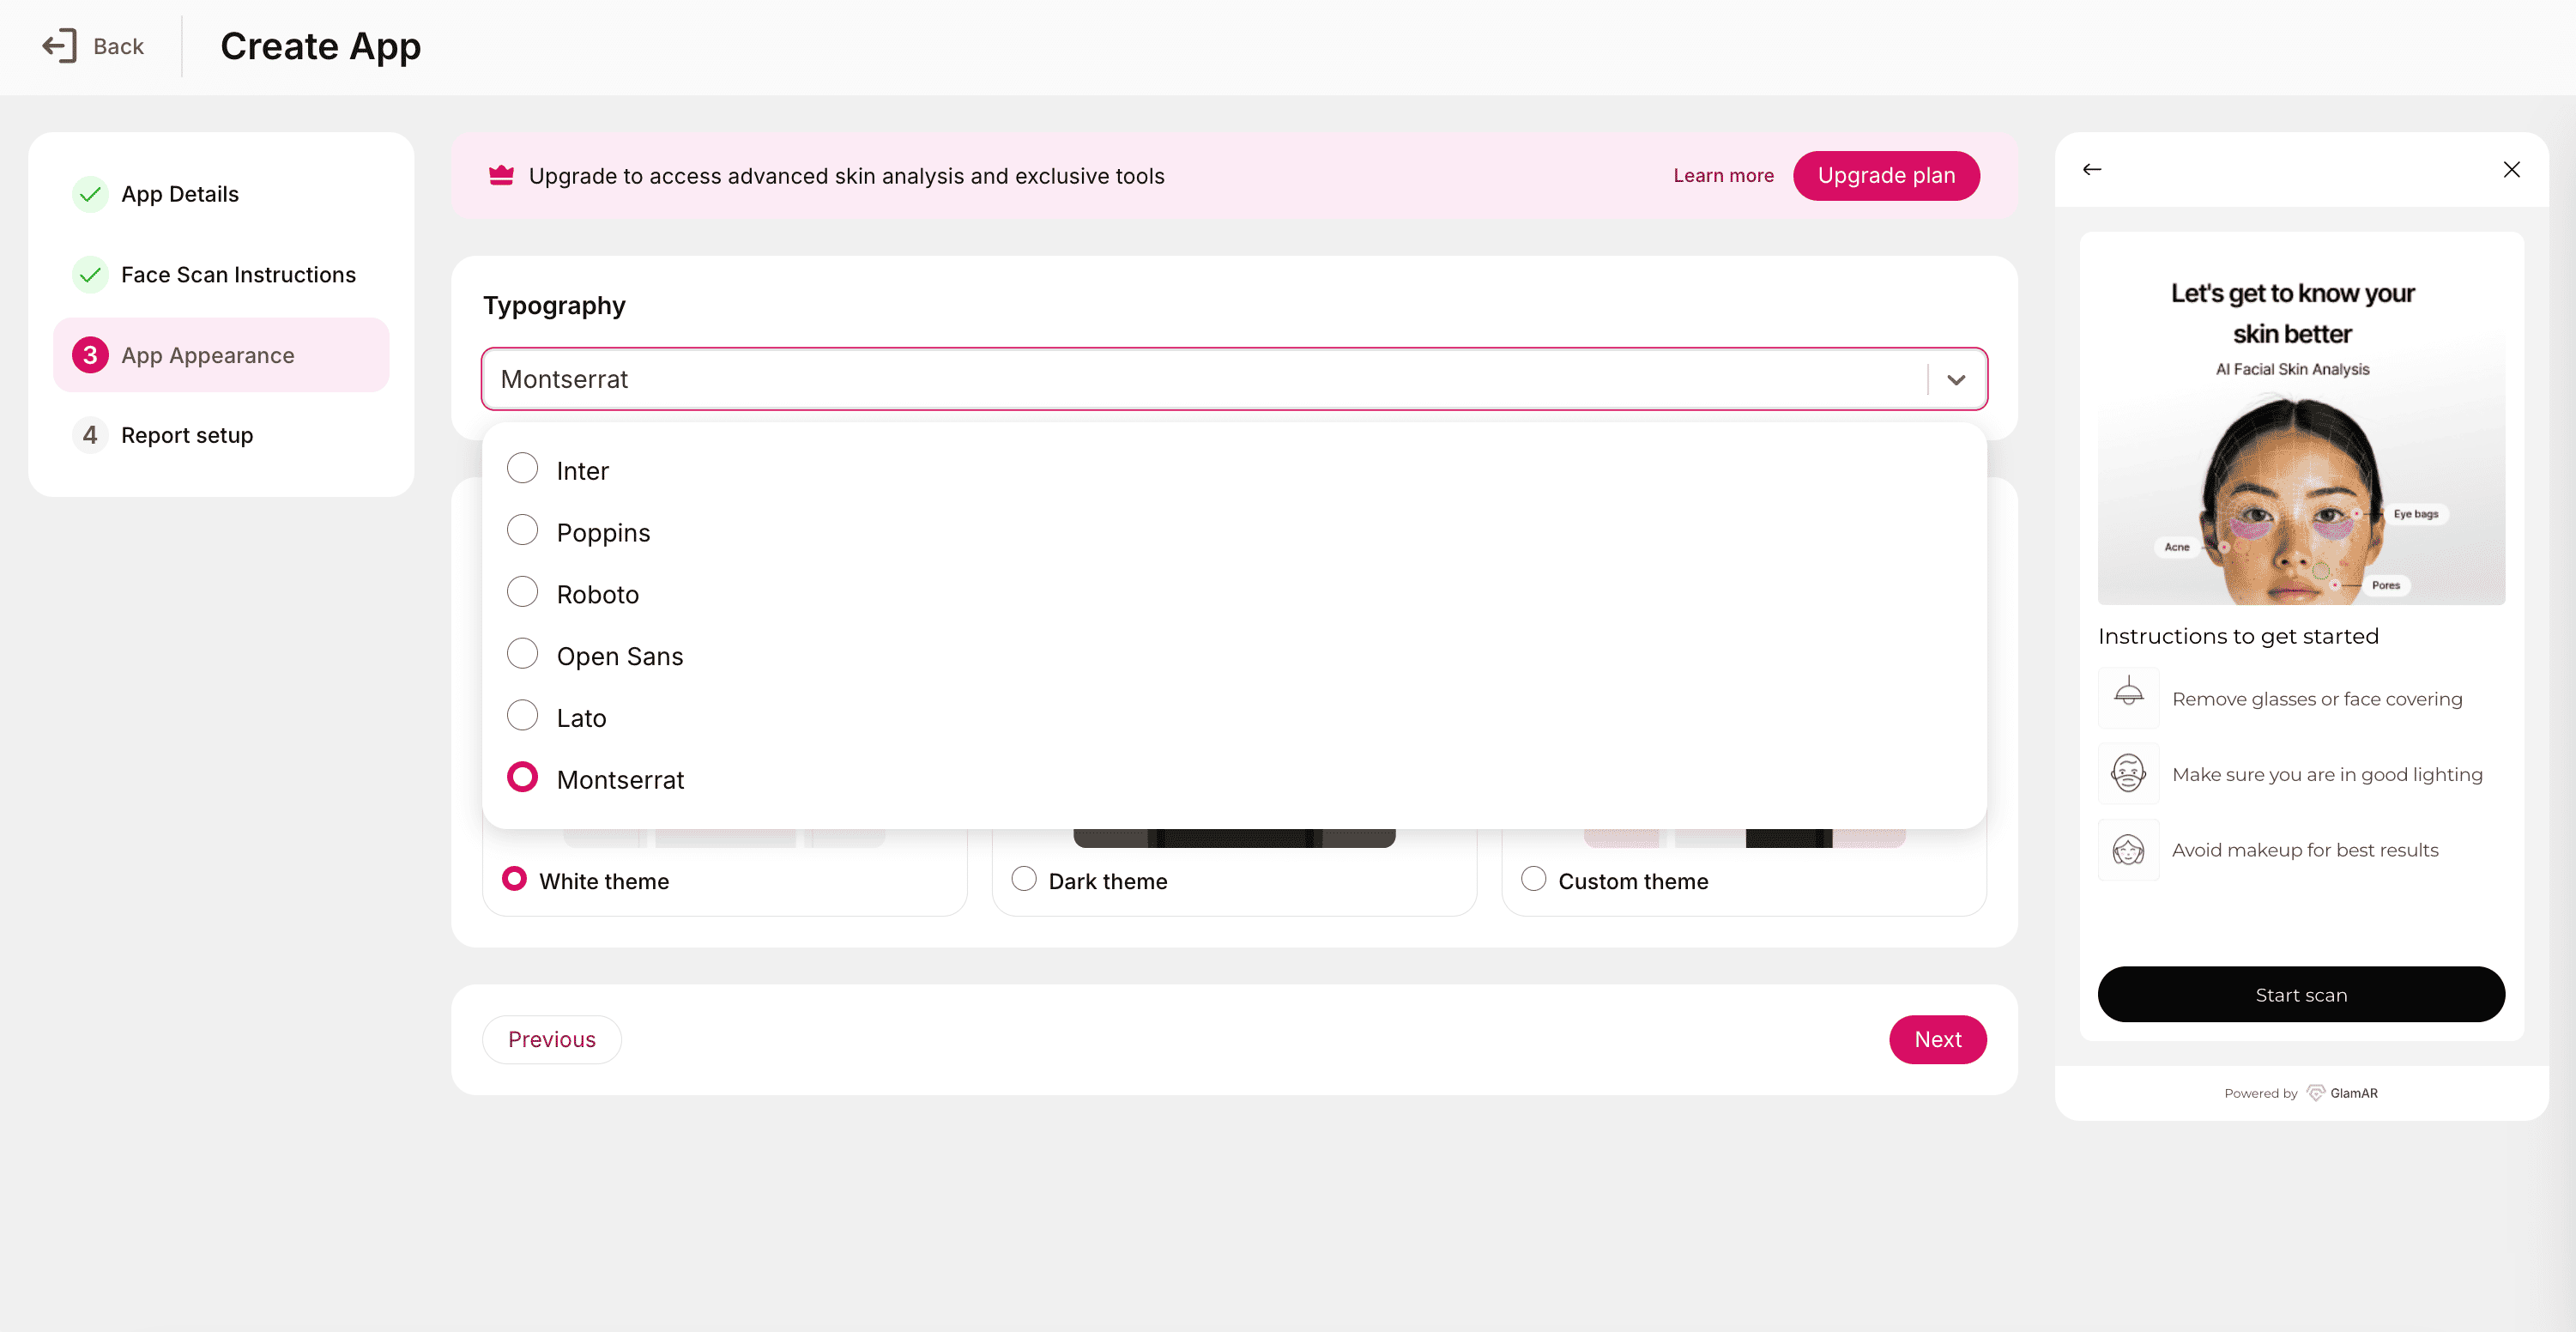
Usage notes:
- Select a font that complements your brand identity and ensures readability across devices.
- The chosen font applies globally across the app’s UI, including headers, instructions, and result screens.
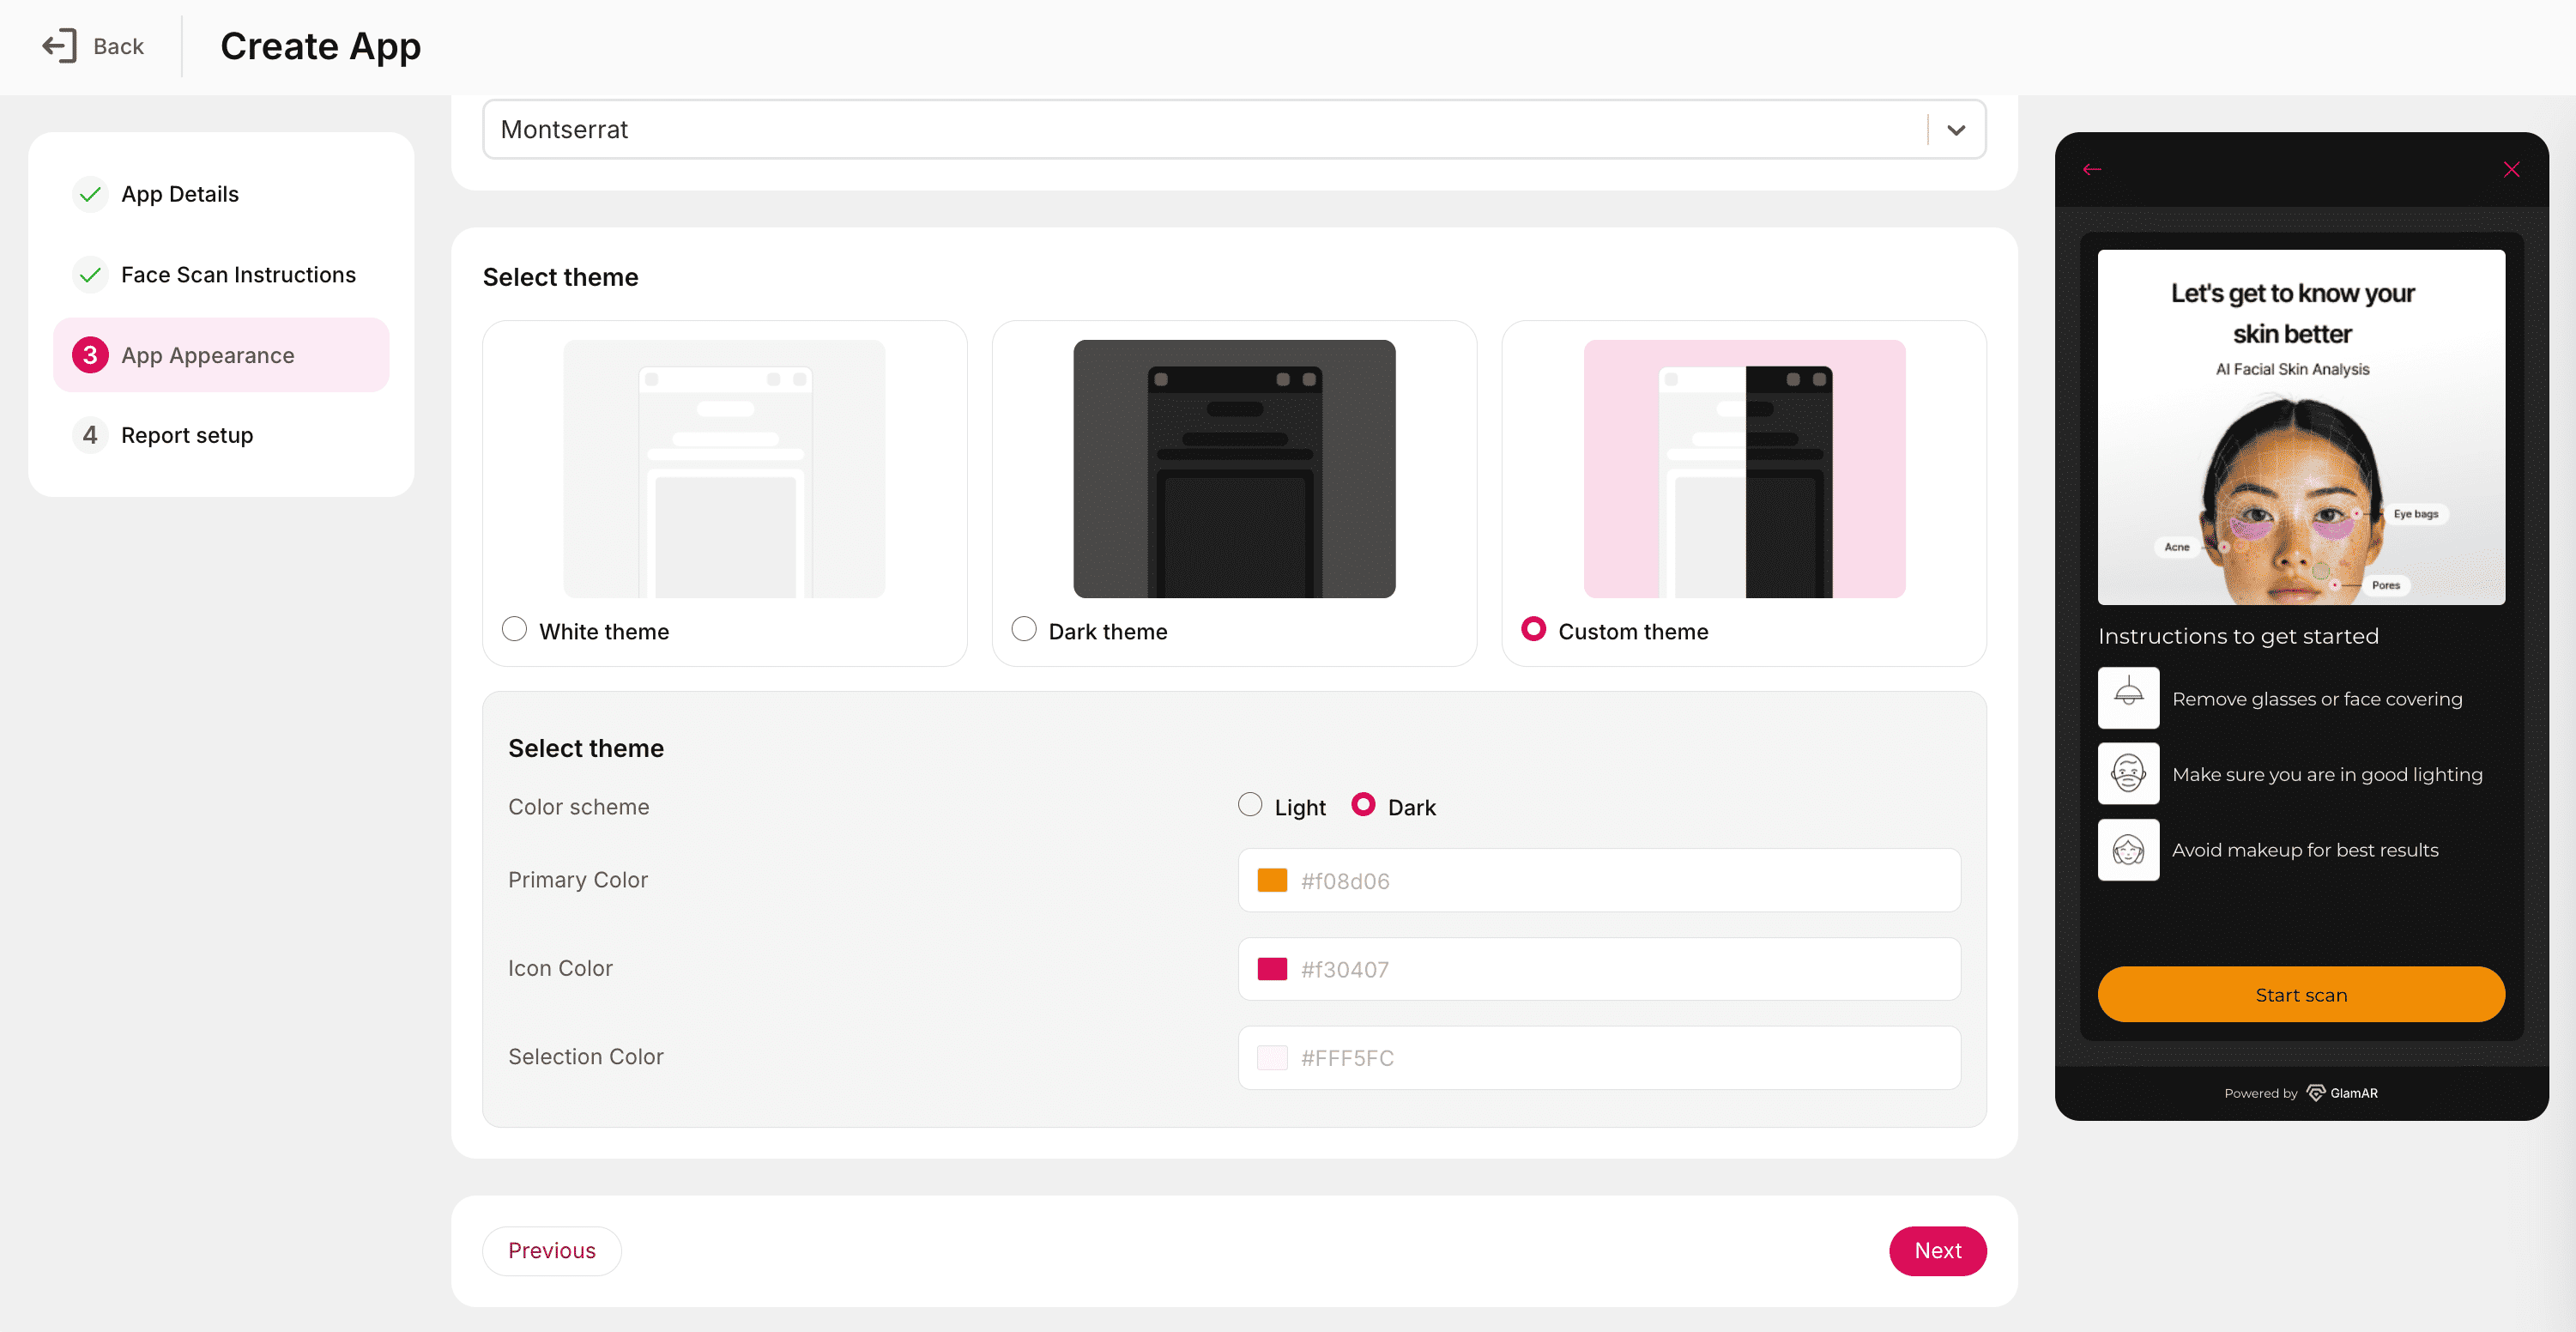
Select theme
Customize the app’s color scheme to control the overall visual aesthetic.
Available themes:
- White theme: A clean, light interface ideal for bright and neutral branding.
- Dark theme: A sleek, dark interface suitable for high-contrast, modern designs.
- Custom theme: Enables complete color customization for brand consistency.
If Custom theme is selected, you can modify the following:
- Primary Color: The dominant color used for highlights, buttons, and interactive elements.
- Icon Color: Defines the color of UI icons for better visibility and design harmony.
- Selection Color: Controls the color of selected elements, such as active buttons or toggles.
Best practices:
- Use your brand’s primary and accent colors to maintain visual consistency.
- Ensure sufficient contrast between text and background for accessibility.
- Preview changes across both light and dark modes to ensure readability in various environments.
Report setup
The Report setup section defines how user skin analysis reports are generated, customized, and presented. These settings let you tailor report visuals, included metrics, and advanced AI features to align with your app’s goals and user experience.
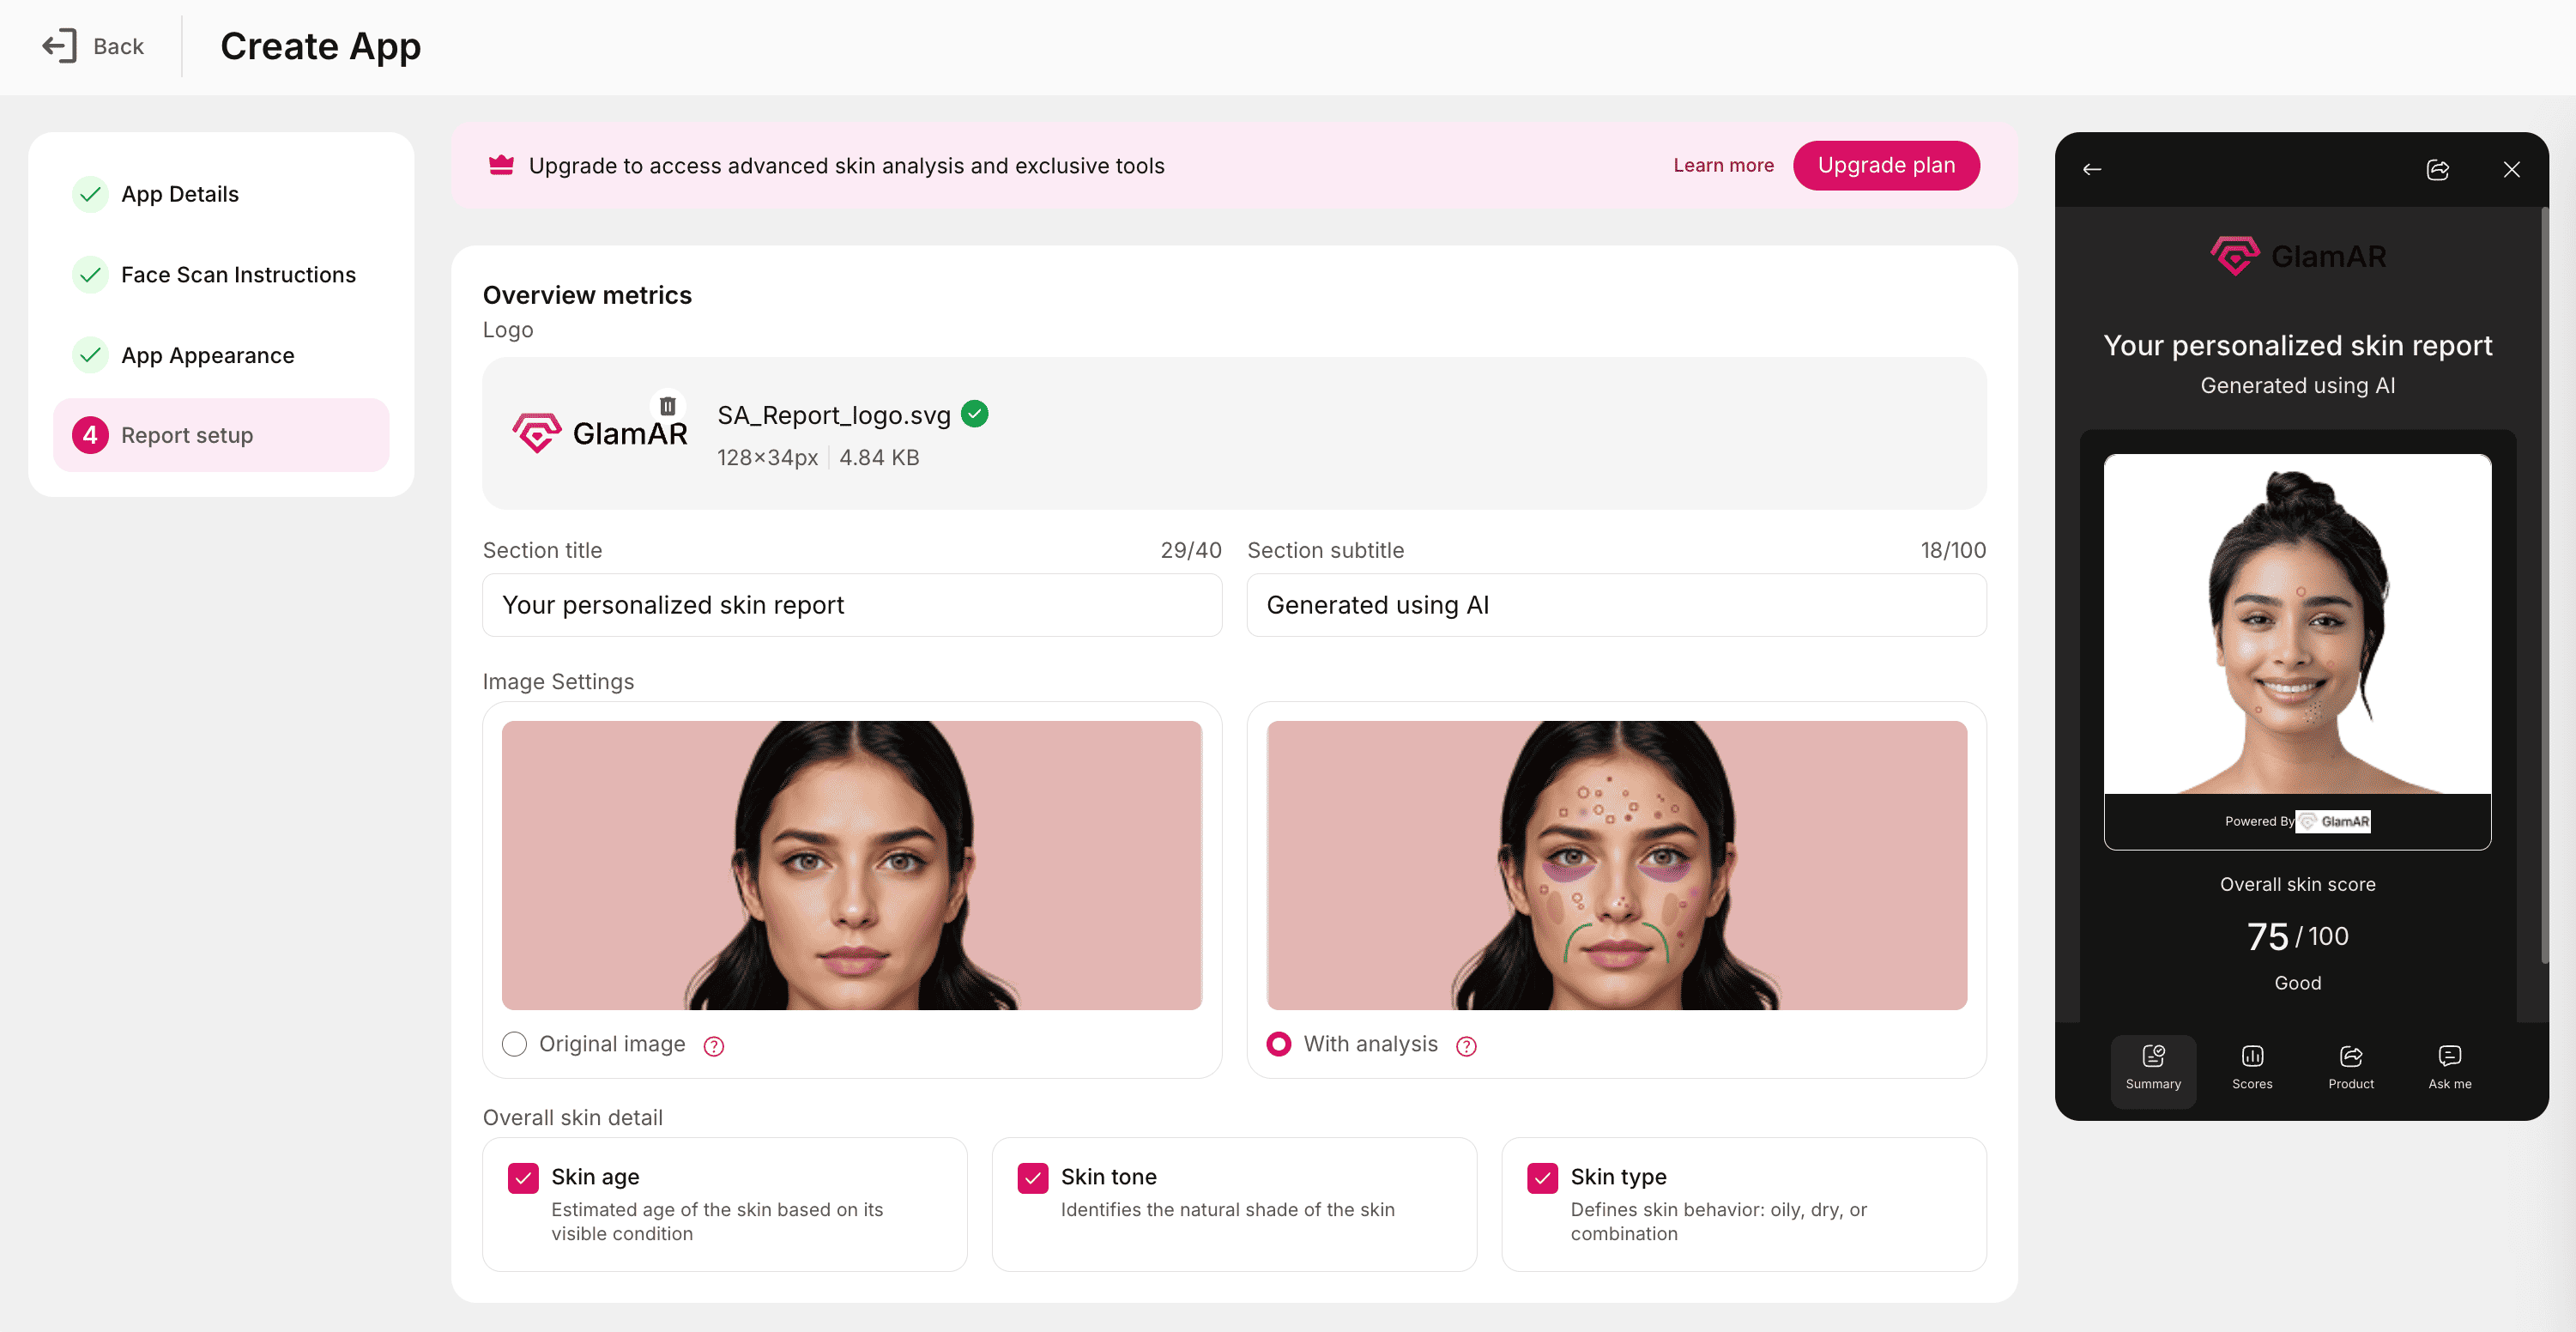
Overview metrics
This section controls the top portion of the report, the header and summary metrics displayed to users.
Logo:
- Upload your brand or clinic logo to display it at the top of the report.
- Helps personalize and brand the generated skin report.
- Supported formats: PNG, JPG, WEBP
- Maximum file size: 2 MB
Section title:
- Add a title for the overview section of the report.
- Character limit: 40
Section subtitle:
- Add a subtitle or short tagline that complements the title (e.g., “Your personalized skin health summary”).
- Character limit: 100
Image Settings:
Choose how the user’s captured image appears in the report:
- Original Image: Displays the unedited photo as captured by the user, without annotations.
- With Analysis: Shows the same image annotated with detected skin conditions for quick visualization of problem areas.
Overall skin detail:
You can choose which key metrics appear in the overview section. Select one or more of the following:
- Skin Age: Estimated biological age of the user’s skin based on its condition.
- Skin Tone: Identifies the user’s natural skin shade.
- Skin Type: Categorizes skin behavior as Oily, Dry, or Combination.
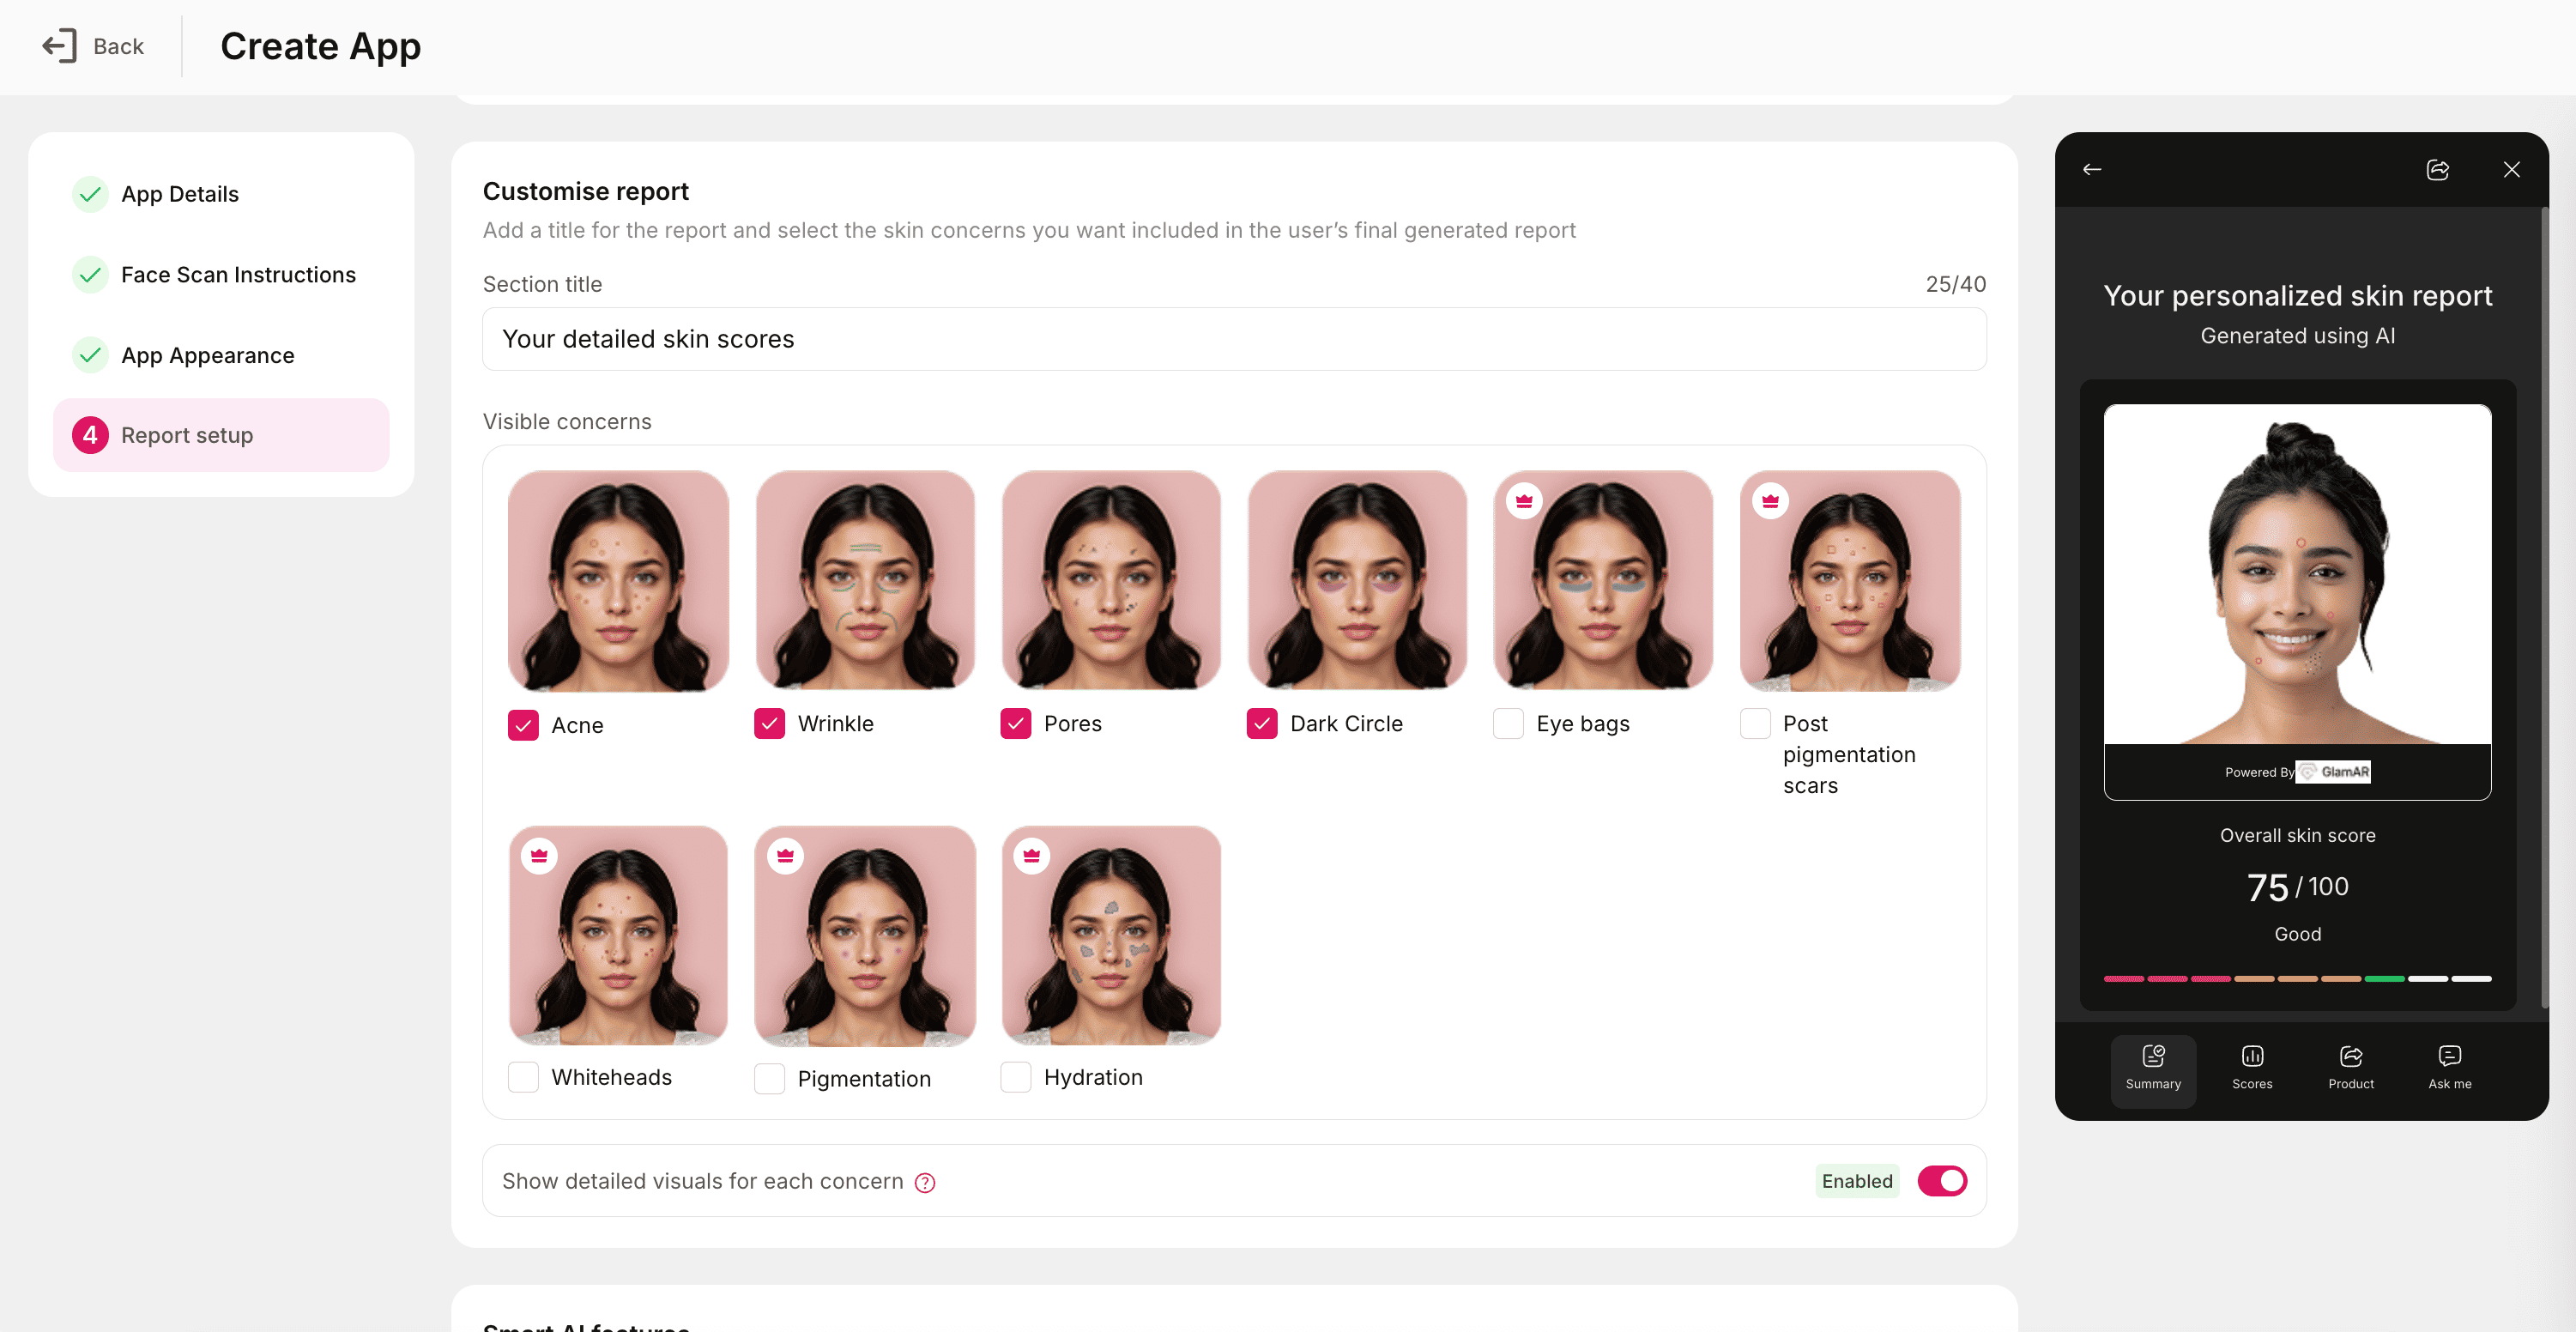
Customise report
This section determines which concerns and parameters are included in the user’s detailed report.
Section Title:
- Enter a title for the report section.
- Character limit: 40
Visible concerns:
Select the specific skin concerns to include in the generated report. Available options for Standard plan are:
- Acne
- Wrinkles
- Pores
- Dark Circles
Available options for Premium plan (for upgraded plan):
- Eye bags
- Post pigmentation scars
- Whiteheads
- Pigmentation
- Hydration
Note: Premium features are unlocked automatically when using an upgraded plan.
Show detailed visuals for each concern
- Enable or disable detailed annotated visuals for each detected skin concern.
- When enabled, the report highlights areas of concern directly on the user’s photo, offering a clear visual context.
Smart AI Features
Advanced AI features available under premium subscriptions enhance user engagement and personalization.
Future skin simulation
- Provides AI-based projections of how a user’s skin may change over time.
- Visualizes improvement or deterioration trends based on current conditions and lifestyle indicators.
Product recommendation
- Suggests personalized skincare products tailored to the user’s analysis results.
- Product data can be linked to your existing product catalog for seamless recommendations.
SkinGPT
- Enables an AI-powered virtual assistant to guide users through their results.
- Allows chat-style interactions to provide skincare advice, recommendations, and insights.

Best practices:
- Keep titles and subtitles concise to maintain visual clarity in reports.
- Always verify visible concerns and AI features before publishing the report configuration to ensure compatibility with your plan level.
- Regularly review updates to the Algorithm Version to benefit from improvements in detection accuracy and report quality.
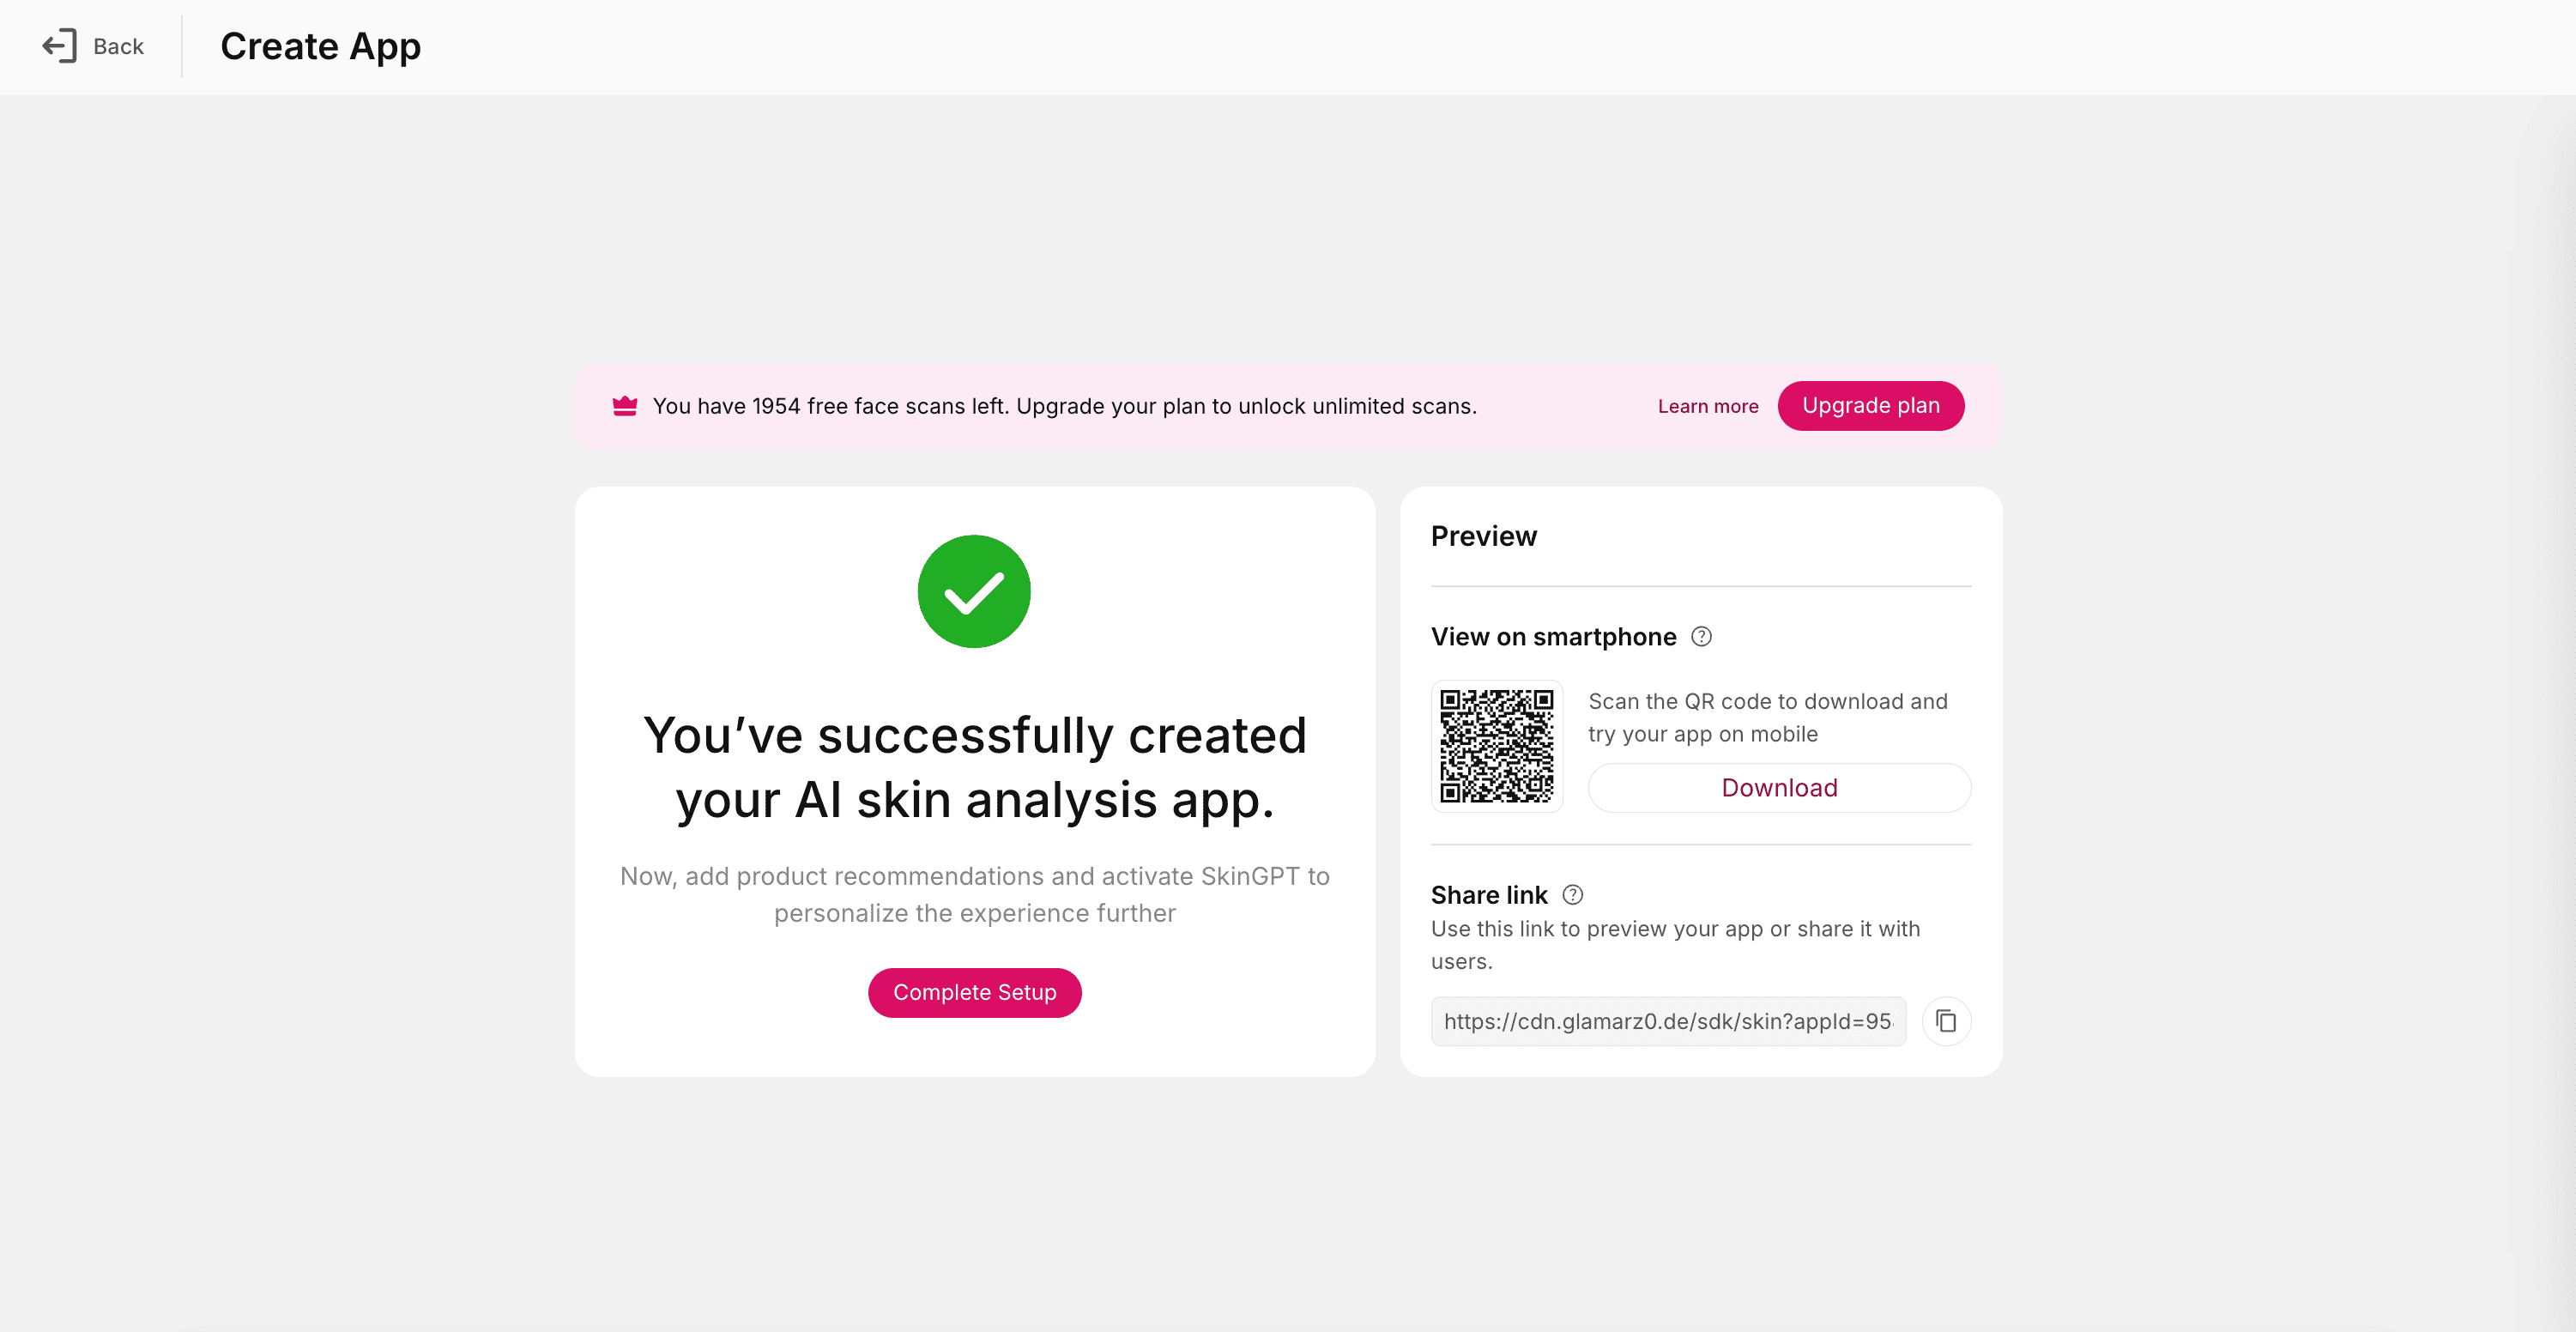
Final step: Create app
Once all configurations under App Details, Face Scan Instructions, App Appearance, and Report Setup are completed, click the Create app button to finalize your Skin Analysis app.
This window provides two convenient ways to preview and share your app:
View on Smartphone
- A QR code is generated for quick testing.
- Scan the QR code using your smartphone camera to instantly open and preview the app on your mobile device.
- This allows you to verify performance and design on smaller screens before publishing or sharing.
Share Link
- A shareable URL is also displayed.
- Click or copy this link to open the app in your browser or share it with others for testing, feedback, or collaboration.
- The share link behaves the same way as mentioned in the Managing Existing Apps section, allowing easy distribution for demos or client previews.
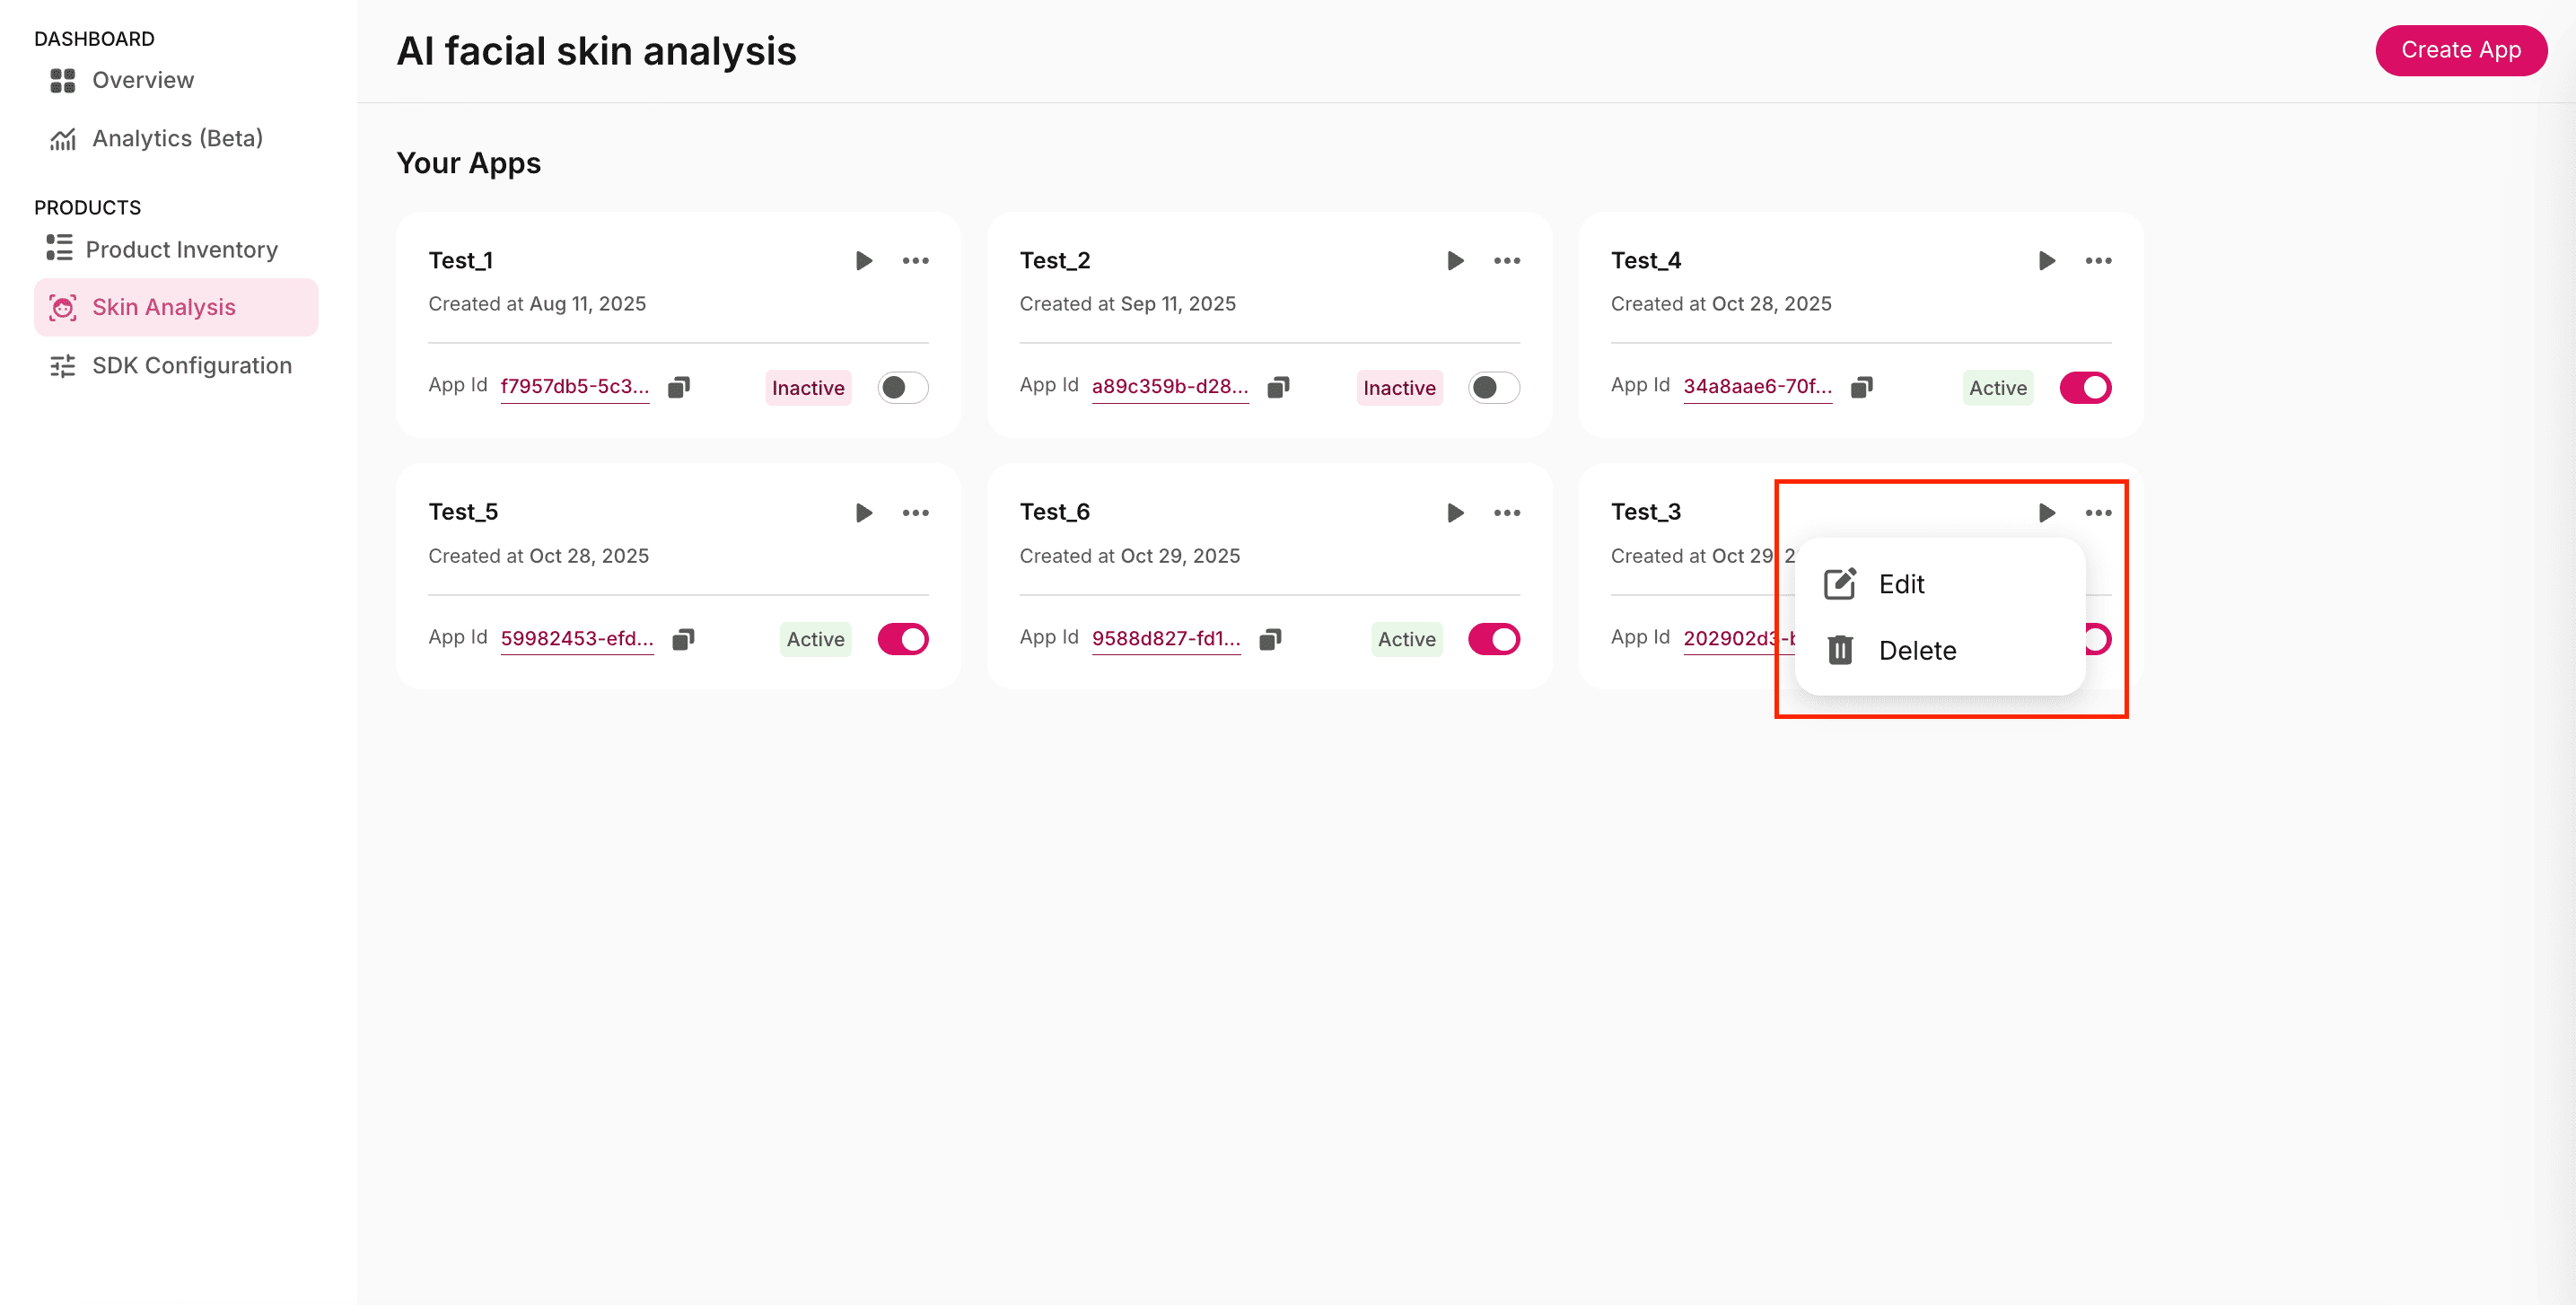
Managing Existing Apps
This section provides tools to view, edit, and maintain your created AI Facial Skin Analysis apps. From here, you can access app configurations, manage SDK settings, enable advanced features such as recommendations. Each app card under Your Apps offers quick actions which let you preview, edit, or delete apps.
- Preview (▶): The Preview feature allows you to test and experience your Skin Analysis app before deploying or sharing it publicly. It helps verify the app’s functionality, flow, and report generation process in real-time.
When you click the Preview (▶) button on any app card, a popup window appears with two options for accessing the app:- View on Smartphone: A QR code is automatically generated. Scan this QR code using your smartphone’s camera to open and test the app directly on a mobile device. This lets you simulate the end-user experience, perform a live skin analysis, and review how reports are generated on smaller screens.
- Using Share Link: A shareable URL is also displayed in the same window.
You can use this link to preview the app in a web browser or share it with team members, testers, or clients for review.
Clicking the link launches the Skin Analysis app, allows users to start a facial scan, analyze results, and generate a full Skin Analysis report.
- Options (⋯): Each app card in the Your Apps section includes an ellipsis (⋯) menu in the top-right corner. Clicking this icon opens a list of management actions that let you modify or remove your Skin Analysis apps:
- Edit: Modify app configurations such as data storage, report parameters, or recommendations. We’ll discuss editing apps in detail in the next section.
- Delete: Permanently remove the app from your account. Once deleted, the app and its associated configurations cannot be recovered.
- App activation status: Each app card includes a status toggle to mark the app as Active or Inactive. Active apps display an Active label and are available for preview, testing, and sharing. Inactive apps display an Inactive label and are temporarily disabled.
You can toggle an app’s status anytime to control its availability without deleting it.
Note: Use activation toggles to manage which apps are live for testing or client demos.
Editing the App
This section allows you to view, manage, and modify configurations, reports, and other advanced settings associated with the selected Skin Analysis app.
Subjects
The Subjects tab displays a list of scanned reports generated through your Skin Analysis app. Each report corresponds to a unique user scan, identified by a Subject ID.
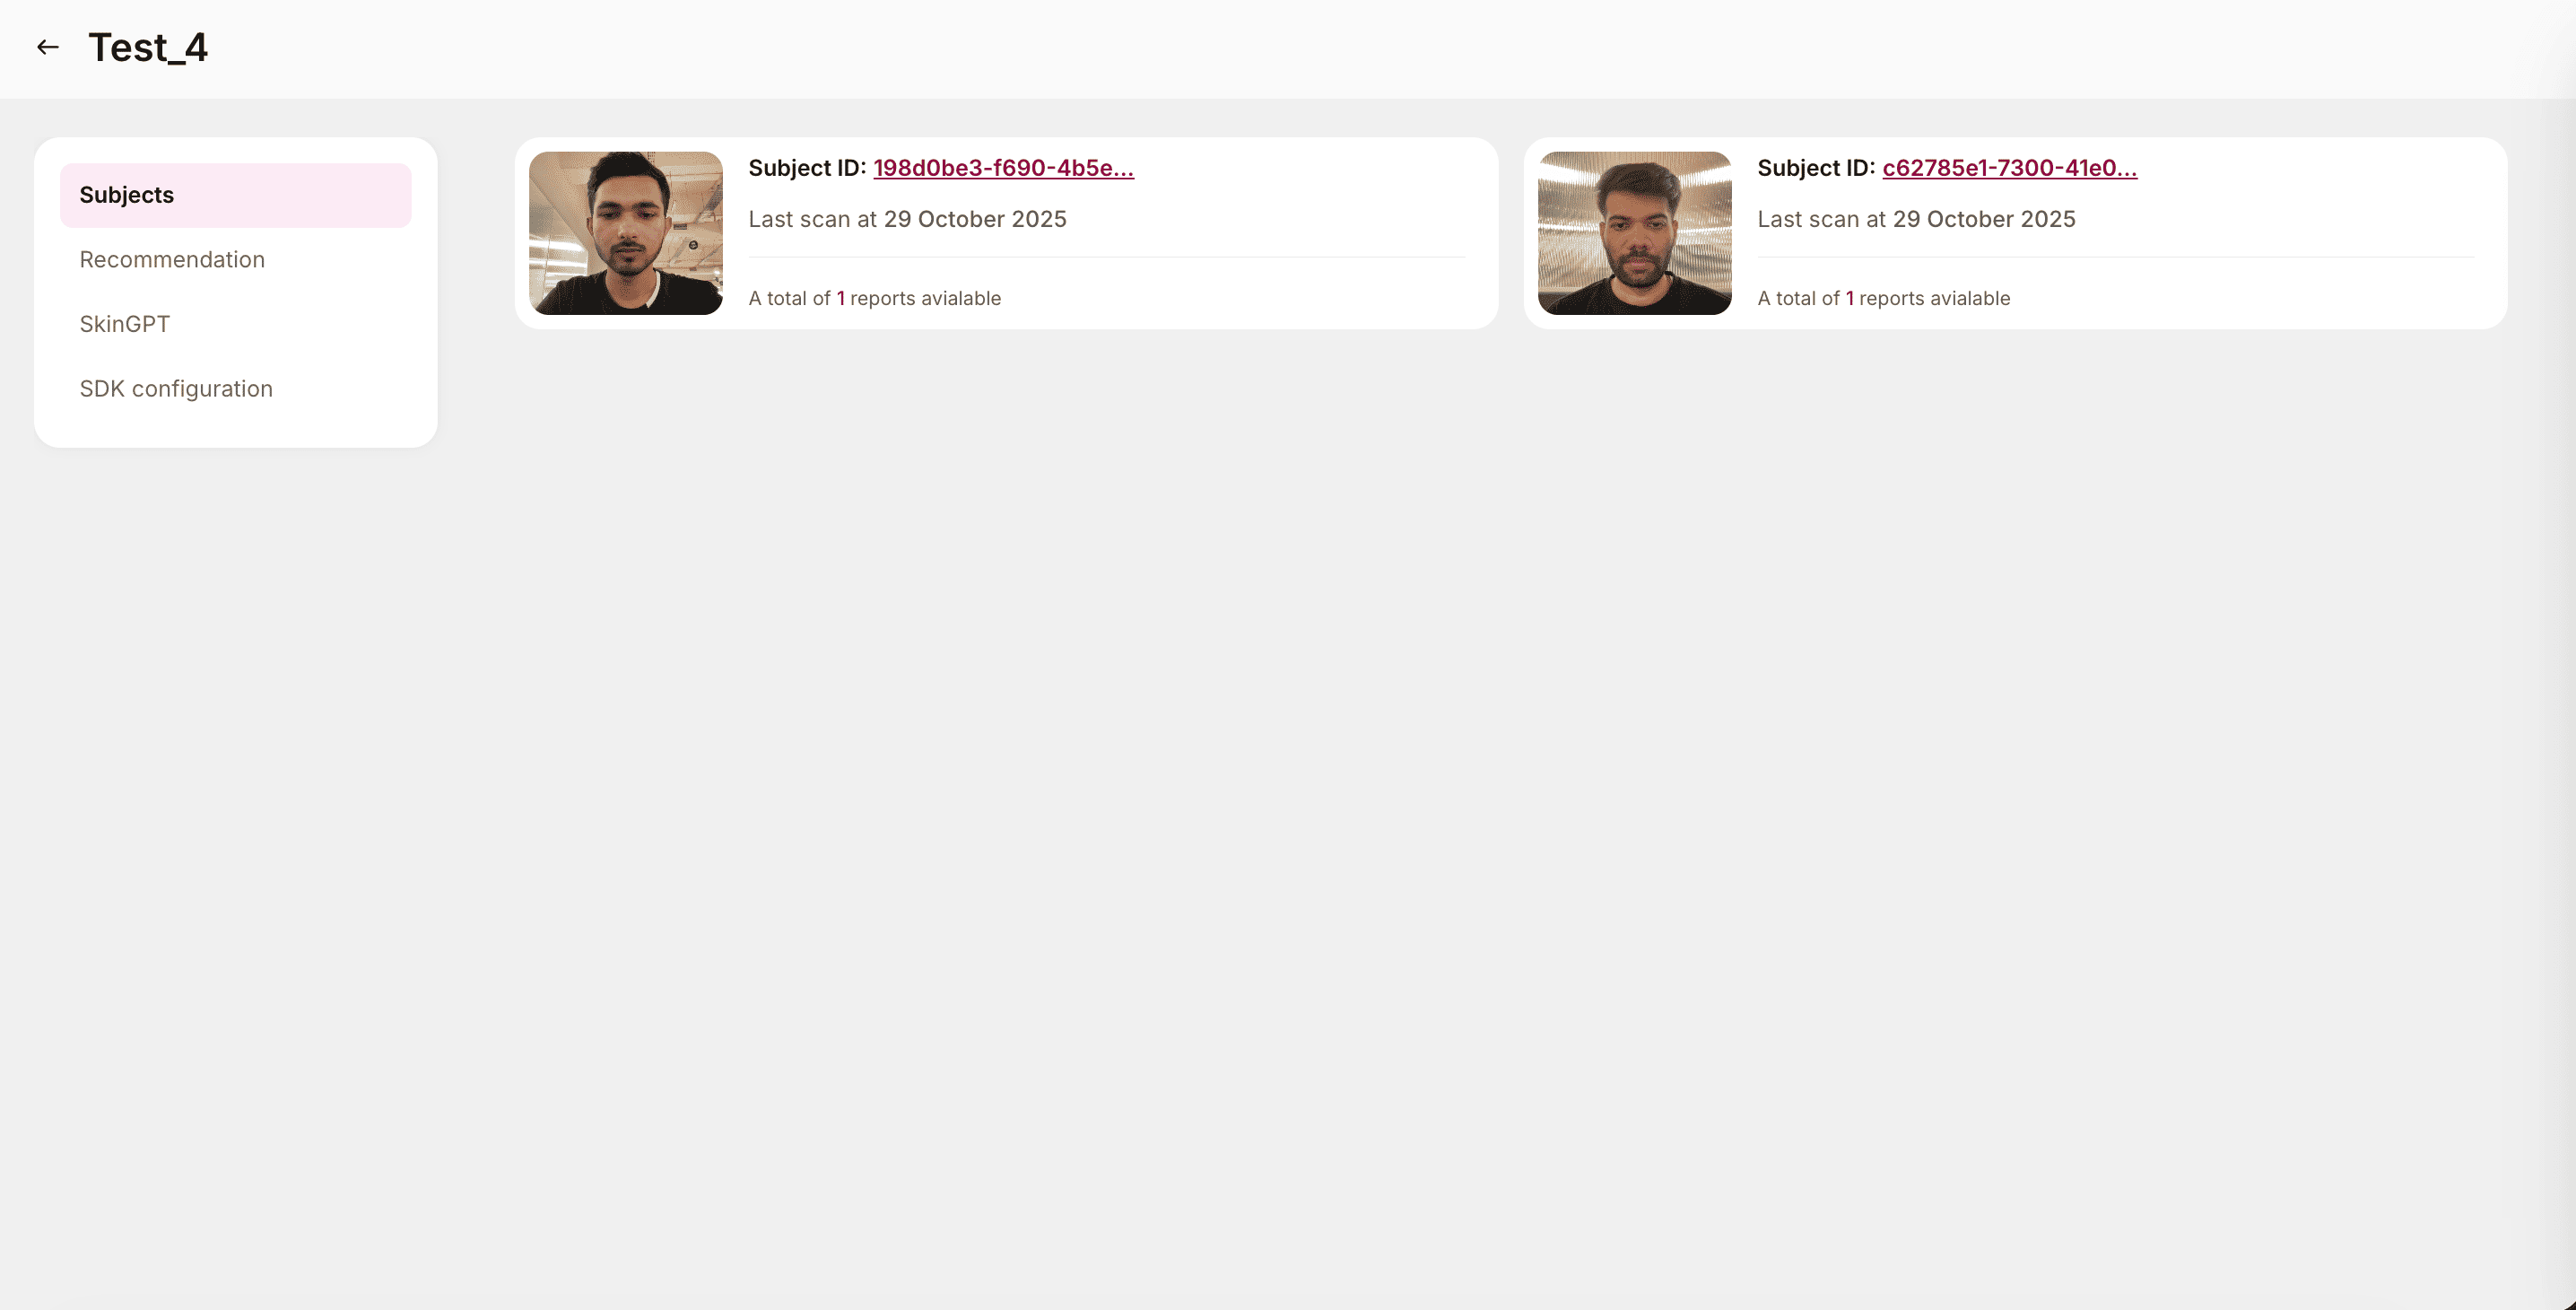
Viewing reports:
- The list of reports is organized by subjects, with each entry shown as a report card.
- Click on any report card or the Subject ID to open and view the detailed Skin Analysis Report.
- The report includes detailed metrics, detected skin conditions, annotated images, and other analytical data for that specific scan.
Downloading reports:
- Within each report card, users have the option to download the complete report.
- The downloaded report can be used for offline reference, sharing with clients, or internal review.
- Reports are typically exported in a standard format (e.g., PDF) that includes all selected report parameters and visuals configured earlier in the Report Setup section.
Deleting reports:
- To remove a report, click the bin icon located at the top-right corner of the respective report card.
- A confirmation dialog will appear before deletion. Once confirmed, the report is permanently deleted and cannot be recovered.
Recommendation
The Recommendation module acts as a curated product mapping system, linking skin issues to relevant products. Once configured, GlamAR’s AI model analyzes skin parameters (like acne, wrinkles, and pores) and returns tailored product suggestions directly in the final skin analysis report.
Additionally, you can import product data in bulk to streamline setup and make sure that recommendations remain accurate and comprehensive.
Importing Product Data
You can populate product recommendations in two ways:
-
CSV Upload (currently supported)
- Click the Import button to upload a CSV file containing product details.
- A file selection window will appear, select the file from your device.
- The system will validate the data and populate the table.
- Supported File Type: CSV
- Maximum File Size: 5 MB
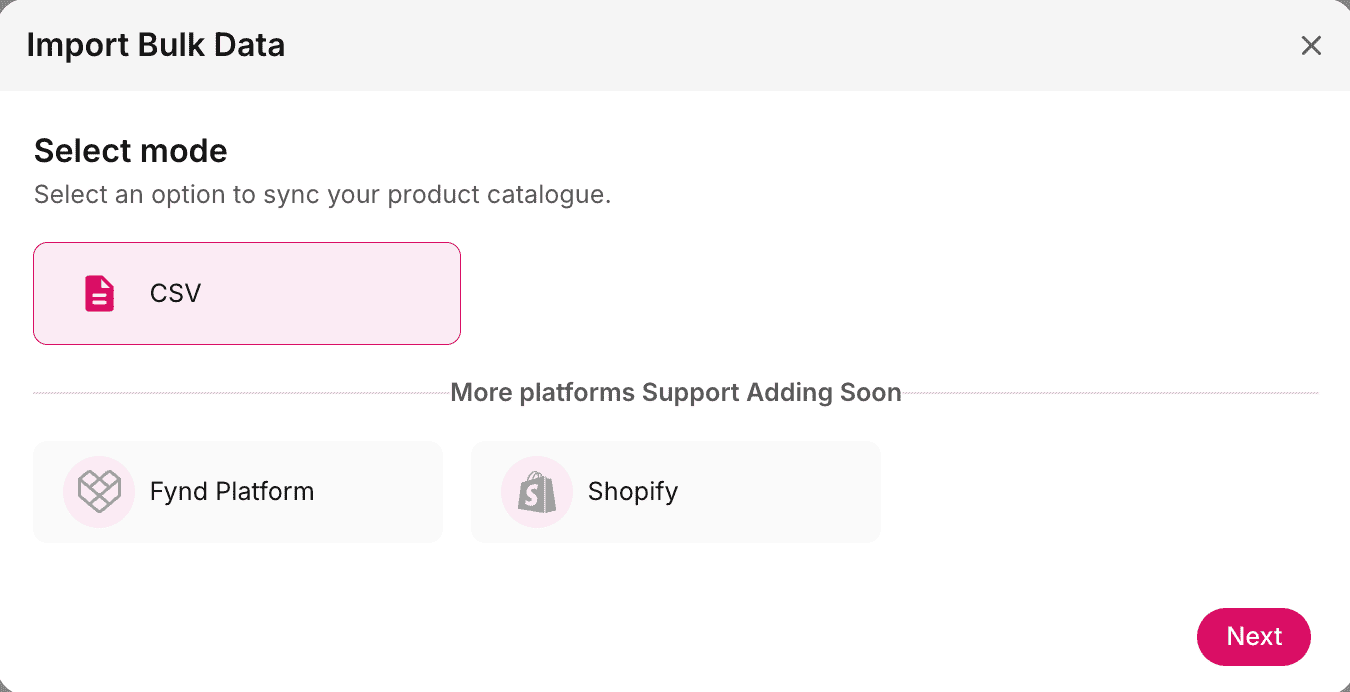
-
Future Integrations (coming soon)
- Product catalogs can also be imported directly from platforms such as Fynd Platform and Shopify.
- These integrations will allow automated synchronization of product data, reducing manual maintenance.
Recommendation table
Once product data is imported, it appears in a structured table for easy management.
| Column | Description |
|---|---|
| Product Name | Displays the name of the recommended product. |
| SKU ID | The unique identifier used for catalog tracking. |
| Category | The category under which the product falls (e.g., Cleanser, Serum, Moisturizer). |
| Use Time | Indicates when the product should be used (e.g., Morning, Night, Anytime). |
| Skin Type | The target skin type for the product (e.g., Oily, Dry, Combination, Sensitive). |
| Concerns | Lists the skin concerns the product addresses (e.g., Acne, Wrinkles, Pigmentation). |
| Actions | Provides options to edit or delete individual products from the list. |
Testing recommendations
Next to the Import button (top-right of the table) is a Play button, which allows you to test and simulate recommendations generated by the AI model.
When you click the button:
- A popup window opens with input options.
- Select your Skin Type from the available choices:
- Normal
- Oily
- Dry
- Combination
- Sensitive
- Select the specific skin parameters and issues to include in the analysis, such as:
- Skin Age
- Skin Tone
- Skin Type
- Skin Score
- Acne
- Pores
- Wrinkles and more
- Click Get Recommendations.
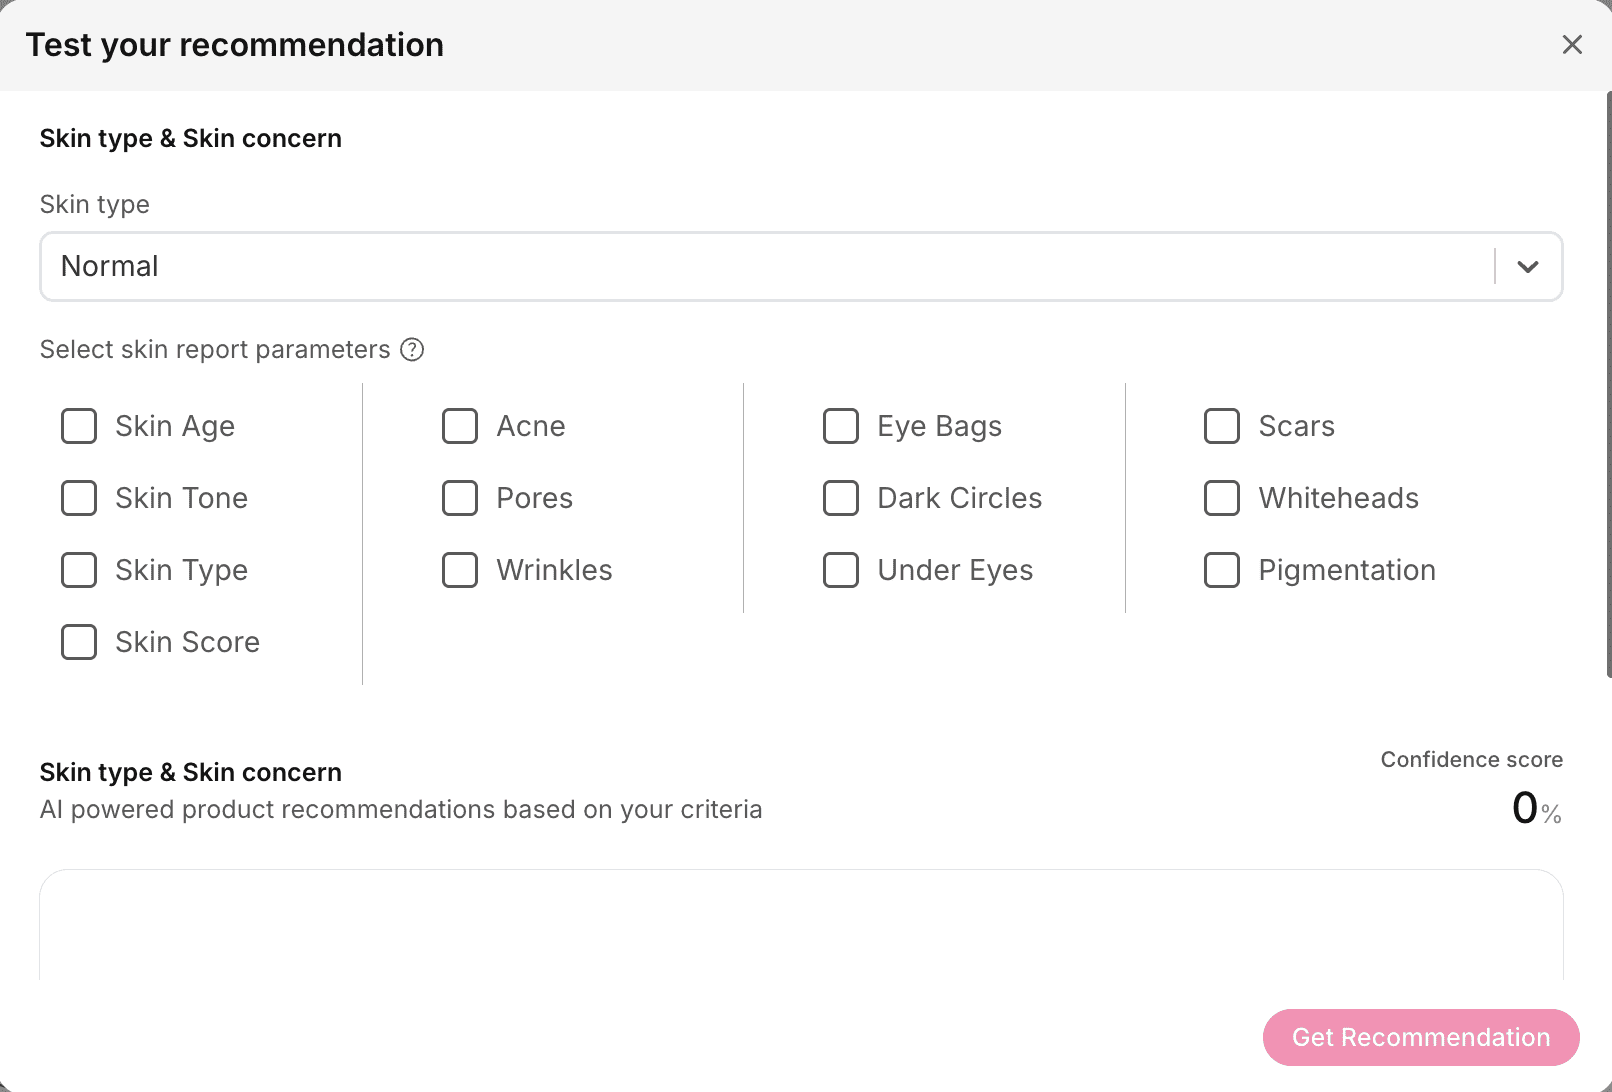
The system then lists all relevant products that match the selected criteria. Each product suggestion is accompanied by a confidence score (in %), which represents the AI’s confidence in the recommendation’s relevance to the user’s skin profile.
Best practices:
- Keep your product catalog updated to ensure recommendations remain accurate and aligned with current inventory.
- Regularly test recommendations using the Play button to evaluate AI performance and mapping accuracy.
- Use descriptive product names and categories to help the AI deliver more precise results.
- Ensure the CSV file adheres to the correct format and includes complete information (Product Name, SKU ID, Category, etc.) for seamless import.
Editing product entries
Each entry in the Recommendation table can be individually edited to update or refine product information. Editing helps ensure that product details, targeting parameters, and metadata remain accurate for AI-driven recommendations.
When you click the edit icon in the Actions column of a product entry, an editing panel opens with the following grouped options:
Basic Details
Contains the primary product information used for display and catalog management.
- SKU ID: The unique identifier assigned to the product.
- Product Name: The name displayed in reports or recommendations.
- Product Image: Upload or replace the product’s image.
- Product URL: The product page link for quick access or purchase.
- Currency: The currency symbol or code used in pricing (e.g., USD, INR).
- MRP: Maximum Retail Price of the product.
- Selling Price: Discounted or final selling price shown to users.
- Brand Name: The brand associated with the product.
- Category: Product category (e.g., Cleanser, Serum, Moisturizer).
Performance and Feedback
Defines the product’s popularity and user response metrics, used to enhance AI ranking in recommendations.
- Popularity Score: Internal rating based on sales or engagement data.
- Average Rating: The product’s customer rating (e.g., 4.5/5).
Details
Includes descriptive and contextual data for user reference.
- Description: A short, user-facing description of the product.
- Keywords: SEO or discovery keywords that improve search relevance.
- Size / Volume: The product’s size or quantity (e.g., 100 ml, 50 g).
- Packaging Style: Product packaging type (e.g., Tube, Bottle, Jar).
Usage and Targeting
Defines when and for whom the product should be recommended.
- AM / PM: Recommended time of use (morning, evening, or both).
- Skin Type: Target skin type(s) (e.g., Oily, Dry, Combination, Sensitive).
- Concerns: Specific skin concerns addressed (e.g., Acne, Pores, Wrinkles).
- Genders: Intended audience (e.g., Male, Female, Unisex).
Description and Metadata
Captures backend details and product attributes for AI processing and filtering.
- Group SKU: Links similar or related SKUs together for grouped recommendations.
- Product Label: Internal or display tag (e.g., Bestseller, New Launch).
- Fragrance Free: Boolean flag indicating if the product is fragrance-free.
- Paraben Free: Indicates whether the product is paraben-free.
- Alcohol Free: Specifies if the product formulation excludes alcohol.
- pH Level: Records the product’s pH value for compatibility insights.
SkinGPT
SkinGPT is an AI-powered virtual skincare assistant that provides personalized responses, product recommendations, and expert guidance, all based on the user’s individual skin scan results. By connecting the AI assistant to your Skin Analysis app, you can offer users an engaging, conversational experience that delivers tailored insights and suggestions in real time.
SkinGPT uses data from the user’s skin analysis, including detected conditions, skin type, tone, and concerns to generate intelligent, context-aware replies.
Users can ask questions about their results, learn more about their skin health, and receive actionable advice or product recommendations directly within the app.
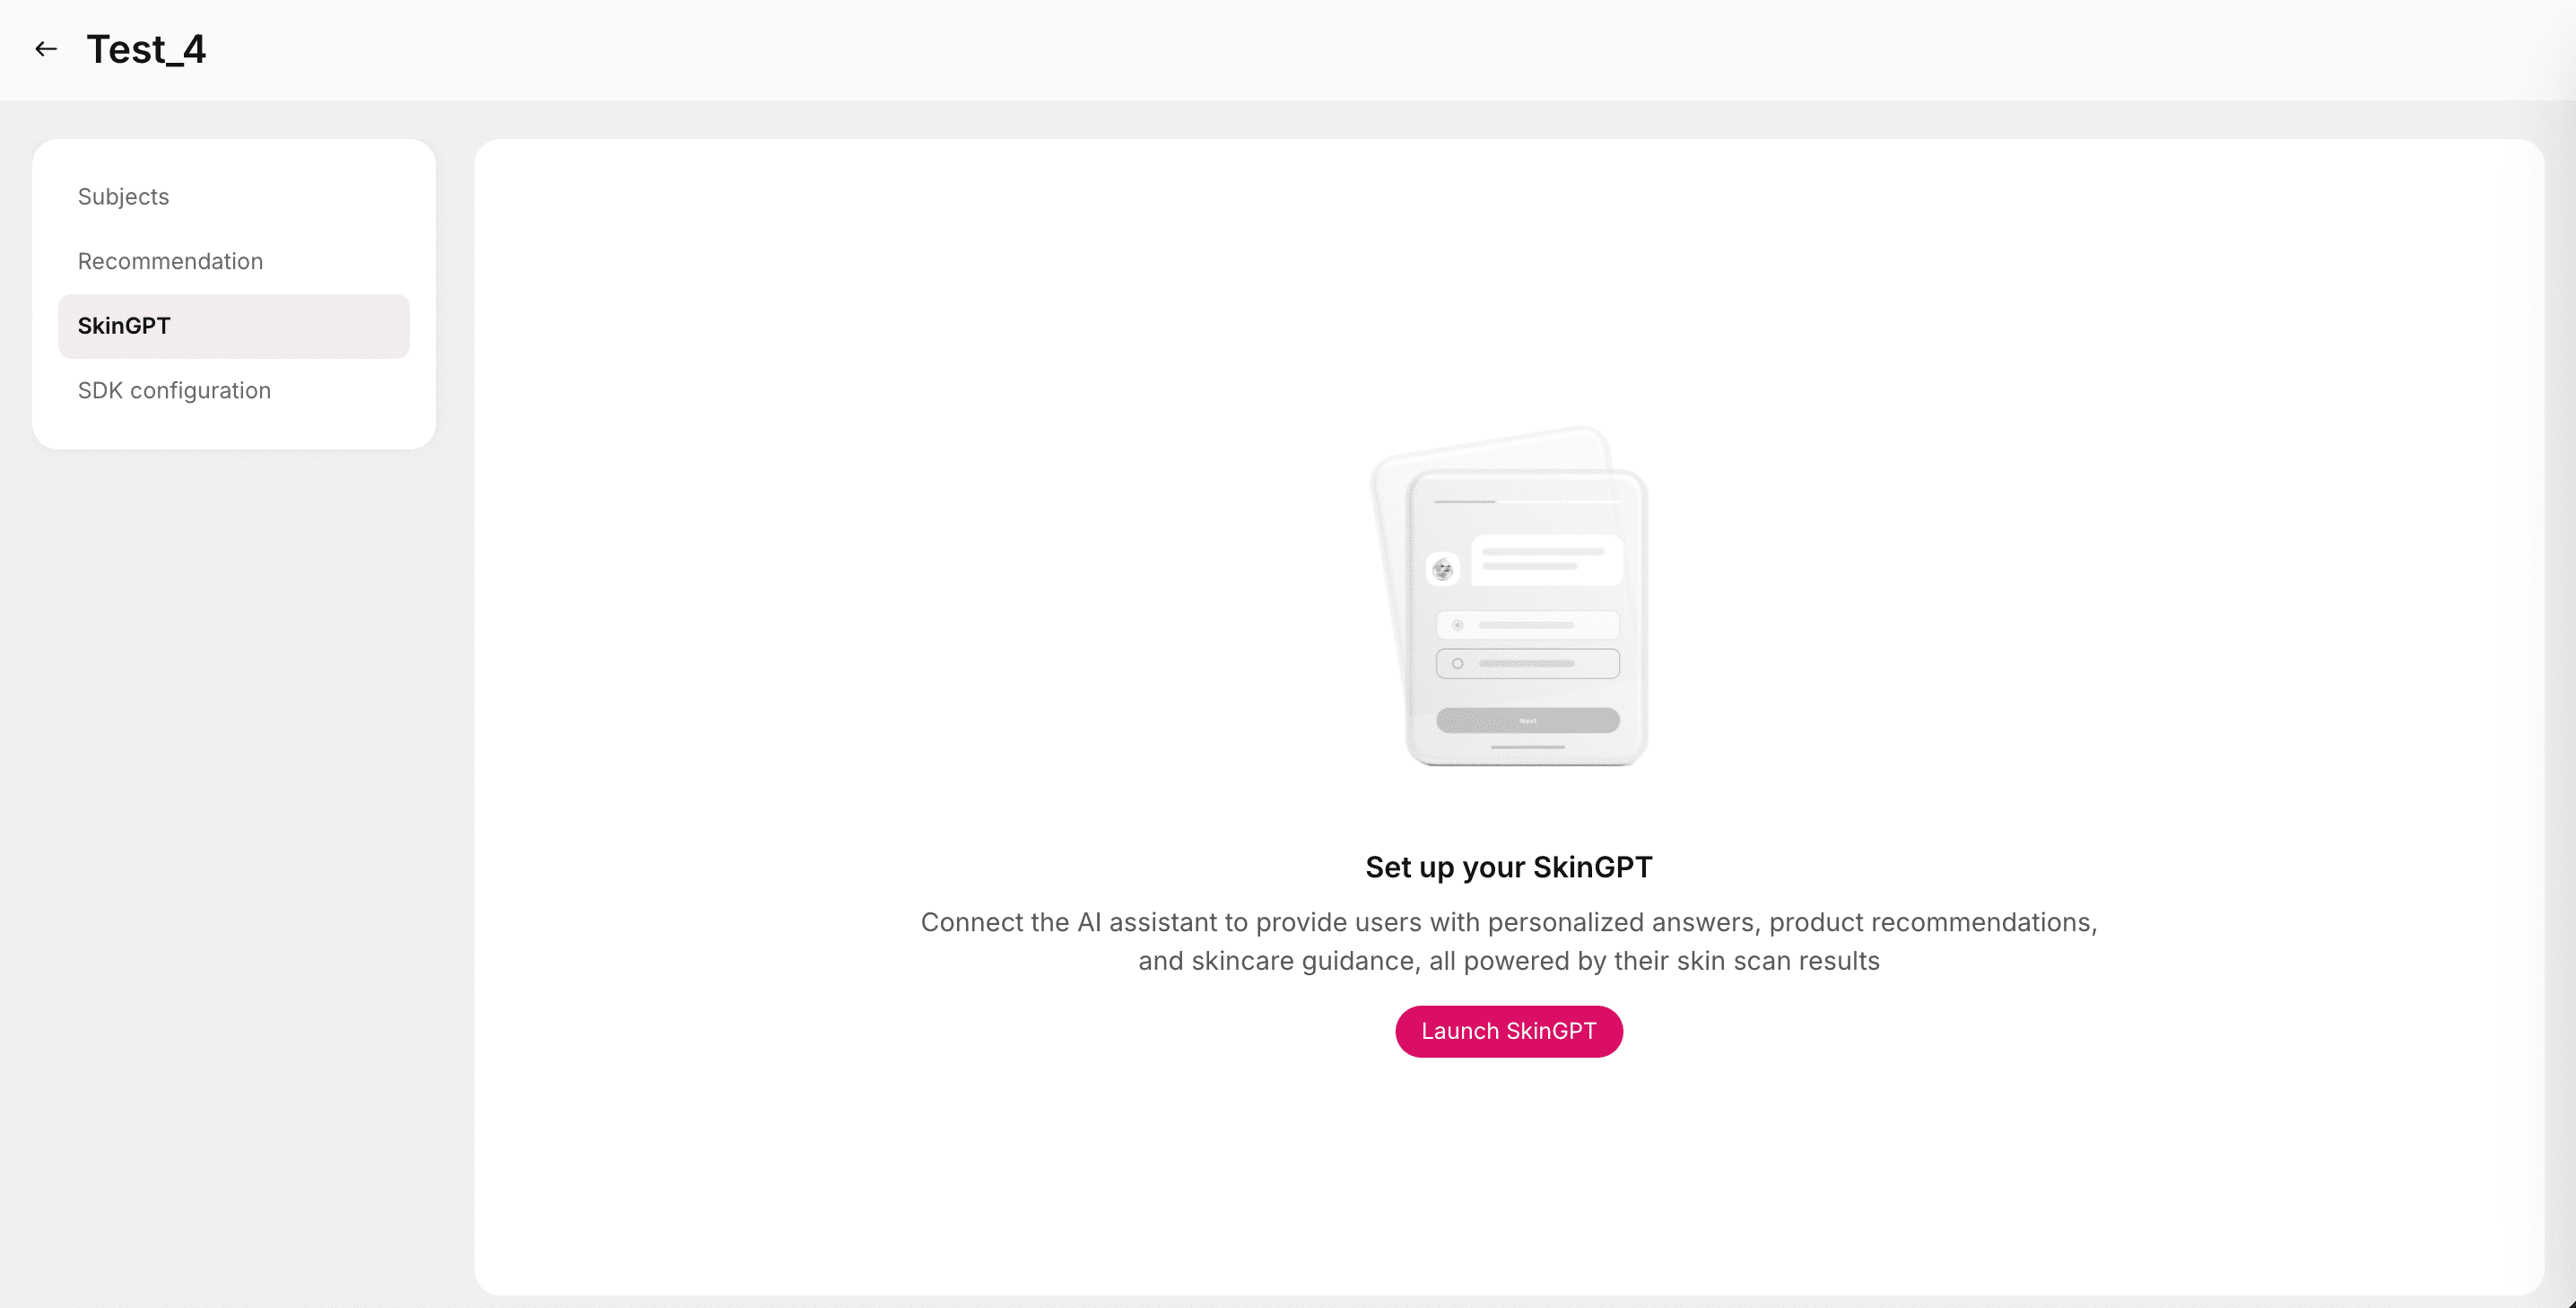
Setup
To begin configuring your AI skincare assistant, click the Launch SkinGPT button. This opens the SkinGPT setup, where you can define your assistant’s appearance, personality, and user interaction behavior.
Basic Info
These settings help personalize the branding and identity of your SkinGPT assistant.
- Logo: Upload a logo to represent your brand within the chat interface.
- Supported formats: PNG, JPEG, WEBP
- Maximum file size: 1 MB
- Recommended aspect ratio: 1:1
- SkinGPT Name: Provide a custom name for your AI assistant. This name will appear at the top of the chat window and in messages, helping users recognize your brand’s voice.
Define Persona
This section defines your SkinGPT’s behavior and tone of communication. Use this space to describe how your assistant should interact with users.
- Write a detailed description of your business, brand identity, and how SkinGPT should behave during conversations.
- Maximum character limit: 5,000
Note: A well-defined persona ensures your AI delivers consistent, brand-aligned conversations.
Welcome Content
Customize how SkinGPT greets users and initiates interaction for a seamless, engaging experience.
- Title: The main greeting or headline (e.g., “Welcome to your personal skincare assistant!”).
- Welcome Subtitle: A short, supportive line that encourages users to start chatting (e.g., “Ask me anything about your skin analysis report.”).
- Conversation Starters: Add example questions or prompts to help users begin the conversation.
Example: “What does my skin report say?” or “Recommend a moisturizer for oily skin.” - Auto Suggestions: Toggle to enable or disable to control whether dynamic follow-up questions or recommendations appear after each SkinGPT response.
When enabled, the AI automatically generates context-based suggestions to guide the next steps in the chat.
Best practices:
- Keep your persona description focused on your target audience’s tone and needs.
- Ensure conversation starters are relevant to your skin analysis workflow and frequently asked questions.
- Use a high-quality logo with a transparent background for professional visual consistency.
- Test SkinGPT’s greeting and flow through the preview feature before going live.
SDK Configuration
The SDK Configuration section consolidates all configuration options necessary to fine-tune how your Skin Analysis app integrates and operates within the GlamAR SDK environment.
Most of the options available here have already been discussed in detail under:
- App Details
- Face Scan Instructions
- App Appearance
- Report Setup
All previously configured settings such as typography, themes, data storage, and report customization are accessible here for quick updates or review without navigating back to individual tabs.
Advance settings
The Advance settings tab provides deeper control over your app’s user interface (UI) and behavior. These settings allow you to toggle certain UI components and adjust SDK behavior directly via configuration or code.
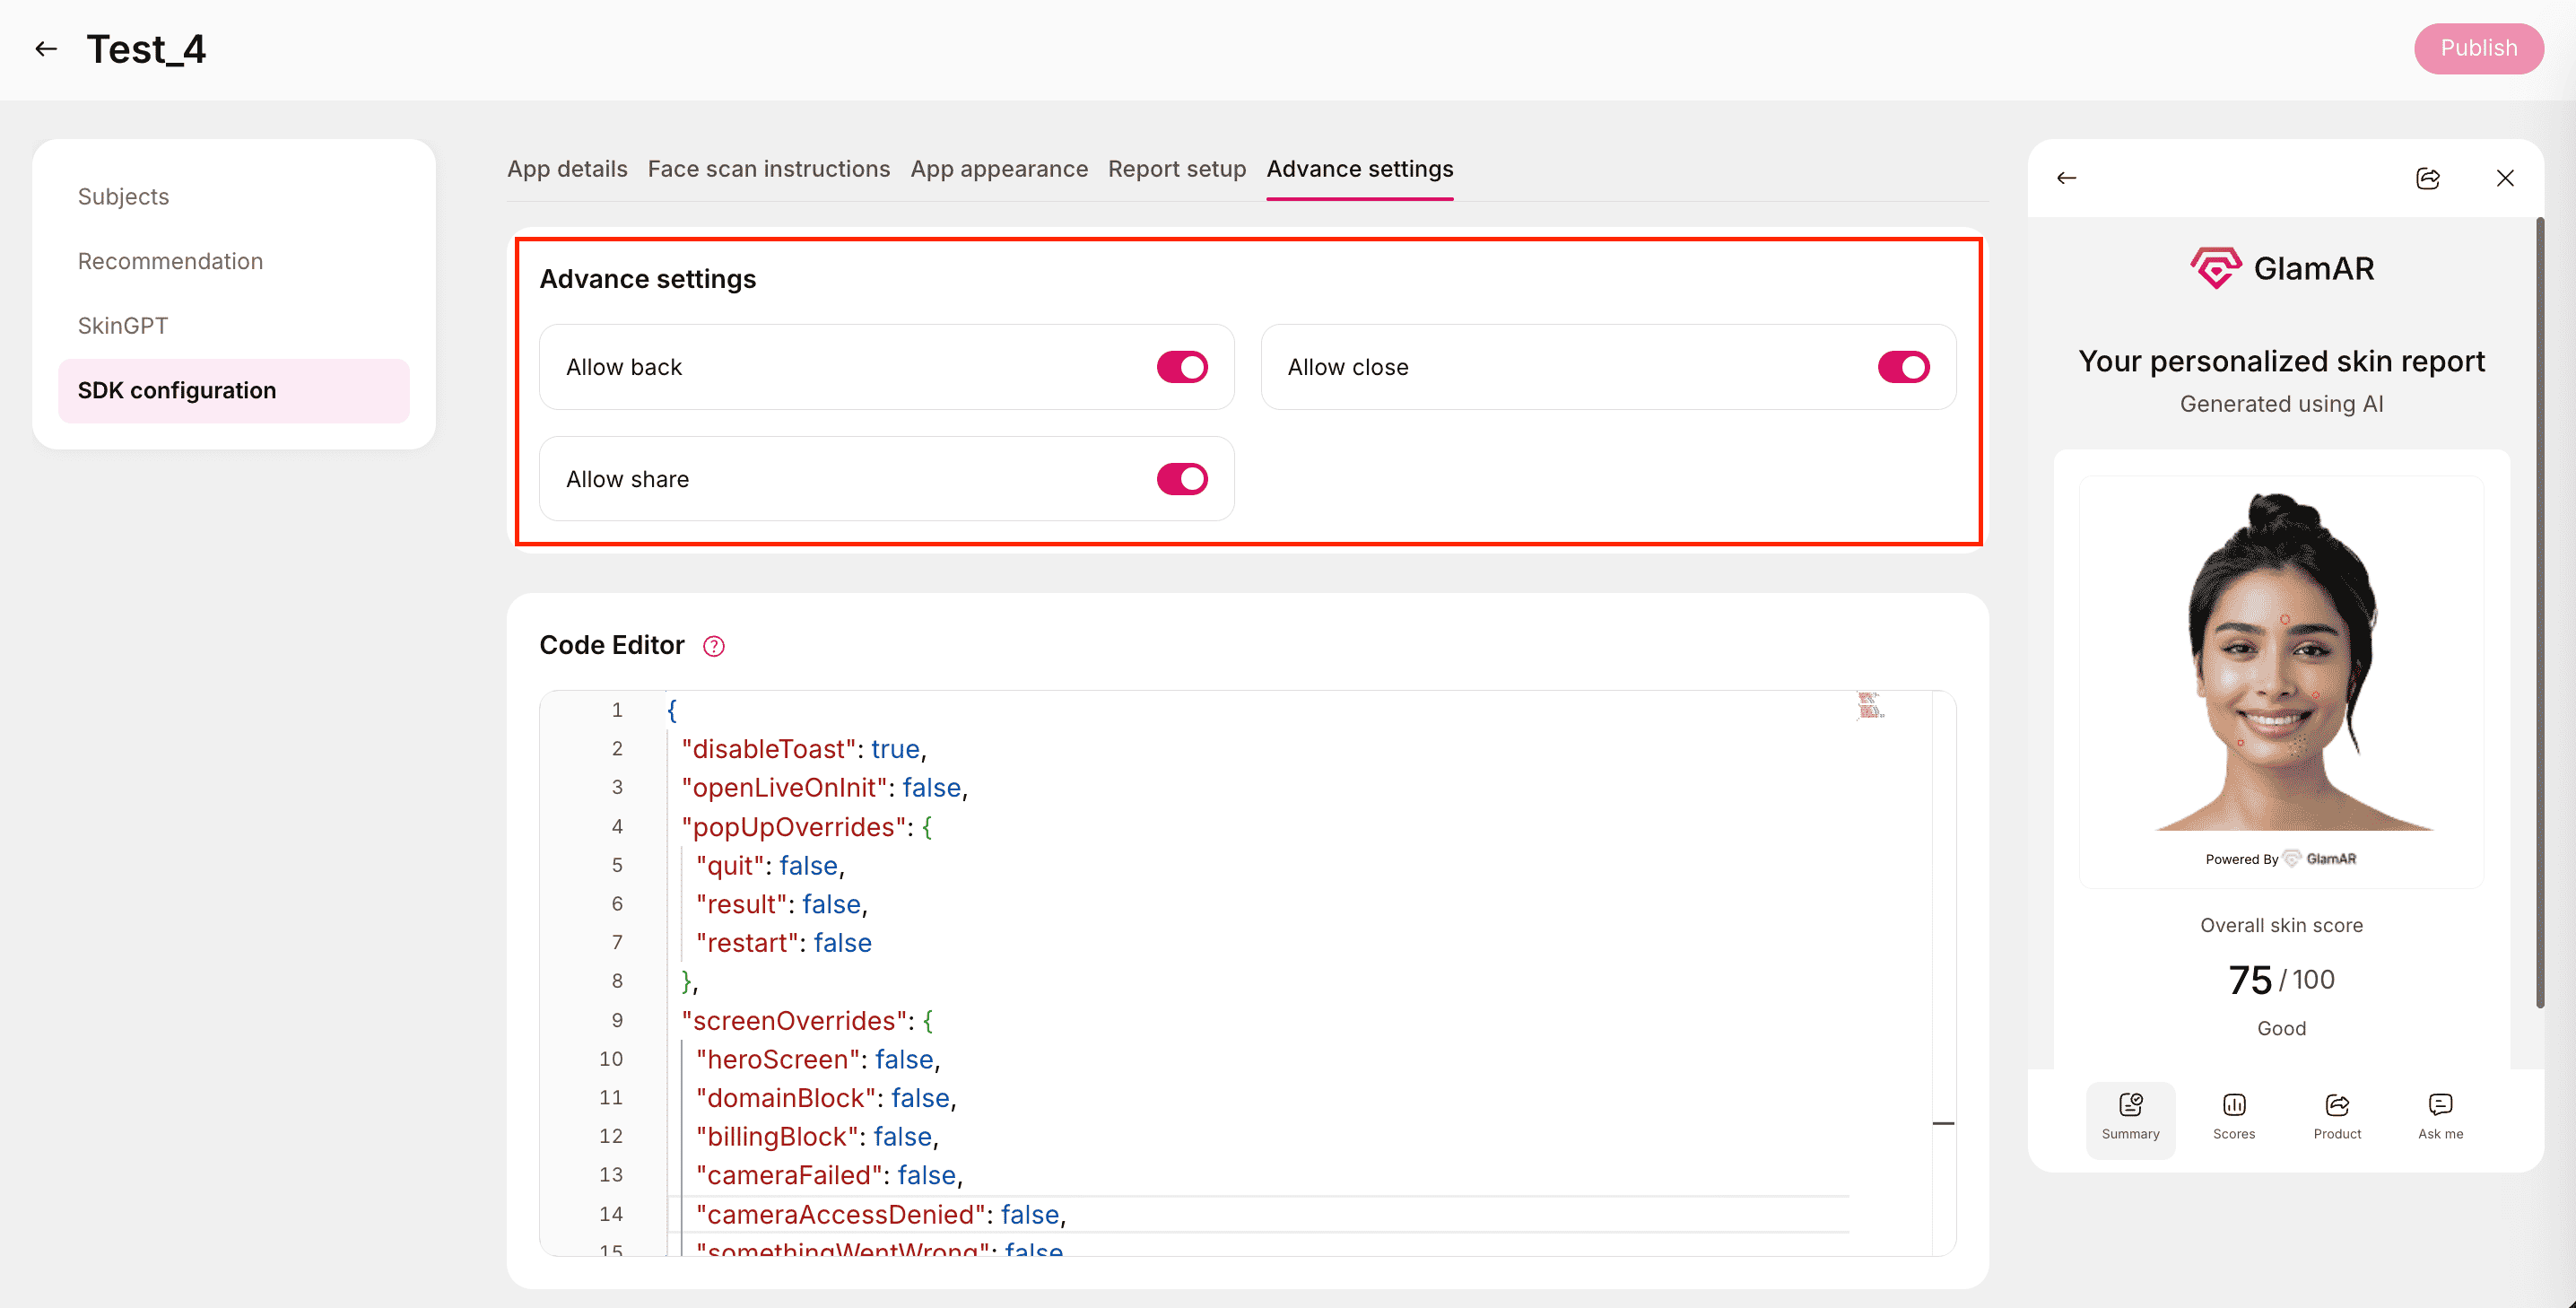
You can enable or disable key user interface actions using simple toggles:
- Allow back: Toggle on/off to show or hide the back navigation option within the try-on or analysis window.
- Allow close: Toggle on/off to include or remove the close (exit) button in the interface.
- Allow share: Toggle on/off to enable users to share their analysis results or reports.
Note: These toggles are primarily used to tailor the in-app experience, controlling navigation and interaction availability.
Code Editor
For developers or advanced users, the Code Editor provides direct access to the SDK’s configuration JSON. You can modify behavioral and UI-level parameters here to customize the app experience further.
Parameters:
| Parameter | Type | Default Value | Description |
|---|---|---|---|
disableToast | Boolean | true | Controls the display of toast notifications. When set to true, the system hides minor pop-up messages (e.g., info or error alerts). |
openLiveOnInit**` | Boolean | false | Determines whether the live camera view should automatically open when the app initializes. Set to true to start the live view immediately on load. |
popUpOverrides.quit | Boolean | false | Controls whether the Quit Confirmation popup appears when users try to exit the app. When set to true, the popup is disabled. |
popUpOverrides.result | Boolean | false | Toggles the Results Summary popup that appears after completing an analysis. When true, this popup is disabled. |
popUpOverrides.restart | Boolean | false | Determines whether the Restart Confirmation popup appears. If true, the popup will be disabled, allowing instant restart. |
screenOverrides.heroScreen | Boolean | false | Enables or disables the Hero Screen (intro or splash screen) displayed when the app starts. When set to true, this screen is skipped. |
screenOverrides.domainBlock | Boolean | false | Controls whether the Domain Restriction screen appears if the current domain is not whitelisted. When true, this screen will be bypassed. |
screenOverrides.billingBlock | Boolean | false | Determines whether the Billing Block screen appears (shown when subscription or billing issues occur). When true, this screen is suppressed. |
screenOverrides.cameraFailed | Boolean | false | Toggles the Camera Failed error screen, which appears when the device camera cannot initialize or connect. When true, this screen will be disabled. |
screenOverrides.cameraAccessDenied | Boolean | false | Controls whether the Camera Access Denied message is shown when user permissions are not granted. When true, the warning is hidden. |
screenOverrides.somethingWentWrong | Boolean | false | Toggles the fallback Something Went Wrong error screen, displayed for unexpected runtime or SDK-level errors. When true, the screen is disabled. |
Configuration tips:
- Use
trueto disable popups or screens andfalseto keep them enabled. - It’s generally recommended to keep error and access-related screens enabled (
false) for debugging or troubleshooting purposes. - The toast notifications and popups can be re-enabled easily without requiring a full SDK redeployment, simply toggle the parameters and save.
- Test your configuration changes using the Preview option before publishing to production.
Publishing the Changes
Once all configurations and edits are complete, you can make your updates live by clicking the Publish button located at the top-right corner of the interface.

What happens on publish?
- The latest changes made to your Skin Analysis app, including updates in App Details, Face Scan Instructions, App Appearance, Report Setup, and SDK Configuration, are saved and deployed.
- Publishing ensures that all adjustments become immediately active across the live environment and accessible through both Share Links and QR Codes.
Important notes:
- Review all configurations before publishing to avoid overwriting active settings.
- Publishing replaces the current live version with the newly updated configuration.
- Once published, you can preview and test the live version again using the Play (Preview) button under Managing Existing Apps.
Summary
The Skin Analysis module empowers you to create, customize, and manage AI-powered facial skin analysis applications—all from within the GlamAR platform. From defining app details and configuring scan instructions to personalizing report layouts, enabling recommendations, and integrating SkinGPT, every setting allows you to tailor the experience to your brand and user needs.
After completing configurations, the Publish action pushes all updates live, making your latest settings immediately available across shared and previewed apps. You can continue to manage, test, and optimize each app through the Managing Existing Apps section, ensuring that users receive accurate results, actionable insights, and a seamless experience.