Insert in Theme
After configuring your products, the next step is to integrate the GlamAR Virtual Try-On experience into your Shopify storefront. The Insert in Theme option allows you to embed the GlamAR component into your active theme so customers can access AR functionality directly while browsing.
This step controls where and how customers will see the try-on experience across your store. Whether on individual product pages, across collections, or as a persistent floating entry point.
How It Works
From the Dashboard, navigate to Insert in Theme and click Insert Now.
This opens the integration interface, where you can:
- Choose how customers will access the try-on experience.
- Customize the placement within your theme.
- Launch the Shopify Theme Editor to publish changes.
The integration process does not modify your product data. It only controls how and where the GlamAR experience appears in your storefront layout.
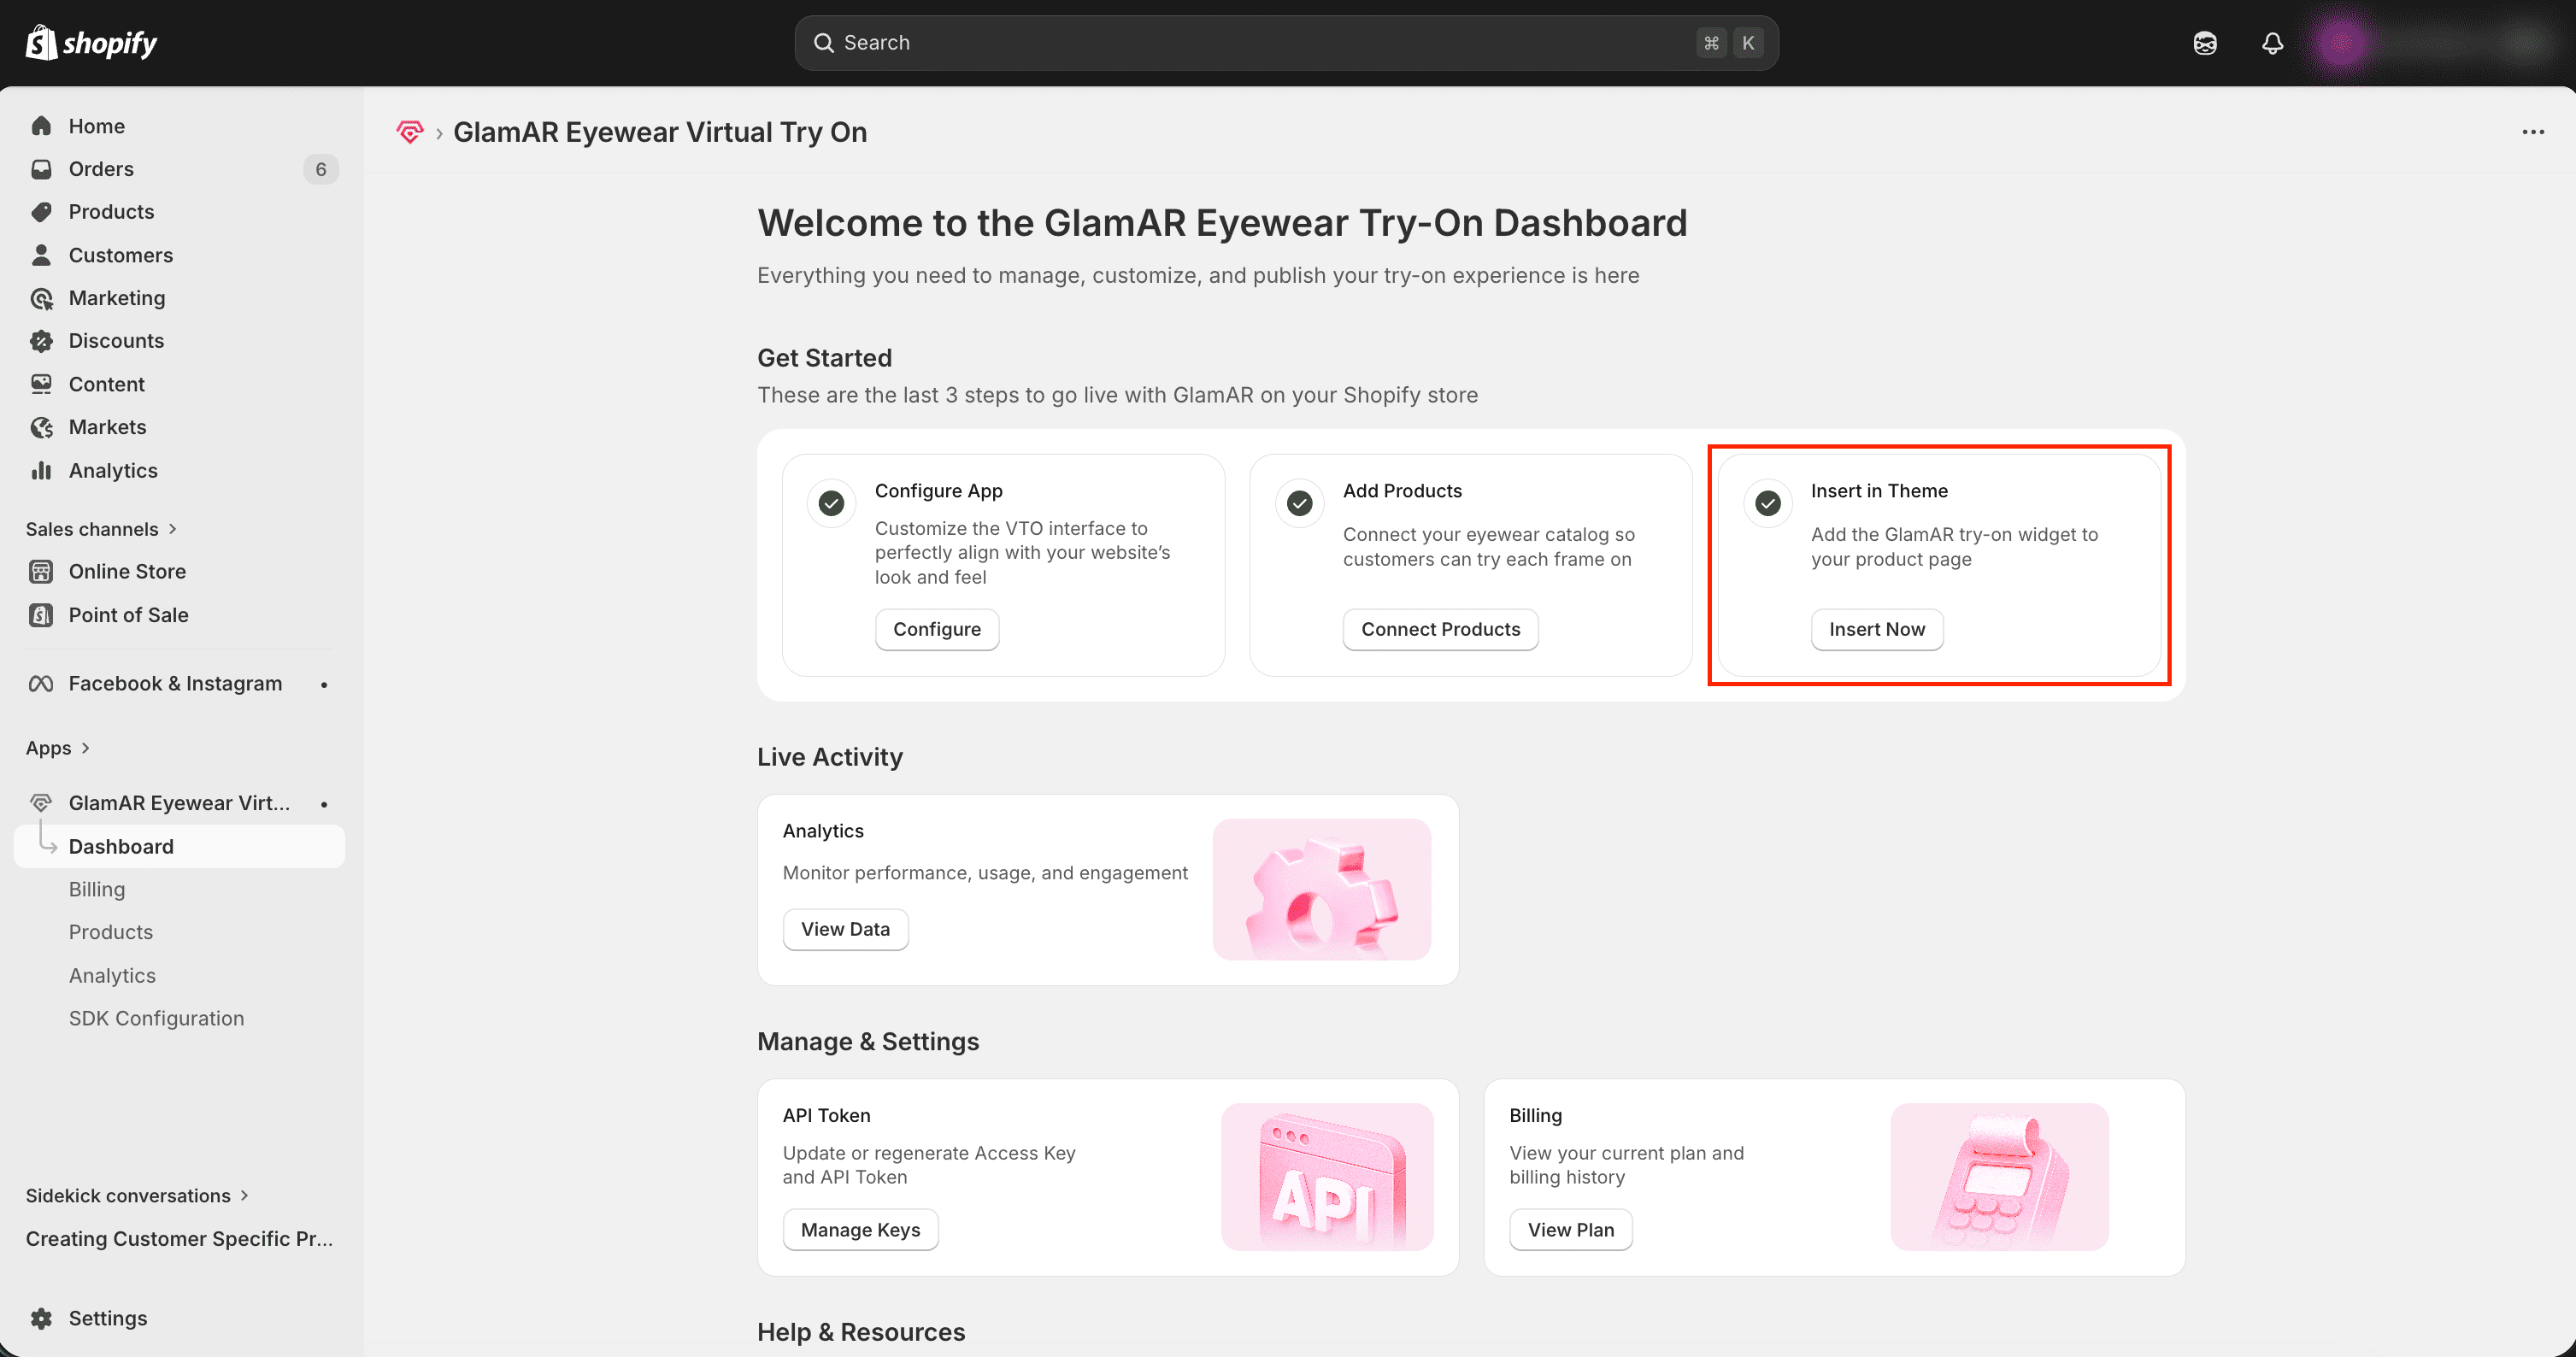
Step 1: Access Insert in Theme
- Go to the Dashboard inside the GlamAR Shopify app.
- Locate the Insert in Theme section.
- Click the Insert Now button.
This action opens the Integration Page, where you configure how the GlamAR experience appears on your storefront.
Step 2: Choose How GlamAR Appears
The integration page allows you to decide how customers will access the try-on feature. This controls how the entry point is displayed on your Shopify product pages.
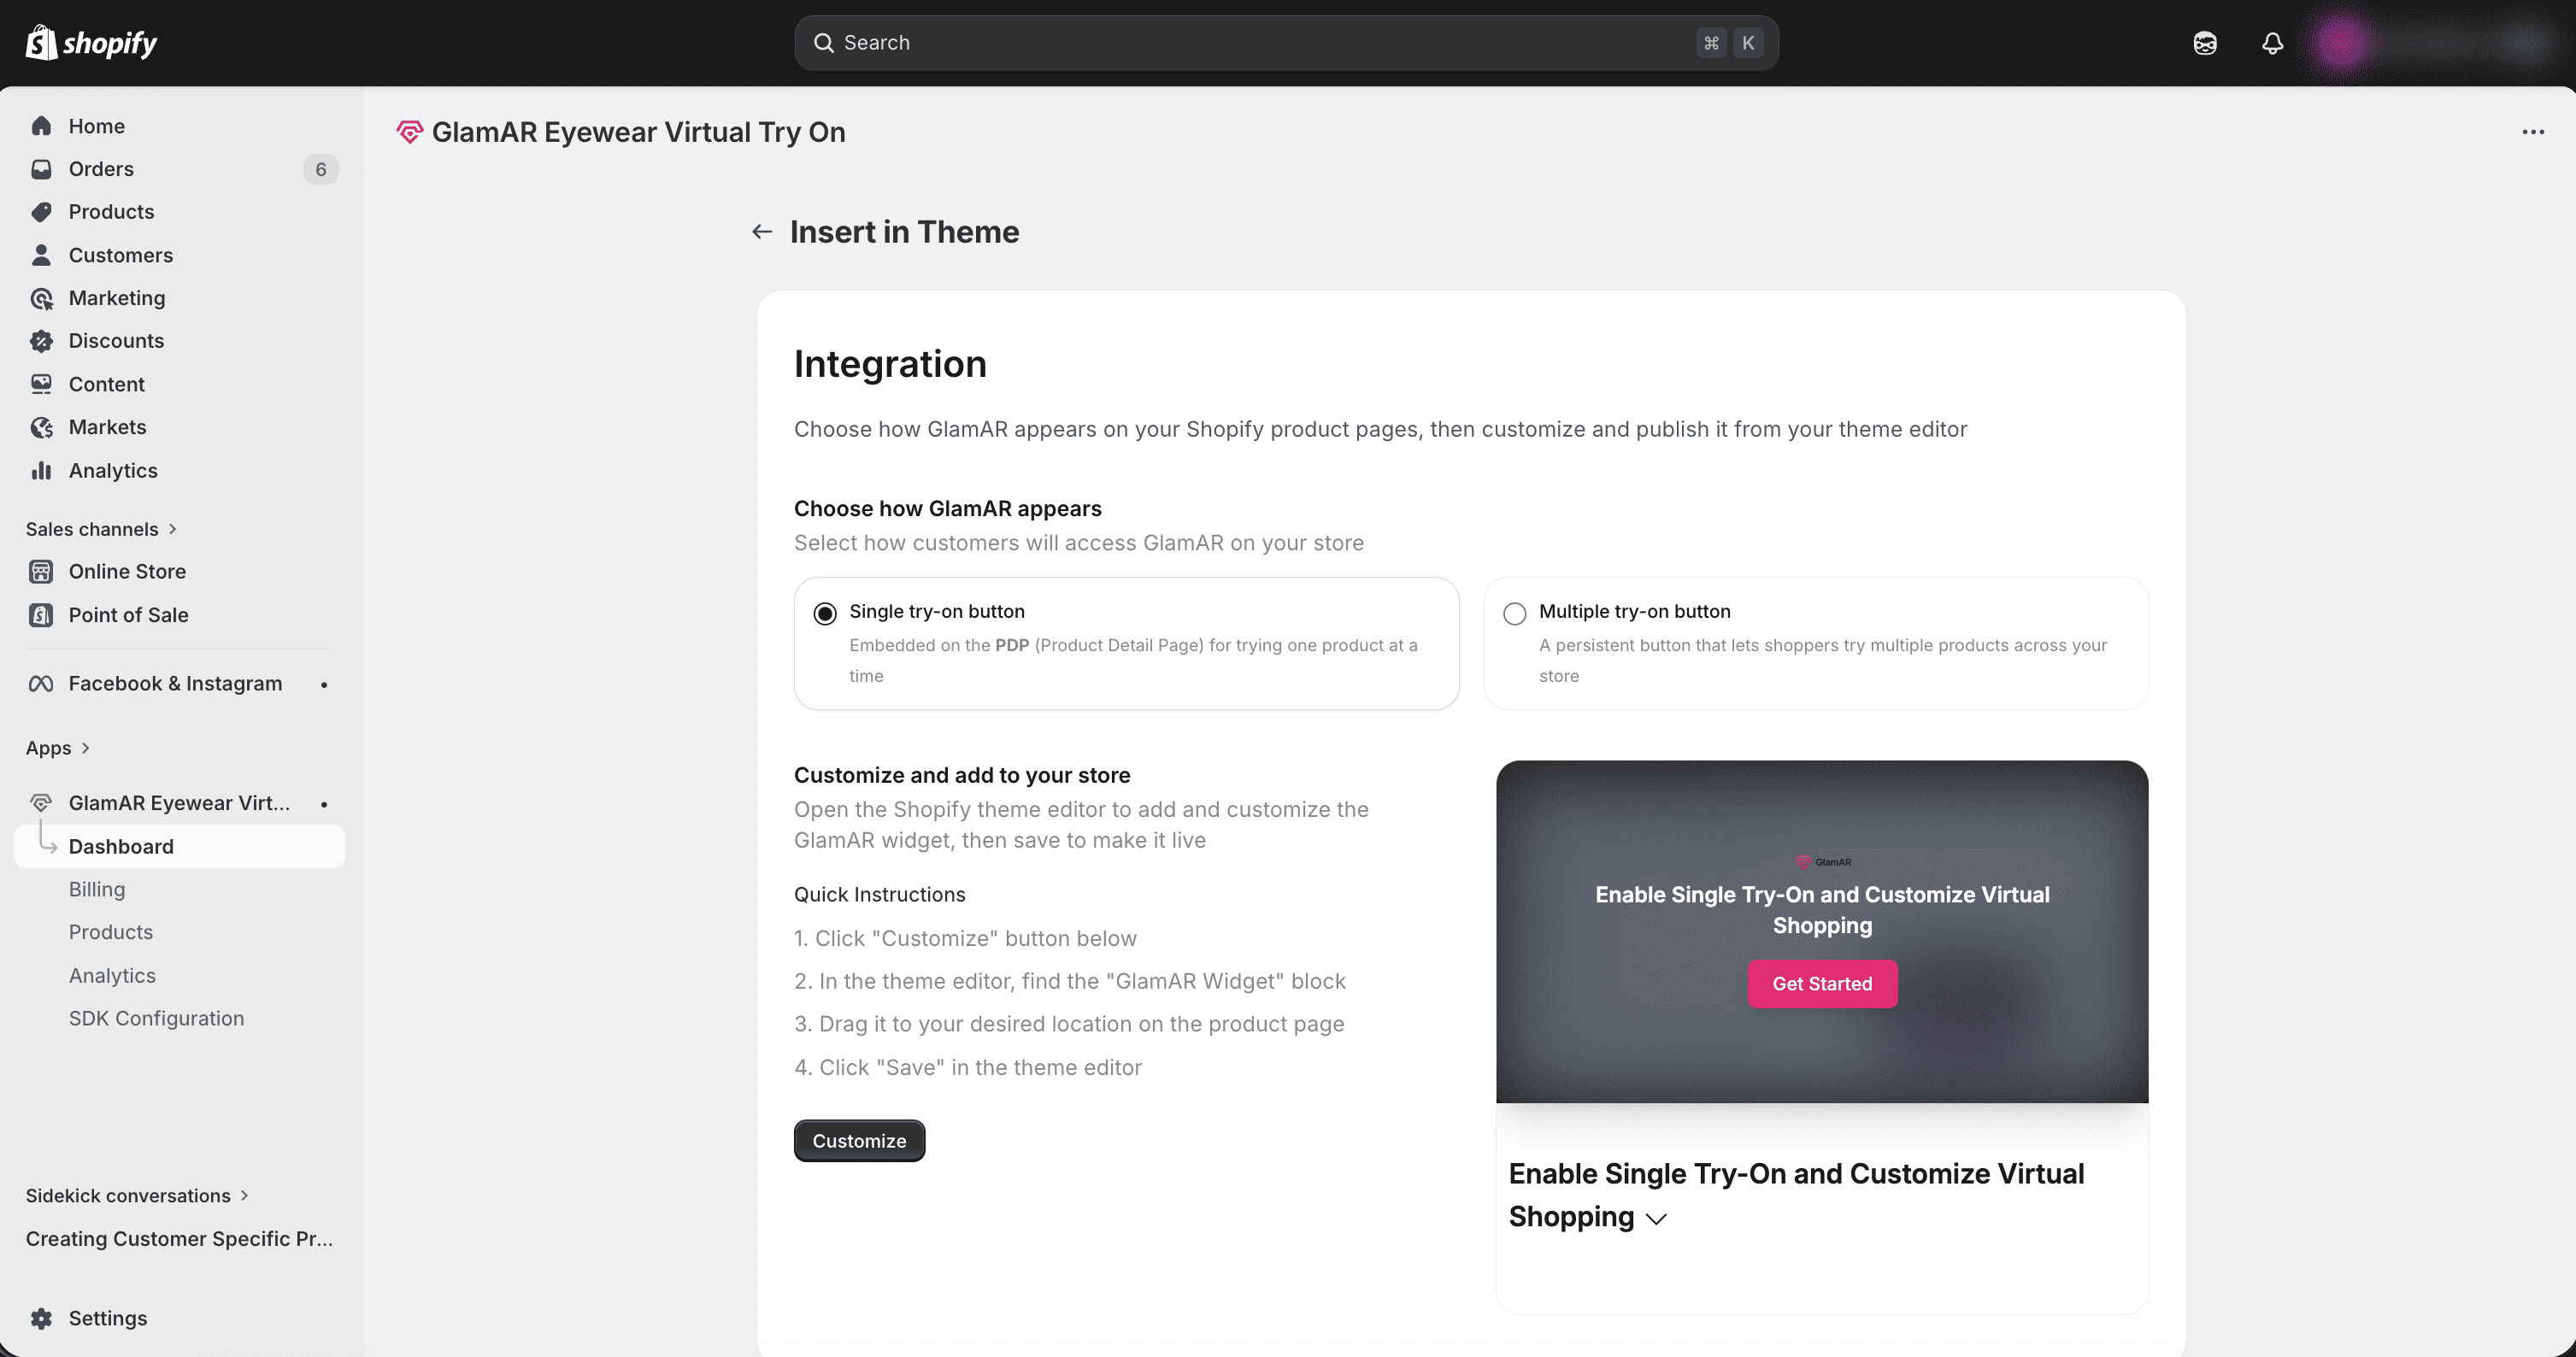
Currently, there are two options available: Single try-on button and Multiple try-on button
Single Try-On Button
The Single Try-On Button embeds a button directly on the Product Detail Page (PDP). This allows customers to try one product at a time while viewing that product’s details.
Best suited for:
- Standard Shopify product pages
- Product-by-product AR interaction
- Clean, minimal UI integration
- Gradual AR rollout across products
Multiple Try-On Button
In addition to embedding a single Try-On button on individual product pages, GlamAR also provides the option to enable a Multiple Try-On Button. This configuration creates a persistent access point for AR experiences across your storefront.
Unlike the Single PDP button, which allows customers to try one product at a time, the Multiple Try-On Button enables shoppers to try multiple products within a single session, without restarting the experience.
When enabled, this option:
- Adds a persistent Try-On button to your storefront.
- Allows customers to switch between products inside the AR interface.
- Maintains the try-on session even as users browse different pages.
- Creates a continuous and immersive AR shopping journey.
This approach is ideal for customers who want to compare multiple frames, styles, or colors before making a purchase.
Step 3: Customize the Placement
After selecting the desired type of try-on button, click on Customize.
This automatically opens Shopify’s Theme Editor and inserts the GlamAR Try-On component into your selected theme.
From here, you can:
- Confirm the button is visible on the Product Detail Page.
- Adjust its position within the page layout.
- Ensure it does not interfere with other UI elements.
- Preview the integration before publishing.
Positioning Best Practices
To maximize engagement:
- Place the Try-On button near the Add to Cart button.
- Ensure the button is visible without excessive scrolling.
- Avoid placing it too low in the layout where users may miss it.
- Keep spacing clean and consistent with your theme.
The Try-On button should feel like a natural part of the purchase journey.
What’s the Difference?
While the setup steps are the same, the behavior changes:
| Single Try-On | Multiple Try-On |
|---|---|
| Appears on individual PDPs | Appears persistently across store |
| One product per session | Multiple products in one session |
| Session resets when leaving PDP | Session remains active across navigation |
| Simple product-level interaction | Continuous browsing experience |
How Virtual Try-On Enhances the Shopping Experience
GlamAR’s Virtual Try-On transforms traditional product browsing into an interactive, confidence-building experience. Whether you choose the Single Try-On Button or the Multiple Try-On Button, both approaches help reduce purchase hesitation and increase engagement, but they do so in slightly different ways.
Single Try-On Button
Focused, Product-Level Interaction
The Single Try-On button is embedded directly on the Product Detail Page (PDP), enabling customers to try one product at a time.
This enhances the shopping experience by:
- Allowing shoppers to visualize a specific product before adding it to cart.
- Integrating seamlessly into the natural purchase journey.
- Keeping the interface clean and minimal.
- Reducing friction for first-time AR users.
- Supporting quick decision-making for customers who already know what they want.
This approach works especially well for:
- Stores with smaller catalogs.
- Brands launching AR for selected hero products.
- Customers who prefer straightforward product evaluation.
Multiple Try-On Button
Continuous, Exploratory Experience
The Multiple Try-On button creates a persistent AR session across the storefront, enabling customers to try multiple products without restarting the experience.
This enhances the shopping experience by:
- Enabling effortless comparison between styles, colors, or variants.
- Keeping the camera active while users browse different products.
- Encouraging exploration and longer session times.
- Creating an immersive, “virtual showroom” experience.
- Increasing the likelihood of discovering additional products.
This approach is ideal for:
- Eyewear brands with large collections.
- Stores that emphasize style comparison.
- Customers who want to experiment before deciding.
Choosing the Right Experience
Both configurations improve customer confidence, reduce returns, and increase conversion rates. The right choice depends on how you want customers to interact with your catalog:
- Choose Single Try-On for focused, product-driven interaction.
- Choose Multiple Try-On for immersive, comparison-based shopping.
You can also test both approaches to see which drives higher engagement and better conversion performance for your audience.
Frequently Asked Questios (FAQs)
-
Why is the Try-On button not appearing on my product page?
If the Try-On button is not visible, check the following:- Ensure the product is enabled in the Product Catalog.
- Confirm the 3D model has been uploaded and synced.
- Verify that the GlamAR component has been inserted and saved in your Shopify theme.
- Make sure you are viewing the correct published theme, not a draft.
If the issue persists, clear your browser cache and preview again.
-
What file format is supported for 3D model uploads?
GlamAR currently supports .glb (GL Transmission Format Binary) files for 3D models.
Other formats (such as .obj, .fbx, .gltf) are not supported directly and must be converted to .glb before upload. -
Do I need to upload a 3D model for every product?
Yes. A 3D model is required for each product you want to enable virtual try-on for.
If a product does not have an associated 3D model:- The Try-On feature will not function for that product.
- The preview option will not load.
If you don’t have 3D models, contact the GlamAR Sales Team at sales@glamar.io for assistance.
-
What happens if I delete a product from the Product Catalog?
Deleting a product removes it from:- The Shopify-GlamAR integration
- GlamAR’s Product Inventory
This permanently disables try-on for that SKU. If needed again, the product must be re-added and reconfigured.
-
What is the difference between “Disable” and “Delete”?
- Disable: Temporarily removes Try-on functionality but keeps the product in the catalog.
- Delete: Completely removes the product from the integration and inventory.
Use Disable for out-of-stock or seasonal items.
-
Why should I click “Sync” after uploading a 3D model?
Sync ensures that:- The uploaded model is registered in GlamAR’s Product Inventory.
- Metadata updates are applied correctly.
- The product becomes AR-ready for storefront display.
If preview does not work after upload, syncing is usually required.
-
Can I enable try-on for an entire collection at once?
Yes. Use the By Collection option when adding products. This lets you to:- Activate try-on for multiple products at once.
- Scale AR across large catalogs.
- Reduce manual configuration effort.
-
Does changing the GlamAR Category affect my Shopify category?
No. The category selected during GlamAR configuration:- Applies only to the AR engine.
- Does not modify Shopify’s internal product categorization.
The GlamAR category ensures correct tracking and rendering logic for try-on.
-
What is the difference between Single Try-on and Multiple Try-on?
- Single try-on: Adds a button on individual product pages. Customers try one product at a time.
- Multiple try-on: Adds a persistent button across the store. Customers can try multiple products in one continuous session.
Choose based on how immersive you want the experience to be.
-
How can I test the Try-on before making it live?
You can:- Preview the theme in Shopify before publishing.
- Use the Preview option in the Product Catalog to inspect 3D models.
- Test on both desktop and mobile devices.
- Verify camera permissions and AR alignment.
Always test after uploading new models or enabling new products.