iOS Package Setup
As you follow this tutorial, we recommend using our demo project reference to assist you in integrating the SDK into your project.

Prerequisites
To follow along you should have basic knowledge of creating ios apps with Xcode and it's ecosystem. In this tutorial we are going to use:
Don't worry if you don't have a lot of experience with these (or any experience at all). It is pretty straightforward to use and we will explain everything along.
Install Xcode and its relevant simulators and versions to use and run project, if you haven't already.
- Create your access key in Fynd Console → your organization → GlamAR → your product account → Settings → Tokens.
- Any valid SKU inside your Product Inventory under GlamAR.
Visit Getting Started Page if access key or SKU has not been created
Installation
You can integrate GlamAR into your project using one of the following dependency managers:
Swift Package Manager (SPM)
- In Xcode, select "File" → "Add Packages..."
- Enter the following URL in the search bar:
https://github.com/pixelbin-io/glamar-swift.git - Set the dependency rule to Branch and enter
main. - Click "Add Package"
CocoaPods
The iOS SDK is available as GlamAR on CocoaPods. Use the unversioned declaration below to install the latest compatible published release.
-
If you haven't already, install CocoaPods:
gem install cocoapods -
In your project directory, create a
Podfileif you don't have one:pod init -
Add the following line to your Podfile:
pod 'GlamAR' -
Run the following command:
pod install -
Open the
.xcworkspacefile to work with your project in Xcode.
If GlamAR is already installed, update it to the latest compatible release:
pod update GlamAR
Carthage
-
If you haven't already, install Carthage:
brew install carthage -
In your project directory, create a
Cartfileif you don't have one:touch Cartfile -
Add the following line to your Cartfile:
github "pixelbin-io/glamar-swift" "main" -
Run the following command:
carthage update --use-xcframeworks -
In your target's "General" settings, add the built
GlamAR.xcframeworkfromCarthage/Buildto the "Frameworks, Libraries, and Embedded Content" section.
Manual Installation
To work with the latest SDK source locally, clone the main branch:
git clone --branch main --single-branch https://github.com/pixelbin-io/glamar-swift.git
In your app's Xcode project, choose File → Add Package Dependencies → Add Local, select the cloned glamar-swift folder, and add the GlamAR product to your app target.
Dependencies
GlamAR depends on Alamofire. SPM (including the local-package setup above), CocoaPods, and Carthage manage this dependency automatically.
After installation, import GlamAR in your Swift files:
import GlamAR
Now you're ready to use GlamAR in your project!
Initialization
To use GlamAR in your iOS application, you need to initialize it with your access key. The initialization should be done when your app starts, typically in your AppDelegate or SceneDelegate.
import GlamAR

// In your AppDelegate
func application(_ application: UIApplication, didFinishLaunchingWithOptions launchOptions: [UIApplication.LaunchOptionsKey: Any]?) -> Bool {
    // Initialize GlamAR with all available options
    // Optional: Can also pass a pre-configured WKWebView as webView
    GlamAr.initialize(
        accessKey: "YOUR_ACCESS_KEY",
        debug: true,  // Use debug environment (true) or production (false)
        bundleIdentifier: String = Bundle.main.bundleIdentifier ?? "", // Used for parent domain reference
        overrides: overrides)
    return true
}
Configuration Options
accessKey: Your unique access key for the GlamAR service (Required)debug: Boolean flag to switch between debug and production environmentstrue: Uses debug/staging environment (default)false: Uses production environment
bundleIdentifier: Parent domain reference (Required)overrides: Category configurations (Optional)webView: Pre-configuredWKWebView(Optional)
Getting GlamAR Instance
After initialization, you can get the GlamAR instance using:
do {
    let glamAr = try GlamAr.getInstance()
    // Use glamAr instance
} catch GlamArError.notInitialized {
    print("GlamAR not initialized")
}
GlamArWebViewManager
The GlamArWebViewManager is the main component for displaying AR content. We use Webkit to display and communicate with our SDK. Make sure to add it inside your Storyboard or create it dynamically using SwiftUI. We use Storyboard approch
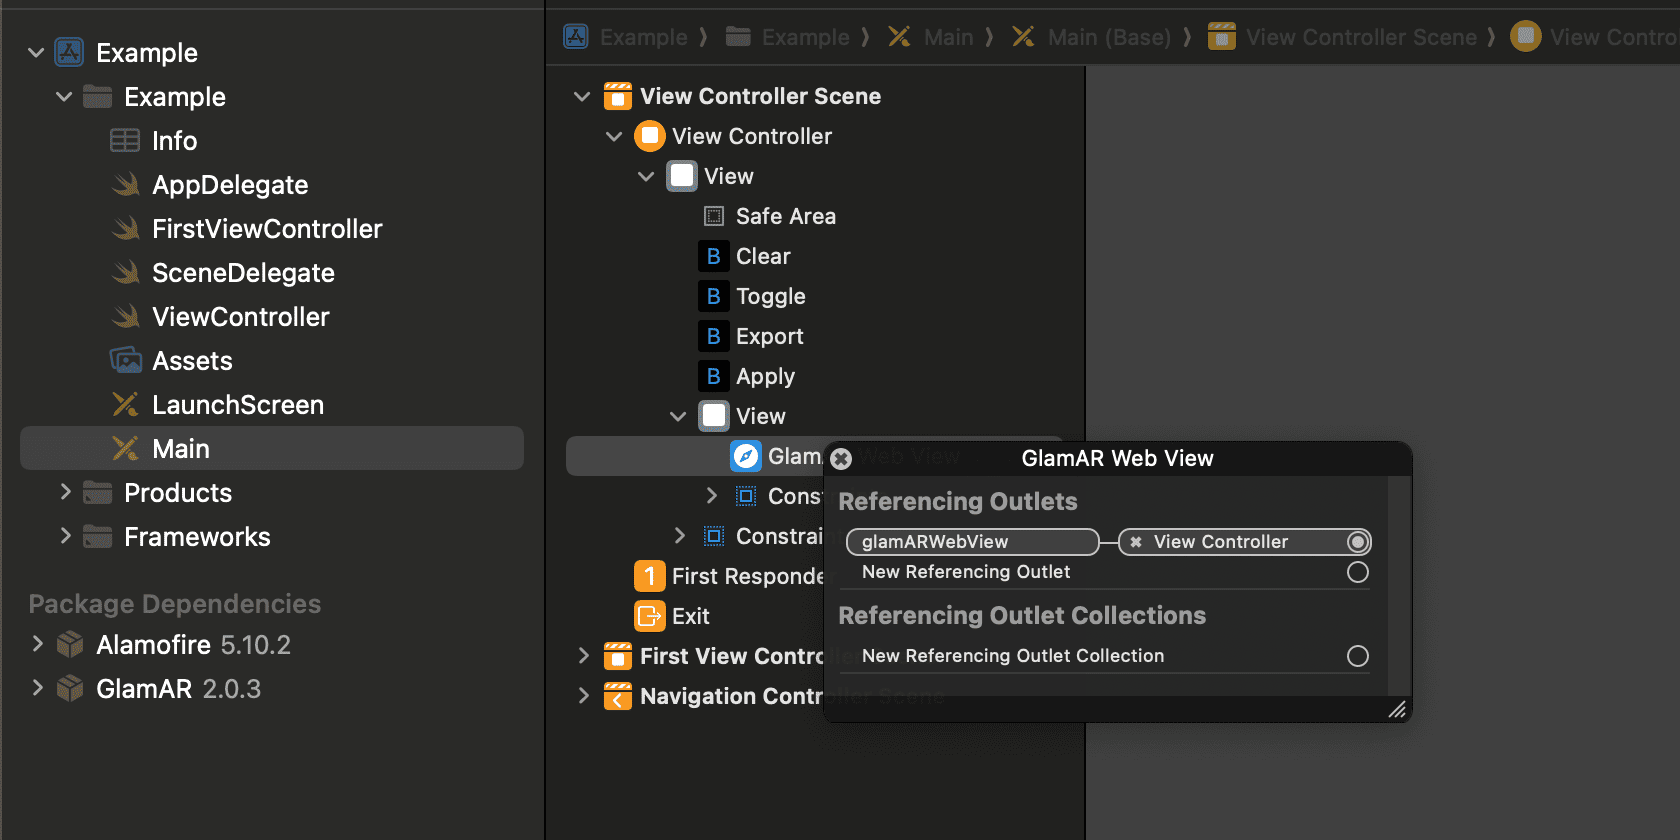
import UIKit
import GlamAR
import WebKit

class ViewController: UIViewController {
    // Refrence to webview for using in storyboard
    @IBOutlet weak var glamARWebView: WKWebView!
    // Create a webview
    if let webview = GlamArWebViewManager.shared.getPreparedWebView() {
        glamARWebView.addSubview(glamARWebView)
    }
}
Permissions
Ensure you handle permissions appropriately, especially for camera access if using PreviewMode.camera. Add the necessary privacy usage descriptions to your Info.plist:
<key>NSCameraUsageDescription</key>
<string>We need access to your camera for AR features.</string>
Basic Functions
addEventListener
Event listeners are essential soon after initialization is called to start listening to GlamAR SDK callback events.
GlamAr.addEventListener(event: "loaded") { (callbackValue) in
    print("loaded: \(callbackValue ?? "")")
}

GlamAr.addEventListener(event: "sku-applied") { (callbackValue) in
    print("sku-applied: \(callbackValue ?? "")")
}
applySku
Load a virtual try-on using applySku method and passing the relevant SKU ID.
GlamAR.applySku(skuId: "YOUR SKU ID"); // Replace with a valid SKU ID from your Console
applyByCategory
Loads the product catalog for a supported category. Pass optional catalog settings to filter the products by storefront.
GlamAr.applyByCategory(category: "eyewear")
GlamAr.applyByCategory(
    category: "eyewear",
    options: ApplyCatalogOptions(storeFront: "store_a")
)
| Parameter | Type | Description |
|---|---|---|
category | String | Required. A supported category, such as eyewear. See supported categories and subcategories. |
options | ApplyCatalogOptions? | Optional catalog settings. |
options.storeFront | String | Optional storefront filter. Use the exact key storeFront and a nonblank storefront value. |
Omit options to load the catalog without a storefront filter. An explicitly empty or whitespace-only storeFront is rejected. Returns no value.
applyBySubCategory
Loads the product catalog for a supported subcategory. Pass optional catalog settings to filter the products by storefront.
GlamAr.applyBySubCategory(subCategory: "sunglasses")
GlamAr.applyBySubCategory(
    subCategory: "sunglasses",
    options: ApplyCatalogOptions(storeFront: "store_a")
)
| Parameter | Type | Description |
|---|---|---|
subCategory | String | Required. A supported subcategory, such as sunglasses. See supported categories and subcategories. |
options | ApplyCatalogOptions? | Optional catalog settings. |
options.storeFront | String | Optional storefront filter. Use the exact key storeFront and a nonblank storefront value. |
Omit options to load the catalog without a storefront filter. An explicitly empty or whitespace-only storeFront is rejected. Returns no value.
open
Use open and its mode variants only when you disable or override the SDK's built-in hero screen and implement your own screen or launch buttons. The built-in hero screen already provides buttons to open the SDK, so no open call is needed when using it. After applying a SKU, call the appropriate variant from your custom button handler.
For example, use open() to launch live try-on from your custom UI.
GlamAR.open();
Example Usage
Here's a complete example demonstrating the usage of GlamAr and GlamArView:
import UIKit
import GlamAR
import WebKit

class ViewController: UIViewController {
    private var showingOriginal = false

    @IBOutlet weak var glamARWebView: WKWebView!

    @IBAction func onApplyCategoryClick(_ sender: Any) {
        GlamAr.applyByCategory(category: "sunglasses")
    }

    @IBAction func onClearClick(_ sender: Any) {
        GlamAr.close()
    }

    @IBAction func onToggleClick(_ sender: Any) {
        GlamAr.skinAnalysis(options: "start")
    }

    @IBAction func onExportClick(_ sender: Any) {
        GlamAr.snapshot()
    }

    override func viewDidLoad() {
        super.viewDidLoad()

        if let webview = GlamArWebViewManager.shared.getPreparedWebView() {

            glamARWebView.addSubview(webview)

            webview.translatesAutoresizingMaskIntoConstraints = false
            NSLayoutConstraint.activate([
                webview.topAnchor.constraint(equalTo: glamARWebView.topAnchor),
                webview.bottomAnchor.constraint(equalTo: glamARWebView.bottomAnchor),
                webview.leadingAnchor.constraint(equalTo: glamARWebView.leadingAnchor),
                webview.trailingAnchor.constraint(equalTo: glamARWebView.trailingAnchor)
            ])
        }

        GlamAr.addEventListener(event: "sku-applied") { (callbackValue) in
            print("sku-applied: \(callbackValue ?? "")")
        }

        GlamAr.addEventListener(event: "sku-failed") { (callbackValue) in
            print("sku-failef: \(callbackValue ?? "")")
        }

        GlamAr.addEventListener(event: "init-complete") { (callbackValue) in
            print("init-complete: \(callbackValue ?? "")")
        }
    }
}